
Canon PIXMA MX330 Support Question
Canon PIXMA MX330 Support Question
Find answers below for this question about Canon PIXMA MX330.Need a Canon PIXMA MX330 manual? We have 2 online manuals for this item!
Question posted by cjcheek on August 31st, 2016
I Have A Mx330 And It Keeps Flashing The On Button And Won't Shut Off.
Also in the window that shows when ink is low it keeps flashing "magnification and won't let me print from my computer. Any help will be appreciated.
Current Answers
Answer #1: Posted by Troubleshooter101 on August 31st, 2016 10:52 AM
Troubleshooter101

Member since:
September 30th, 2015 Points: 2,927,030

Member since:
September 30th, 2015 Points: 2,927,030
Try a power reset - if that doesn't help, please click on the link below for more troubleshooting:
- Press the Power button ( ) to turn on the product.
- With the product turned on , disconnect the power cord from the rear of the product.
- Unplug the power cord from the wall outlet.
- Wait at least 15 seconds.
- Plug the power cord back into the wall outlet.
- Reconnect the power cord to the rear of the product.
If the product does not turn on by itself, press the Power button ( ) to turn it on
Thanks
Please respond to my effort to provide you with the best possible solution by using the "Acceptable Solution" and/or the "Helpful" buttons when the answer has proven to be helpful. Please feel free to submit further info for your question, if a solution was not provided. I appreciate the opportunity to serve you!
Troublshooter101
Related Canon PIXMA MX330 Manual Pages
Guía de inicio [Spanish Version] - Page 10

...áigala suavemente.
• Be careful not to stain your hands or surrounding work area with ink on the right side.
H
Pull the orange protective tape (H) in the direction of the arrow ...y levante la cubierta. Pinch (G) firmly and pull up the cover. 5
2
3
4
G
Open the Ink Cartridge Locking Cover on the removed protective tape.
• Tenga cuidado de no mancharse las manos ni el &#...
Guía de inicio [Spanish Version] - Page 41
...Windows XP to date. We
recommend that you keep your system
up to change without notice.
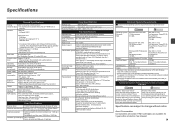
USB Port: Hi-Speed USB*1
Direct Print Port: PictBridge Bluetooth v2.0 (Option)*2 *3 *4 USB flash drive
Print...dial (max. 19 destinations)
Regular dialing (with Numeric buttons) Automatic redialing Manual redialing (with the Canon inkjet printer. • Macintosh: Hard Disk must be installed. ...
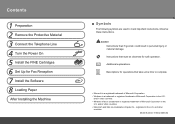
Getting Started - Page 1

Please keep it in hand for future reference. Office All-In-One
series
Getting Started
=Read Me First=
Make sure to read this manual before using the machine.
Getting Started - Page 2
.... Additional explanations.
and/or other
countries.
Model Number: K10332 (MX330) Instructions that must be observed for operations that , if ignored,...a registered trademark of Microsoft Corporation. • Windows is a trademark or registered trademark of Microsoft Corporation in the
U.S.
and other countries. • Windows Vista is a trademark or registered trademark of ...
Getting Started - Page 6
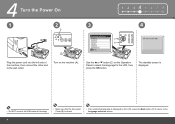
... connect the other end to the Language selection screen.
Turn on the Operation Panel to select the language for the LCD, then press the OK button.
The standby screen is displayed.
• Do NOT connect the USB cable at this stage.
• Make sure that the Document Cover (B) is closed.
•...
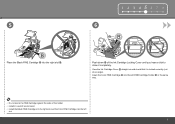
Getting Started - Page 8

H
Pull the orange protective tape (H) in the direction of the arrow and remove it gently.
• Be careful not to stain your hands or surrounding work area with ink on the right side. Remove the Black FINE Cartridge from its box. on the removed protective tape.
5
2
3
4
G
Open the Ink Cartridge Locking Cover Pinch (G) firmly and pull up the cover.
Getting Started - Page 9
Insert the Color FINE Cartridge into the left
slot.
View the Ink Cartridge Cover straight on and check that it completely. Push down of the holder. • Install in a well-lit ... Cartridge Holder in the same way.
• Do not knock the FINE Cartridge against the sides of the Ink Cartridge Locking Cover until you hear a click to close it is locked correctly (not at an angle).
Getting Started - Page 11
... the Software" on -screen manual: Basic Guide.
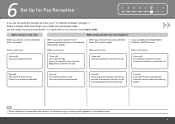
You can change the receive mode any time. Voice call: Pick up the handset, then press the Stop button to answer the call .
For details, refer to the on page 11. 6 Set Up for Fax Reception
1 2 3 4 567 8
If you are received automatically when the...
Getting Started - Page 12
Use the { or } button (C) to select a receive mode, then press the OK button. The selected receive mode is displayed. The FAX menu screen is displayed.
10 Press the OK button.
When the FAX menu returns, press the Back button (D). The Receive mode settings screen is displayed.
6
1
A
2
B
C
D
1 2 3 4 567 8 3
Press the FAX button (A), then press the Menu button (B).
Getting Started - Page 13
...Mac OS 9, Mac OS X Classic environments, or Mac OS X v.10.3.8 or earlier are based on Windows Vista operating system Ultimate Edition (hereafter referred to as "Windows Vista") and Mac OS X v.10.5.x.
• Quit all running applications before installation. • You need... during the installation process. The screens below are not supported.
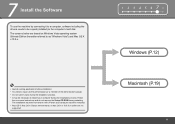
1 2 3 4 5 678
Windows (P.12) Macintosh (P.19)
11
Getting Started - Page 14
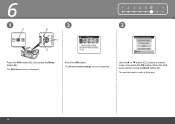
... the computer, then insert the Setup CD-ROM into the CD-ROM drive.
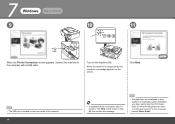
Turn on the computer. Windows XP/2000
Go to Step . 7
Windows
Macintosh
If the Found New Hardware or Found New
1
2
Hardware Wizard dialog box appears:
A
1... case, proceed from .
2 Click Cancel to your computer. Make sure that the ON button (A) stops flashing.
• If the program does not start automatically.
Getting Started - Page 15
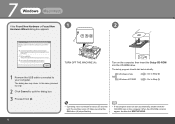
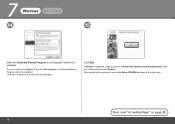
If the same dialog box reappears in subsequent steps, click Continue.
13 Windows Macintosh
3 Windows Vista
4 Windows Vista
1 2 3 4 5 678
AutoPlay screen appears, click Run Msetup4.exe. User Account Control dialog box appears, click Continue.
Getting Started - Page 18
... machine is not satisfactory after installation, you may need to "When Printing Becomes Faint or Colors Are Incorrect" in the on-screen manual: ... Help on the screen in step , then confirm the message.
• If straight lines are misaligned or print quality is recognized by the computer, a message appears on the machine (A). 7
Windows
Macintosh
9
10
11
A
When the Printer Connection...
Getting Started - Page 20
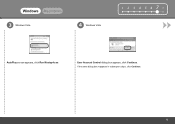
After restarting the computer, remove the Setup CD-ROM and keep it in a safe place. If Restart is displayed, make sure that the Restart the system now (recommended) check box is ... you click Do not agree, the Extended Survey Program will not be installed. (This has no effect on page 24!
18 7
Windows
Macintosh
14
15
When the Extended Survey Program screen appears, confirm the message.
Getting Started - Page 25
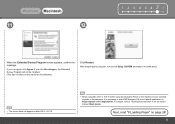
... Paper" on the machine's functionality.)
Click Restart. After restarting the computer, remove the Setup CD-ROM and keep it is necessary to the computer, it in the on Image Capture under Applications. If you can agree, click... installed. (This has no effect on page 24!
23
Windows Macintosh
11
12
1 2 3 4 5 678
When the Extended Survey Program screen appears, confirm the message.
Getting Started - Page 28
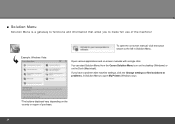
... left in Solution Menu.
You can start Solution Menu from the Canon Solution Menu icon on the desktop (Windows) or on -screen manual, click the button shown to open the on the Dock (Macintosh). Example: Windows Vista
To open My Printer (Windows only).
*The buttons displayed vary depending on the country or region of the machine!
Getting Started - Page 30
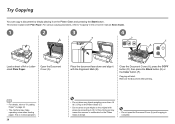
... (A). Remove the document after printing.
• For details, refer to "8 Loading Paper" on page 24.
• The machine may cause the scanner to malfunction or the Platen Glass to "Copying" in the on the Platen Glass and pressing the Start button. F
Close the Document Cover (A), press the COPY button (D), then press the Black...
Getting Started - Page 32
... Guide.
30
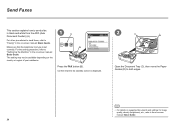
For the setting procedure, refer to "Setting Up the Machine" in the on the country or region of your residence.
1
B
A
Press the FAX button (B).
Confirm that the telephone line type is displayed.
2
D
C
Open the Document Tray (C), then move the Paper Guides (D) to both edges.
• For details on supported...
Getting Started - Page 33
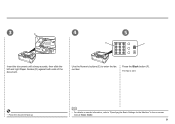
... of the document.
The fax is sent.
• Place the document face-up.
• For details on -screen manual: Basic Guide.
31 Use the Numeric buttons (E) to "Specifying the Basic Settings for the Machine" in the on sender information, refer to enter the fax number.
Getting Started - Page 35
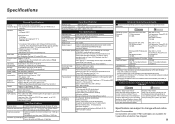
.... 19 destinations)
Regular dialing (with Numeric buttons) Automatic redialing Manual redialing (with USB 1.1, it can be placed with the Canon inkjet printer. • Macintosh: Hard Disk must be displayed your operating system. USB Port: Hi-Speed USB*1
Direct Print Port: PictBridge Bluetooth v2.0 (Option)*2 *3 *4 USB flash drive
Print width
Acoustic noise level
Operating environment Storage...
Similar Questions

How To Fix A Paper Jam On A Canon Printer Pixma Mx882
(Posted by JWManbabolo 9 years ago)
Canon Mx330 Keeps Saying There Is No Paper When There Is Paper
(Posted by kdhufCOKE 9 years ago)

What Is The Wps Button On The Cannon Printer Pixma 430
(Posted by misiralenop 10 years ago)

Where Is The Wps Button On A Canon Printer Pixma Mx430
(Posted by ib6fdb 10 years ago)
