Canon PIXMA MG7520 Support Question
Canon PIXMA MG7520 Support Question
Find answers below for this question about Canon PIXMA MG7520.Need a Canon PIXMA MG7520 manual? We have 3 online manuals for this item!
Question posted by krisfe3 on February 9th, 2016
I Need A Step By Step To Scan To My Mac
I was able to scan yesterday and now nothing. I need a review on how to scan, step by step to scan to my mac so I can email a doc.Thank YouKris
Current Answers
Answer #1: Posted by aureliamarygrace on February 9th, 2016 9:05 PM
aureliamarygrace

Member since:
December 31st, 2012 Points: 1,682,568

Member since:
December 31st, 2012 Points: 1,682,568
Please refer to this link for a step by step procedure , scroll down and click "guides and manuals" button:
Then scroll down to desired manual operation and then click the "Select" button then "download" button. A pop up will appear for a pdf file selected.
Answer #2: Posted by Queenie25 on February 10th, 2016 1:53 AM
Queenie25

Member since:
February 9th, 2016 Points: 10
Member since:
February 9th, 2016 Points: 10
STEP 01Connecting Your Scanner
Warnings
Things You'll Need
Plug in your multifunction printer or scanner. Connect it to your Mac with a USB cable that attaches from the printer's port to the back or side of your Mac.
- Alternatively, you can use a wireless-enabled printer or scanner through your local Wi-Fi connection.
- If you prefer to communicate with the scanner wirelessly, go through the setup procedure on your scanner. Make sure it is connected to the same strong wireless network as your Mac.
- Click on the Apple icon at the top left of your desktop. Select "System Preferences." Choose "Print & Fax" in the Hardware menu.
- Wait for your computer to add the new printer/scanner device. If it does not, click the plus (+) sign to prompt your computer to recognize the scanner. Click "Add."
- Place the item in the scanning bed. If you are using a scanner with a feeder, place the object in the front of the feeder.
- Open your application. You have several choices of applications that are installed on Mac computers automatically. Choose 1 of the following apps:
- Use Preview. If this is on your desktop, opening the Preview icon will be the fastest way to scan.
- Use Image Capture. If you are using devices in a network, you can easily choose from cameras, shared devices and devices dedicated to your Mac.
- Use the scanner's icon. Once the device is installed you can place it on your dock. Then, when you want to print or scan, click on the device's icon and select "Scanner" in the upper right corner.
- You can also open the device's icon by going to the "Print & Fax" preferences window under "System Preferences." Click on "Scanner," and then click "Open Scanner."
- Enable the scanner on your computer.
- If you are using Preview, click "File" and "Import From Scanner."
- If you are using Image Capture, simply double click on the application in your dock or in your Applications folder.
- If you are using the scanner icon, simply click on "Scanner" in the upper right corner.
- Select whether the document is on the flatbed (underneath a printer or scanner cover) or in a document feeder. Your scanner may have additional options for different types of scans, such as transparencies.
- Click "Scan" to warm up your scanner. It will give you an overview of the scan so you can adjust it. If it scans automatically, you can return to the scan menu to adjust it before you scan again.
- Use the crop tool to adjust the scan area. This is the dotted line around the object. You can drag each corner inward or outward to change the scan area.
- Choose the Scan Size. Choose standard letter or legal sizes.
- Click on the drop down menu next to "Scan To." Choose where you would like your scanned file to appear. You can choose your Desktop, Documents or Pictures folders and If you are using Image Capture, you can also choose to open it in Preview, Mail or iPhoto.
- Select or deselect the option to detect separate items. If you are scanning something with both text and images, you will want to deselect this. If you are separating items on a scan, it can help you isolate different pictures.
- Click "Show Details" to further change the orientation, resolution, color or file format of your scan. You can even edit an image with brightness and tint.
- Click "Show Details" to further change the orientation, resolution, color or file format of your scan. You can even edit an image with brightness and tint.
Warnings
- Beware when using discs to install your printer or scanner. Most Macs are programmed to recognize external devices and set up the scanning function without the discs. Some installation discs may be out of date and create problems on your Mac.
Things You'll Need
- USB cord
- Scanner
- Multi-function printer
Answer #3: Posted by ofelia23castillo on February 9th, 2016 10:51 PM
ofelia23castillo

Member since:
February 9th, 2016 Points: 11,310
Member since:
February 9th, 2016 Points: 11,310
Related Canon PIXMA MG7520 Manual Pages
User Manual - Page 28

Using the Machine with simple steps to enjoy scanning and printing wirelessly. Switch to "access point mode" with the Access Point Mode
28 When you use the machine with Ease in "Access Point Mode"
...
User Manual - Page 49

... agreement and Privacy statement windows, read the statements, and then select Agree if you agree
49 On the confirmation screen, select Next
5. Check that the printer is connected to the cloud service server.
1. Preparing to Use PIXMA Cloud Link from Your Printer
Follow the steps described below to register the printer information to the Internet
2.
User Manual - Page 68
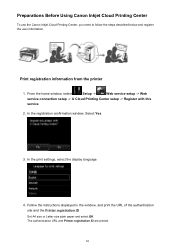
...instructions displayed in the window, and print the URL of the authentication site and the Printer registration ID
Set A4 size or Letter size plain paper and select OK. Preparations Before... use the Canon Inkjet Cloud Printing Center, you need to follow the steps described below and register the user information. The authentication URL and Printer registration ID are printed.
68 From the home ...
User Manual - Page 600

... the connection from USB connection to start IJ Scan Utility. If IJ Scan Utility is not displayed on the Start screen to network connection, set up the network environment from IJ Scan Utility. Network Scan Settings
Follow the steps below to start IJ Scan Utility. Windows 8.1/Windows 8: Select IJ Scan Utility on the Start screen, select the...
User Manual - Page 622

...Scan Utility > IJ Scan Utility to a computer. You can be specified in the Settings (Photo Scan) dialog box.
Photo Scans items as documents and saves them to start IJ Scan Utility. Document Scans... Scan) dialog box. Note
• Refer to "Network Scan Settings" for "IJ Scan Utility". Scan/save settings and the response after scanning can be specified in the Settings (Document Scan)...
User Manual - Page 680

... with a standard interface called TWAIN. (ScanGear is software required for scanning documents.
ScanGear can be started from IJ Scan Utility or applications that are two modes: Basic Mode and Advanced Mode... tone, as it allows you to scan easily by clicking a tab on -screen steps ( , , and ).
680 Basic Mode
Use the Basic Mode tab to preview scan results or set document type and output...
User Manual - Page 683

... network environment if you want to use a network compatible model by connecting to network connection. Starting IJ Scan Utility
Follow these steps (example) to start ScanGear from an application. Click ScanGear in the IJ Scan Utility main screen. The ScanGear screen appears.
683
On the menu of the Online Manual for your model...
User Manual - Page 684

... that case, click on the Toolbar to switch to whole image view and scan.
• Photos that have a whitish background • Documents printed on -screen steps. Set Select Source according to scan multiple documents at one time from the Platen. When scanning from a Computer) Starting ScanGear (Scanner Driver)
2. Place the document on the Platen...
User Manual - Page 685

... containing many color photos, select Magazine (Color).
3. Adjust the cropping frames (scan areas) as required.
685 Adjust the size and position of the cropping frames on the document type selected in Destination.
6.
Set Destination.
Set Output Size according to Step 7 when an ADF type is selected for Select Source.
5.
For details, refer...
User Manual - Page 715
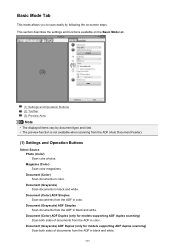
... models supporting ADF duplex scanning) Scan both sides of documents from the ADF in color. Document (Grayscale) ADF Duplex (only for models supporting ADF duplex scanning) Scan both sides of documents from... the ADF in black and white.
715 Basic Mode Tab
This mode allows you to scan easily by following the on ...
User Manual - Page 759

...two or more scanner or multifunction printers with Restrictions on the machine.
• ScanGear cannot be opened for the second time when it . 3. Keep these steps and scan again.
1. This is already ... scanning large images at the same time. General Notes (Scanner Driver)
ScanGear (scanner driver) is accepted, or multiple images are connected, you may not be able to scan using...
User Manual - Page 772

...) • For network connection: XXX series_MAC address (where "XXX" is an example of scanning using an application.
The setting may have more than one scanner or printer, a scanner selection screen may appear. Select New on your environment. The scan setting screen appears. Scanner The currently set product name is a driver model implemented in...
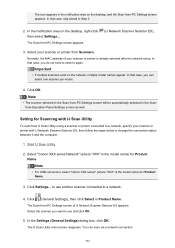
User Manual - Page 781

... machine is displayed. You can specify the destination and the file name in Canon IJ Scan Utility. Make sure that all the required settings have been specified. If you save the... is turned on settings of the Machine
Before forwarding scanned data to step 3.
If MP Drivers are specified in Canon IJ Scan Utility. Network Scan Settings
• The destination and the file name ...
User Manual - Page 784

..., select the document type or size according to the settings specified in step 3.
Scanned data is automatically started.
784 If you are using Windows XP: The program selection screen may be displayed after scanning is complete. Load the original on the scan setting screen: The confirmation screen asking you if you select PDF or...
User Manual - Page 792
... model.
4. In that case, you want to a network, specify your scanner or printer from Scanners. The icon appears in the notification area on the desktop, and the Scan-from -PC Settings screen appears.
(IJ Network Scanner Selector EX),
3.
Normally, the MAC address of IJ Network Scanner Selector EX appears. In that case, skip...
User Manual - Page 793

...scanning from Scanners and click OK. Select the MAC address of your scanner or printer via a network, you can make the setting for Scanning with IJ Scan Utility
1.
Note
• If your scanner or printer...connection beforehand.
Select your scanner or printer does not appear, check the following, click OK to Step 3.
2.
Important
• Set IJ Scan Utility to start.
• ...
User Manual - Page 812

...settings. If you need to ask the administrator to open other ports, input the other ports (138TCP, 138UDP, 139TCP, and 139UDP). 10. If you did in step 3 except for selecting.... ■ In Windows XP, click Start > Control Panel > Security Center > Windows Firewall. 2. Repeat steps 3 to 8 to "WORKGROUP" following information, and click OK. Confirm that the port names are added on...
User Manual - Page 844

...Devices and Printers. • In Windows 7, select Devices and Printers from the MAC address or a character string specified by default, select Set as a user account with "Canon XXX series Printer" appearing in... the Main sheet in the printer driver matches the paper loaded in step 1. Confirm the settings following port(s). Check8 Make sure that "Canon XXX series Printer" (where "XXX" is ...
User Manual - Page 883

...and Windows Vista, a confirmation/warning dialog box may appear when installing, uninstalling, or starting up software. When a confirmation appears, click Yes. 4. Step 1: Uninstall MP Drivers. Step 2: Uninstall IJ Scan Utility.
• Windows 8.1 / Windows 8: 1. When a confirmation appears, click Yes. 4.
When a confirmation appears, click Yes. 4.
If you are logged on to delete...
User Manual - Page 916

...machine is connected to the computer using Associate Port in step 4, then associate the port with administrator privilege. 2. ... "xxxxxxxxxx" is the character string generated from the MAC address or a character string specified by the user ...programs, Canon Utilities, Canon My Printer, Canon My Printer, then select Diagnose and Repair Printer.
If My Printer is not resolved, reinstall the ...
Similar Questions

How Can I Get My Cannon Mg7520 To Only Print In Black Ink?
I Want To Only Print In Black, Dont Want Color Option
I Want To Only Print In Black, Dont Want Color Option
(Posted by MICHAELDKOVALCIK 7 years ago)

How To Scan To Email Using Canon Mx892
How to scan to email using Canon MX892
How to scan to email using Canon MX892
(Posted by Anonymous-157390 8 years ago)

New Canon Mg7520. . Photo Won't Finish Print, Stops 1/4 Way Through.
trying to print photographs, loaed 4/6 in each tray bc I couldn't figure out how to get it to go wit...
trying to print photographs, loaed 4/6 in each tray bc I couldn't figure out how to get it to go wit...
(Posted by Wcorkum 8 years ago)

Canon Printer Pixma 2120 Series - Told Cd Not Necessary For Install?
purchased canon printer pixma 2120 last night at walmarts. i toldkid working there my laptop didn't ...
purchased canon printer pixma 2120 last night at walmarts. i toldkid working there my laptop didn't ...
(Posted by safrn5 11 years ago)

Does The Multi Function Canon Mx 432 Support Scan To Email Since It Has Wifi ?
Does the Multi Function Canon MX 432 support scan to email since it has WiFi ?
Does the Multi Function Canon MX 432 support scan to email since it has WiFi ?
(Posted by faisal75922 11 years ago)