Canon PIXMA MG4220 Support Question
Canon PIXMA MG4220 Support Question
Find answers below for this question about Canon PIXMA MG4220.Need a Canon PIXMA MG4220 manual? We have 3 online manuals for this item!
Question posted by jtheisen5 on August 27th, 2013
Wheres The Wps Button
The person who posted this question about this Canon product did not include a detailed explanation. Please use the "Request More Information" button to the right if more details would help you to answer this question.
Current Answers
Answer #1: Posted by SoCalWoman on August 27th, 2013 9:40 PM
SoCalWoman

Member since:
December 16th, 2012 Points: 2,938,577

Member since:
December 16th, 2012 Points: 2,938,577
Hello jtheisen5,
Page 13 of the Canon Pixma - Wireless Connection Setup Manual should help, as well as answer any other questions you may have regarding your printer's wireless connection set up.
Hope this helps
Much appreciation to those who acknowledge our members for their contribution toward finding a solution.
~It always seems impossible until it is done~
Nelson Mandela
Answer #2: Posted by jodylecompte on August 27th, 2013 8:12 PM
jodylecompte

Member since:
August 27th, 2013 Points: 4,590
Member since:
August 27th, 2013 Points: 4,590
Unfortunately your post did not contain enough information to be 100%, but I believe I know what you are talking about.
WPS stands for Wifi Protected Setup and is a simple way of attaching wireless equipped devices to your router. The WPS button, if applicable, will be on your router or modem/router combo device. You would hold it down after you activate the WPS function on your printer.
My router does not have a WPS button, and yours might not either. If this is the case, you'll need to either download the drivers or use the driver installer from the CD to do a standard wireless setup.
Related Canon PIXMA MG4220 Manual Pages
Installation Guide - Page 1
>
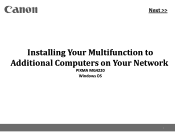
Installing Your Multifunction to Additional Computers on Your Network
PIXMA MG4220 Windows OS
1
Installation Guide - Page 2
>
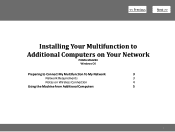
Installing Your Multifunction to
Additional Computers on Your Network
PIXMA MG4220 Windows OS
Preparing to Connect My Multifunction To My Network
3
Network Requirements
3
Notes on Wireless Connection
4
Using the Machine from Additional Computers
5
2
Installation Guide - Page 6
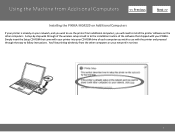
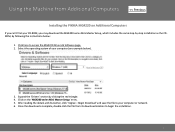
... follow instructions. Simply insert the Setup CD-ROM that shipped with your PIXMA. Using the Machine from additional computers, you wish to use with the printer and proceed through of each computer you wish to use the printer from Additional Computers >
Installing the PIXMA MG4220 on Additional Computers
If your printer is built in no time.
6
Installation Guide - Page 7
Using the Machine from Additional Computers
Setup Guide - Page 2
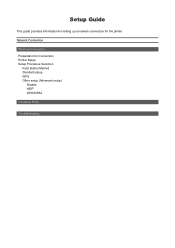
Network Connection
Wireless Connection Preparation for the printer. Setup Guide
This guide provides information for setting up a network connection for Connection Printer Setup Setup Procedure Selection
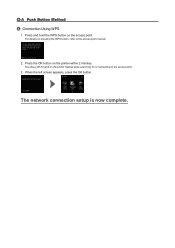
Push Button Method Standard setup WPS Other setup (Advanced setup)
Disable WEP WPA/WPA2
Character Entry
Troubleshooting
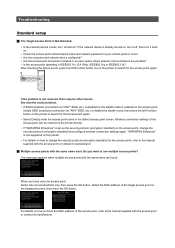
Setup Guide - Page 3
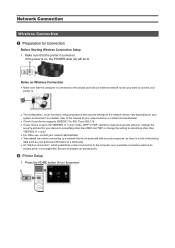
...over a wireless connection without an access point, is not supported. Press the HOME button (A) on the printer.
Change the
security protocol for Connection
Before Starting Wireless Connection Setup 1.
Be sure to...to the access point (A) (or wireless network router) you want to connect your printer to.
• The configuration, router functions, setup procedures and security settings of ...
Setup Guide - Page 4
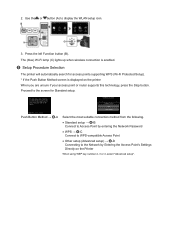
... the WLAN setup icon.
3. Proceed to the screen for access points supporting WPS (Wi-Fi Protected Setup). * If the Push Button Method screen is enabled.
c Setup Procedure Selection
The printer will automatically search for Standard setup. Press the left Function button (B). Push Button Method → d-A
Select the most suitable connection method from the following.
•...
Setup Guide - Page 5
... the access point.
3. When the left screen appears, press the OK button.
For details on the printer within 2 minutes. The (blue) Wi-Fi lamp on the access point. The network connection setup is now complete.
Press and hold the WPS button on the printer flashes while searching for or connecting to the access point...
Setup Guide - Page 6
... password is now complete.
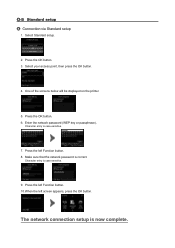
Press the left Function button. 10.When the left Function button. 8. The network connection setup is correct. Press the OK button. 6. Character entry is case-sensitive.
9. Character entry is case-sensitive.
7. One of the screens below will be displayed on the printer.
5. d-B Standard setup d Connection via Standard setup
1. Press the...
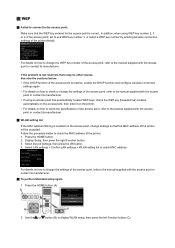
Setup Guide - Page 7
... on pressing the WPS button, refer to the access point.
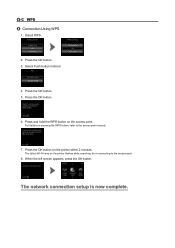
8. d-C WPS d Connection Using WPS
1. Press the OK button. 5. Press the OK button on the access point.
The network connection setup is now complete. When the left screen appears, press the OK button. Select Push button method.
4. Press the OK button.
6. Press and hold the WPS button on the printer within 2 minutes. For...
Setup Guide - Page 11
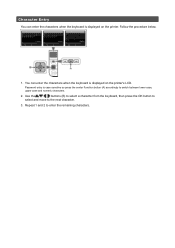
Character Entry
You can enter the characters when the keyboard is displayed on the printer. Password entry is displayed on the printer's LCD. You can enter the characters when the keyboard is case sensitive so press the center Function button (A) accordingly to switch between lower case, upper case and numeric characters.
2. Repeat 1 and 2 to...
Setup Guide - Page 12
.... See also the sections below: • If SSID broadcast (connection via "ANY" SSID, etc.) or disable the stealth mode, then press the left Function button (A) on the printer to search for the access point again. • Select Directly enter the access point name in IEEE802.11n (2.4 GHz), IEEE802.11g or IEEE802.11b...
Setup Guide - Page 14
... key number 1, or select a WEP key number by entering wireless connection settings of the printer directly. Follow the procedure below : • If the DHCP function of the access point...access point, set to change the settings of the printer. 1. WEP
Failed to connect to display WLAN setup, then press the left Function button (C). Make sure that the MAC address of the ...
Setup Guide - Page 15
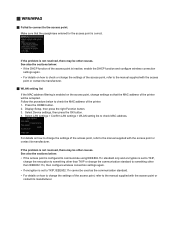
... refer to the manual supplied with the access
point or contact its manufacturer. Press the HOME button. 2.
See also the sections below : • If the access point is configured to ...8226; For details on how to check or change the settings of the printer. 1. Select Device settings, then press the OK button. 4. Make sure that the MAC address of the access point, refer...
Setup Guide - Page 16

Press the HOME button (A).
2. Use the or button (B) to display WLAN setup, then press the left Function button (C). To perform Standard setup again 1.
Setup Guide - Page 17
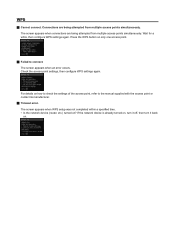
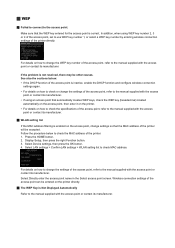
..., etc.) turned on how to check the settings of the access point, refer to connect. Press the WPS button on . If the network device is already turned on, turn it off, then turn it back
on ...the access point or contact its manufacturer. Timeout error.
WPS
Cannot connect. Connections are being attempted from multiple access points simultaneously. The screen appears when ...
Setup Guide - Page 18
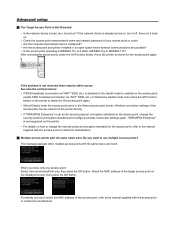
... also the sections below: • If SSID broadcast (connection via "ANY" SSID, etc.) or disable the stealth mode, then press the left Function button (A) on the printer to use multiple access points? Advanced setup
The Target Access Point is already turned on, turn it off, then turn it back on. •...
Setup Guide - Page 20
...
automatically on the access point, then enter it on the printer. • For details on how to check or change the settings of the printer directly. Select Directly enter the access point name in the Select access point screen. Press the HOME button. 2. Select LAN settings > Confirm LAN settings > WLAN setting list to...
Setup Guide - Page 21
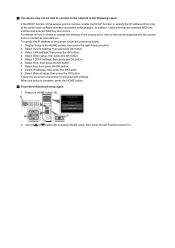
... selected WEP key number and entered WEP key are correct. Follow the on how to check or change the settings of the printer, follow the procedure below. 1. Select Yes, then press the OK button. 8. When the setup is inactive, enable the DHCP function or specify the IP address (IPv4 only) of the...
Setup Guide - Page 22

...printer will be other causes. See also the sections below to the manual supplied with the access
point or contact its manufacturer. Display Setup, then press the right Function button. 3. Select Device settings, then press the OK button. 4. Press the HOME button...access point is enabled on how to change the settings of the printer. 1. Follow the procedure below : • If the access ...
Similar Questions

How Do I Open The Transport Unit On Rear Side Of Pixma Mg4220?
How do I open the transport unit on rear side of printer, Canon, model PIXMA MG4220? It pulled in a ...
How do I open the transport unit on rear side of printer, Canon, model PIXMA MG4220? It pulled in a ...
(Posted by tdforsberg 5 years ago)

Canon Where Is The Wps Button On Pixma Mx432 User Guide
(Posted by sunilsu 10 years ago)


I Need Drive For My Printer Pixma Mg4220, I Lost The Printer Disk
Got a new computer from dell . I need to install this printer to it. Its running with windows
Got a new computer from dell . I need to install this printer to it. Its running with windows
(Posted by soopysoup 10 years ago)

How To Install My Printer To My Dell?
My printer is mg4220 . Need helpwith printer software. No disk
My printer is mg4220 . Need helpwith printer software. No disk
(Posted by vence6 10 years ago)