Brother International XL 5500 Support Question
Brother International XL 5500 Support Question
Find answers below for this question about Brother International XL 5500 - 42 Stitch Sewing Machine.Need a Brother International XL 5500 manual? We have 1 online manual for this item!
Question posted by marychapman279 on November 11th, 2014
Spring S
Where do the springs gothat are near the bobbin. There's a big one on the left just behind the bobbin shuttle and a small one but it came off and I don't know where it goes.
Current Answers
Related Brother International XL 5500 Manual Pages
Users Manual - English - Page 2

... plug, not the cord. 10. This sewing machine is intended for examination, repair, or electrical or mechanical adjustment.
4. IMPORTANT SAFETY INSTRUCTIONS
When using it and before cleaning it.
2. To reduce the risk of burns, fire, electric shock, or injury to be left unattended while plugged in this machine, basic safety precautions, including the following...
Users Manual - English - Page 4

... CONTROLS ...10
Pattern Selection Dial ...10 Recommended Widths and Lengths for Stitches 11 Stitch Length Dial ...13 Stretch Stitching ...13 Stitch Width Dial ...14 Reverse Sewing Lever ...14 Drop Feed Lever (if the machine is equipped with a drop feed lever 14
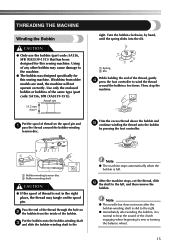
THREADING THE MACHINE 15
Winding the Bobbin ...15 Lower Threading ...16 Upper Threading ...18 Using the Needle...
Users Manual - English - Page 5

KNOWING YOUR SEWING MACHINE
PRINCIPAL PARTS
1 Bobbin-winding assembly (page 15) This winds the thread onto the bobbin, which you use this to control the sewing speed, and to start and stop sewing. F Main power/sewing light switch (page 7) You can turn the main power and sewing light on certain models.
4
D Handle
E Balance wheel Turn toward you want. 9 Stitch length dial...
Users Manual - English - Page 9
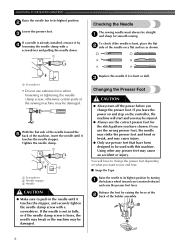
... side of the sewing machine may be straight 1 and sharp for the stitch pattern you have to change the presser foot. If you use extreme force when loosening or tightening the needle clamp screw, otherwise certain parts of the needle toward you (counterclockwise)
and raise the presser foot lever. KNOWING YOUR SEWING MACHINE
Raise the needle...
Users Manual - English - Page 11
....
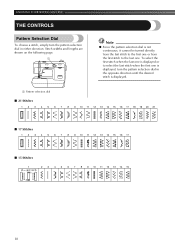
1 Pattern selection dial
■ 21 Stitches
1 2 3 4 5 6 7 8 9 10 11 12 13 14 15 16 17 18 19 20 21
■ 17 Stitches
1 2 3 4 5 6 7 8 9 10 11 12 13 14 15 16 17
■ 15 Stitches
1
2 3 4 5 6 7 8 9 10 11 12 13 14 15
10 KNOWING YOUR SEWING MACHINE
THE CONTROLS
Pattern Selection Dial
To choose a stitch, simply turn the pattern selection dial...
Users Manual - English - Page 13
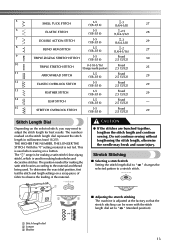
... 29 25 30 29 29 29 29 30 -
KNOWING YOUR SEWING MACHINE
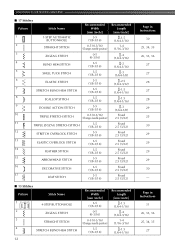
■ 17 Stitches Pattern
1
Stitch Name
1-STEP AUTOMATIC BUTTONHOLE
Recommended Width
[mm (inch)]
3-5 (1/8-3/16)
2
STRAIGHT STITCH
0-5 (0-3/16) (Changes needle position)
3
ZIGZAG STITCH
0-5 (0-3/16)
4
BLIND HEM STITCH
3-5 (1/8-3/16)
5
SHELL TUCK STITCH
3-5 (1/8-3/16)
6
ELASTIC STITCH
3-5 (1/8-3/16)
7
STRETCH BLIND HEM...
Users Manual - English - Page 14
... the material. SS
1
10
2
2
3
1
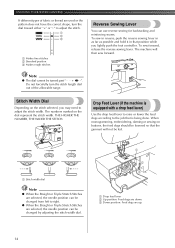
■ Adjusting the stretch stitching The machine is not fed.
The numbers marked on a scrap piece of fabric to adjust the stitch length for best results. The " " range is for making a satin stitch (close zigzag stitch), which is used when sewing on the selected stitch, you may break and cause injury.
This is...
Users Manual - English - Page 15
... machine is being done. KNOWING YOUR SEWING MACHINE
If different types of fabric or thread are used or the pattern does not have the correct shape, turn the stitch length dial out of the allowable range.
. When monogramming, embroidering, darning or sewing on buttons, the feed dogs should be changed from left to adjust the stitch width. To sew...
Users Manual - English - Page 16
...
tension disc. right. Put the bobbin onto the bobbin-winding shaft 3 and slide the bobbin-winding shaft to the left, and then remove the
bobbin.
Then, stop the machine. If bobbins from the inside of the thread, gently 4 press the foot controller to the machine.
● The bobbin was designed specifically for this sewing machine. Using of the same type (part...
Users Manual - English - Page 18
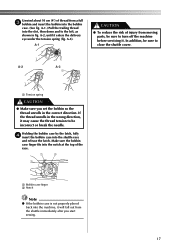
... the needle. Unwind about 10 cm (4") of thread from the shuttle immediately after you set the bobbin so the thread unrolls in the correct direction. A-2
A-3
1
1 Tension spring
CAUTION
● Make sure you start sewing.
17 A-2, until it may cause the thread tension to the left, as shown in the wrong direction, it enters the delivery...
Users Manual - English - Page 22
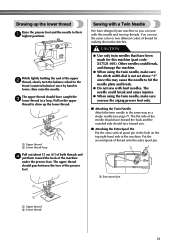
... foot and the needle to hit the needle plate and break.
● Do not sew with this machine (part code: X57521-001). The needle could break, and damage the machine.
● When using the twin needle, make sure the stitch width dial is not set above "3" since this may cause the needle to their...
Users Manual - English - Page 23

... do not turn . Bobbin Increase the tension in the same way that are equipped with the upper tension control dial. KNOWING YOUR SEWING MACHINE
■ Twin Needle Threading You should thread each needle separately.
Instead, thread the twin needle by turning the dial to its original position before starting your stitches. Remember to return the...
Users Manual - English - Page 25
... may pucker, or the machine may bend or break the needle. KNOWING YOUR SEWING MACHINE
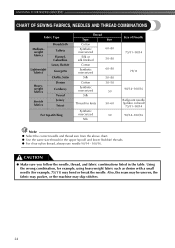
CHART OF SEWING FABRICS, NEEDLES AND THREAD COMBINATIONS
Fabric Type
Mediumweight fabrics
Lightweight fabrics
Heavyweight fabrics
Stretch fabrics
Broadcloth
Taffeta
Flannel, Gabardine Lawn, Batiste
Georgette
Challis, Satin Denim
Corduroy
Tweed Jersey Tricot
For top-stitching
Thread
Type
Cotton
Synthetic...
Users Manual - English - Page 26
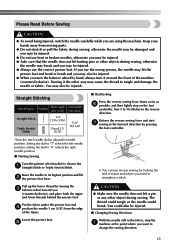
... behind the presser foot. Keep your hands away from the edge
of the machine
(counterclockwise). Straight Stitching
Stitch Name
Pattern
Stitch Length [mm (inch)]
Stitch Width [mm (inch)]
Straight Stitch
Triple Stretch Stitch
1-4 (1/16-3/16)
Fixed 2.5 (3/32)
5-0* (3/16-0)
■ Backtacking
Press the reverse sewing lever down as far as 6 possible, and then lightly step on the foot...
Users Manual - English - Page 27
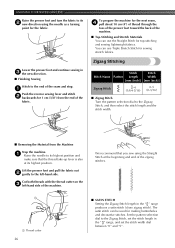
... selection dial to the Zigzag Stitch, and then select the stitch length and the stitch width.
■ Removing the Material from the end of the machine. Cut both threads with the thread cutter on the 3 left -hand side.
Set the pattern selection dial to the left -hand side of the
fabric. KNOWING YOUR SEWING MACHINE
Raise the presser foot...
Users Manual - English - Page 29
...together.
Place the reinforcement fabric under the presser
foot.
KNOWING YOUR SEWING MACHINE
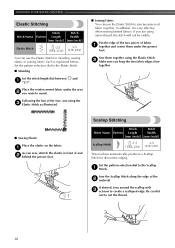
Elastic Stitching
Stitch
Stitch
Stitch Name Pattern Length
Width
[mm (inch)] [mm (inch)]
Elastic Stitch
-2.5
3-5
(1/64-3/32) (1/8-3/16)
You can use the Elastic Stitch for decorative edging.
Scallop Stitching
Stitch
Stitch
Stitch Name Pattern Length
Width
[mm (inch)] [mm (inch...
Users Manual - English - Page 31
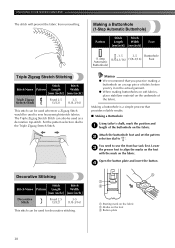
.... Stitch
Stitch
2
Stitch Name Pattern Length
Width
[mm (inch)] [mm (inch)]
Decorative Stitch
Fixed 2.5
3-5
(3/32)
(1/8-3/16)
This stitch can also be used to sew heavyweight stretch fabrics.
The Triple Zigzag Stretch Stitch can be used as a decorative top-stitch. You need to align the marks on the foot
with the mark on the fabric. KNOWING YOUR SEWING MACHINE
The stitch...
Users Manual - English - Page 32
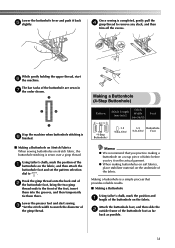
The bar tacks of the buttonhole are sewn in 7 the order shown.
3
2
4
1
Stop the machine when buttonhole stitching is a simple process that you try it back 5 slightly.
Making a buttonhole is 8 finished.
■ Making a Buttonhole on Stretch Fabrics When sewing buttonholes on the fabric, and then attach the
buttonhole foot and set the pattern selection...
Users Manual - English - Page 44
...36
N
Needle Replacement 7 Needle Threader 19
O
Oiling 38 Overedge Stitching 29
P
Pattern Length 11 Pattern Selection Dial 10 Pattern Width 11 Performance Checklist 40 Presser foot lever 4 Presser Foot Replacement 8 Principal Parts 4
Q
Quick Thread-setting System 20
R
Rampart Stitch 11 Recommended Widths and Lengths for Stitches 11 Repacking the Machine 42 Reverse Sewing Lever 14
43
Users Manual - English - Page 45
... Stitch 26
Scallop Stitch 11, 12, 28
Sewing Buttons 33 Sewing Light Bulb Replacement 38
Sewing Light Switch 2, 7
Sewing with a Twin Needle 21
Shell Tuck Stitch 11, 12, 13, 27
Shuttle Hook Removal 39 Shuttle Race Cleaning 39
Spool pin 15, 18
Steadying the Machine 9 Stitch Length Dial 13 Stitch Width Dial 14
Straight Stitch 11, 12, 25, 34, 35 Stretch Blind Hem Stitch...
Similar Questions

What Is The Ss Stitch On A Brother Sewing Machine
(Posted by katograha 9 years ago)

How To Thread A Brother Sewing Machine Xl-5500
(Posted by CAB14mitk 9 years ago)
How To Use Foot Attachments Of Brother Sewing Machine Xl 5130
(Posted by brusSi 10 years ago)

How To Use A Brother Sewing Machine Xl-2600i Setting Stitch And Tension
(Posted by v007CCdu 10 years ago)

How To Change Needle Brother Sewing Machine Ce 5500 Prw
i lost my manual and do not know how to change the needle for a brother sewing machine CE 5500 PRW. ...
i lost my manual and do not know how to change the needle for a brother sewing machine CE 5500 PRW. ...
(Posted by giomariagina 11 years ago)