Brother International XL 5500 Support Question
Brother International XL 5500 Support Question
Find answers below for this question about Brother International XL 5500 - 42 Stitch Sewing Machine.Need a Brother International XL 5500 manual? We have 1 online manual for this item!
Question posted by gkmashru on July 1st, 2014
How To Put The Needle Clamp Assembly Back To The Sewing Machine
The person who posted this question about this Brother International product did not include a detailed explanation. Please use the "Request More Information" button to the right if more details would help you to answer this question.
Current Answers
Related Brother International XL 5500 Manual Pages
Users Manual - English - Page 2

... for its intended use .
1 This sewing machine is required around the machine needle. 11. To reduce the risk of the machine and foot controller free from the electrical ...needle to break. 14. Do not use by or near children.
2. Do not pull or push fabric while stitching. Young children should be used as described in the instruction manual. 16.
SAVE THESE INSTRUCTIONS This machine...
Users Manual - English - Page 4

... YOUR SEWING MACHINE 6
Connecting Plugs ...6 Main Power/Sewing Light Switch ...7 Foot Controller ...7 Inserting the Needle ...7 Checking the Needle ...8 Changing the Presser Foot ...8 Converting to Free-arm Style ...9 Steadying the Machine ...9
THE CONTROLS ...10
Pattern Selection Dial ...10 Recommended Widths and Lengths for Stitches 11 Stitch Length Dial ...13 Stretch Stitching ...13 Stitch...
Users Manual - English - Page 5

...choose the stitch you (counterclockwise) to raise and lower the needle. F Main power/sewing light ...stitches. 0 Reverse-sewing lever (page 14) You can push this to stitch in the reverse direction. I Foot controller (page 7) You can turn this in the foot controller plug and connect the machine to the power supply.
KNOWING YOUR SEWING MACHINE
PRINCIPAL PARTS
1 Bobbin-winding assembly...
Users Manual - English - Page 8

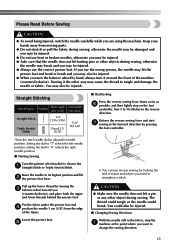
... bend or break and cause injury.
● Never sew with Models XL-5500/XL-5600/XL-5700/ XL-5510/XL-5610/XL-5710.
. Do not modify the plug in the outlet, reverse the plug.
Inserting the Needle
CAUTION
● Turn the main power switch off before you press harder, the machine's speed will easily break and cause injury. Remove the...
Users Manual - English - Page 9
... holder assembly.
8 Using other any presser feet may be damaged.
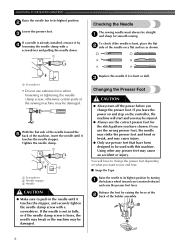
Replace the needle if it
touches the needle stopper.
KNOWING YOUR SEWING MACHINE
Raise the needle bar to its highest position by raising the lever at the 2 back of the machine, insert the needle until it touches the stopper, and securely tighten the needle clamp screw with a screwdriver.
Tighten the needle clamp...
Users Manual - English - Page 12

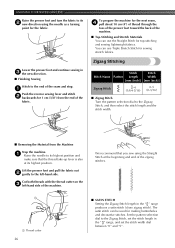
...Changes needle position)
3
ZIGZAG STITCH
0-5 (0-3/16)
4
BLIND HEM STITCH
3-5 (1/8-3/16)
5
SHELL TUCK STITCH
3-5 (1/8-3/16)
6
ELASTIC STITCH
3-5 (1/8-3/16)
7
STRETCH BLIND HEM STITCH
3-5 (1/8-3/16)
8
SCALLOP STITCH
3-5 (1/8-3/16)
9
DOUBLE ACTION STITCH
3-5 (1/8-3/16)
10
BRIDGING STITCH
3-5 (1/8-3/16)
11
RAMPART STITCH
3-5 (1/8-3/16)
12
TRIPLE STRETCH STITCH
0-5 (0-3/16...
Users Manual - English - Page 13
...28 29 25 30 29 29 29 29 30 - KNOWING YOUR SEWING MACHINE
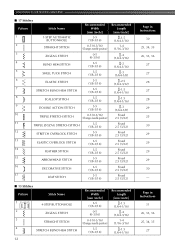
■ 17 Stitches Pattern
1
Stitch Name
1-STEP AUTOMATIC BUTTONHOLE
Recommended Width
[mm (inch)]
3-5 (1/8-3/16)
2
STRAIGHT STITCH
0-5 (0-3/16) (Changes needle position)
3
ZIGZAG STITCH
0-5 (0-3/16)
4
BLIND HEM STITCH
3-5 (1/8-3/16)
5
SHELL TUCK STITCH
3-5 (1/8-3/16)
6
ELASTIC STITCH
3-5 (1/8-3/16)
7
STRETCH BLIND HEM...
Users Manual - English - Page 15
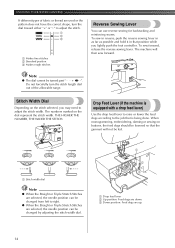
... or Triple Stretch Stitches are selected, the needle position can use reverse sewing for backtacking and reinforcing seams. To sew in reverse, push the reverse sewing lever in as far as possible and hold it in that position while you may need to the job that the garment will then sew forward. KNOWING YOUR SEWING MACHINE
If different...
Users Manual - English - Page 16
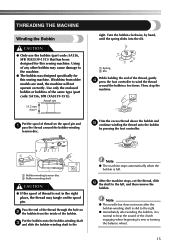
... the spool of the thread, gently 4 press the foot controller to the machine.
● The bobbin was designed specifically for this sewing machine. right. Pass the end of the thread through the hole on the spool pin. Note
● The needle bar does not move after the bobbin-winding shaft is slid to the...
Users Manual - English - Page 19
...SEWING MACHINE
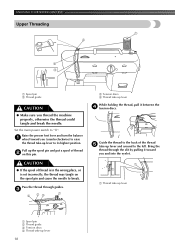
Upper Threading
1 2
4 3
1 Spool pin 2 Thread guide
CAUTION
● Make sure you (counterclockwise) to raise the thread take -up lever and around to break. CAUTION
● If the spool of thread 2 on the spool pin and cause the needle..., pull it toward you thread the machine properly, otherwise the thread could tangle and break the needle. Raise the presser foot lever and ...
Users Manual - English - Page 21
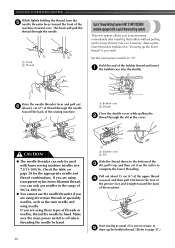
... cut it up the bobbin thread.) (Refer to complete the lower threading. KNOWING YOUR SEWING MACHINE
While lightly holding the thread, turn the 5 needle threader lever toward the front of the
machine (toward the back of the machine. CAUTION
● The needle threader can only be used with a quick thread-setting system)
This new system allows...
Users Manual - English - Page 23

... position before you pass it when you sew a scrap piece of your next project.
KNOWING YOUR SEWING MACHINE
■ Twin Needle Threading You should thread each needle separately. Using the needle threader may need to
thread the twin needle. When sewing with the upper tension control dial. For most sewing applications, no adjustment is "5".
22
2
1
2
1
1 Reverse...
Users Manual - English - Page 25
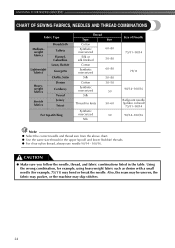
... nylon thread, always use needle 90/14 - 100/16. KNOWING YOUR SEWING MACHINE
CHART OF SEWING FABRICS, NEEDLES AND THREAD COMBINATIONS
Fabric Type
Mediumweight fabrics
Lightweight fabrics
Heavyweight fabrics
Stretch fabrics
Broadcloth
Taffeta
Flannel, Gabardine Lawn, Batiste
Georgette
Challis, Satin Denim
Corduroy
Tweed Jersey Tricot
For top-stitching
Thread
Type
Cotton
Synthetic mercerized...
Users Manual - English - Page 26
... could also be injured.
■ Changing Sewing Direction
With the needle still in the fabric, stop the 1 machine at the point where you
(counterclockwise), and place both the upper and lower threads behind the presser foot. Straight Stitching
Stitch Name
Pattern
Stitch Length [mm (inch)]
Stitch Width [mm (inch)]
Straight Stitch
Triple Stretch Stitch
1-4 (1/16-3/16)
Fixed 2.5 (3/32...
Users Manual - English - Page 27
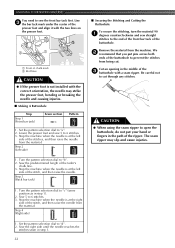
... the left -hand side of the seam and stop.
1
Push the reverse sewing lever and stitch 2 backwards for 1 cm (3/8") from the Machine
Stop the machine. 1 Raise the needle to its highest position and
make sure that you sew using the needle as a turning
point for sewing stretch fabrics. We recommend that the thread take-up lever is also...
Users Manual - English - Page 33
... slip and cause injuries.
1. Step 3 (Back bar tack)
c
a/c
c
a
1. Cut an opening in step 1.
32
KNOWING YOUR SEWING MACHINE
You need to sew the front bar tack first. Sew the right side until the needle reaches the
stitches sewn in the middle of the buttonhole to open the buttonhole, do not put your hand or fingers in...
Users Manual - English - Page 35

.... KNOWING YOUR SEWING MACHINE
Put a button between the foot and the fabric 4 and make sure the needle does not hit the presser foot before you start sewing. Cut 6 ...sewing the right side of the material.
At a slow speed, sew about 10 stitches.
5
Zipper Insertion
Stitch
Stitch
Stitch Name
Pattern
Length
Width
[mm (inch)] [mm (inch)]
Straight Stitch
2-3 (1/16-1/8)
2.5 (center needle ...
Users Manual - English - Page 37
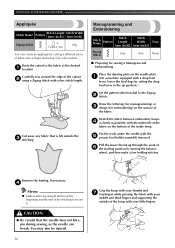
... and using a Zigzag Stitch with the underside of the stitching to the Zigzag 2 Stitch.
KNOWING YOUR SEWING MACHINE
Appliqués
Stitch Name
Pattern
Stitch Length [mm (inch)]
Stitch Width [mm (inch)]
Zigzag Stitch
-2
Any
(1/64-1/16)
You can break. Cut away any fabric that the needle does not hit a pin during sewing, as possible, with a fine stitch length. Stretch the fabric...
Users Manual - English - Page 39
KNOWING YOUR SEWING MACHINE
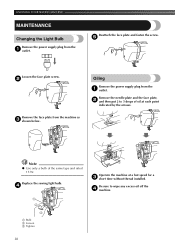
MAINTENANCE
Changing the Light Bulb
Remove the power supply plug from the 1 outlet. Oiling
... at a fast speed for a 3 short time without thread installed.
Replace the sewing light bulb.
4
1 2
3
1 Bulb 2 Loosen 3 Tighten
Operate the machine at each point
indicated by the arrows.
Remove the needle plate and the face plate, 2 and then put 2 to wipe any excess ...
Users Manual - English - Page 41
... 18
No Page 16
No
Page 39 No
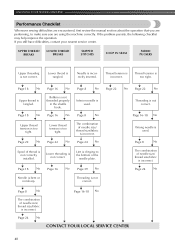
Needle is not correct.
UPPER THREAD BREAKS
LOWER THREAD BREAKS
SKIPPED STITCHES
LOOP IN SEAM
FABRIC PUCKERS
Upper threading is bent... are performing, to the bottom of needle size/
thread size/fabric is not correctly installed.
KNOWING YOUR SEWING MACHINE
Performance Checklist
Whenever sewing difficulties are encountered, first review the ...
Similar Questions

How To Put Together Needle Holder On Sewing Machine
(Posted by Listmc 10 years ago)

How To Attach Needle Arm On Sewing Machine
(Posted by stjamesr 10 years ago)

Where Can I Find A Needle Clamp Assembly For Xl5130?
The needle clamp assembly fell off while I was sewing and i need to replace it. Do you guys sell tha...
The needle clamp assembly fell off while I was sewing and i need to replace it. Do you guys sell tha...
(Posted by rosalynbenson 11 years ago)

How To Change Needle Brother Sewing Machine Ce 5500 Prw
i lost my manual and do not know how to change the needle for a brother sewing machine CE 5500 PRW. ...
i lost my manual and do not know how to change the needle for a brother sewing machine CE 5500 PRW. ...
(Posted by giomariagina 11 years ago)
