Brother International XL 5500 Support Question
Brother International XL 5500 Support Question
Find answers below for this question about Brother International XL 5500 - 42 Stitch Sewing Machine.Need a Brother International XL 5500 manual? We have 1 online manual for this item!
Question posted by afmipfed on October 26th, 2014
How Do I Get The Clamp Back On My Sewing Machine
The person who posted this question about this Brother International product did not include a detailed explanation. Please use the "Request More Information" button to the right if more details would help you to answer this question.
Current Answers
Related Brother International XL 5500 Manual Pages
Users Manual - English - Page 2

... or push fabric while stitching. Do not allow this machine to the nearest authorized dealer or service center for use . Keep fingers away from the outlet. 9. Never operate this machine if it has a ... plug, not the cord. 10. Do not unplug by or near children.
2. This sewing machine is required around the machine needle. 11. To reduce the risk of lint, dust, and loose cloth.
5. IMPORTANT...
Users Manual - English - Page 4

... YOUR SEWING MACHINE 6
Connecting Plugs ...6 Main Power/Sewing Light Switch ...7 Foot Controller ...7 Inserting the Needle ...7 Checking the Needle ...8 Changing the Presser Foot ...8 Converting to Free-arm Style ...9 Steadying the Machine ...9
THE CONTROLS ...10
Pattern Selection Dial ...10 Recommended Widths and Lengths for Stitches 11 Stitch Length Dial ...13 Stretch Stitching ...13 Stitch...
Users Manual - English - Page 5

... can turn this in either direction to choose the stitch you (counterclockwise) to the power supply.
A Buttonhole fine adjustment screw (page 33) B Buttonhole lever (1-Step automatic buttonhole) (page 30) C Needle threader (page 19) This is only available on and off.
KNOWING YOUR SEWING MACHINE
PRINCIPAL PARTS
1 Bobbin-winding assembly (page 15) This winds...
Users Manual - English - Page 9
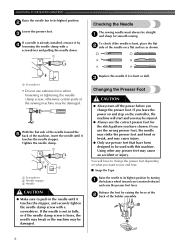
...sewing needle must always be straight 1 and sharp for the stitch pattern you have chosen. Tighten the needle clamp.
1
3 2
1 Screwdriver 2 Needle stopper 3 Needle
CAUTION
● Make sure to push in fully, or if the needle clamp screw is bent, place the flat 2 side of the needle on the controller, the machine... the needle clamp screw, otherwise certain parts of the sewing machine may cause ...
Users Manual - English - Page 11
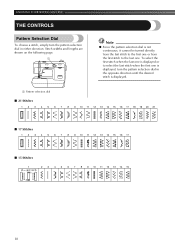
... in the opposite direction until the desired stitch is not continuous, it cannot be turned directly from the last stitch to the first one or from the first stitch to select the last stitch when the first one . KNOWING YOUR SEWING MACHINE
THE CONTROLS
Pattern Selection Dial
To choose a stitch, simply turn the pattern selection dial in...
Users Manual - English - Page 13
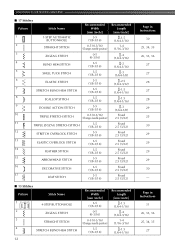
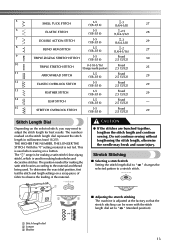
...28 29 25 30 29 29 29 29 30 - KNOWING YOUR SEWING MACHINE
■ 17 Stitches Pattern
1
Stitch Name
1-STEP AUTOMATIC BUTTONHOLE
Recommended Width
[mm (inch)]
3-5 (1/8-3/16)
2
STRAIGHT STITCH
0-5 (0-3/16) (Changes needle position)
3
ZIGZAG STITCH
0-5 (0-3/16)
4
BLIND HEM STITCH
3-5 (1/8-3/16)
5
SHELL TUCK STITCH
3-5 (1/8-3/16)
6
ELASTIC STITCH
3-5 (1/8-3/16)
7
STRETCH BLIND HEM...
Users Manual - English - Page 14
... of fabric to observe the feeding of the material.
SS
1
10
2
2
3
1
■ Adjusting the stretch stitching The machine is used when sewing on a button. THE HIGHER THE NUMBER, THE LONGER THE STITCH. The position needed for making a satin stitch (close zigzag stitch), which is not fed. This is adjusted at the factory so that the stretch...
Users Manual - English - Page 15
... far as possible and hold it in that is being done.
The machine will not be fed.
1 Stitch width dial
Note
● When the Straight or Triple Stretch Stitches are selected, the needle position can be turned past SS -". KNOWING YOUR SEWING MACHINE
If different types of fabric or thread are used or the pattern...
Users Manual - English - Page 22
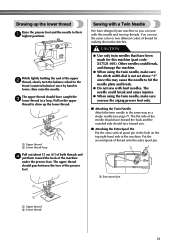
The upper thread should pass between the toes of the presser foot.
1
Sewing with a Twin Needle
We have been made for making decorative stitches. CAUTION
● Use only twin needles that have designed your machine so you can use the zigzag presser foot only.
■ Attaching the Twin Needle Attach the twin needle in...
Users Manual - English - Page 23

... needle threader to
thread the twin needle. You may damage the machine. Lower tension is needed. KNOWING YOUR SEWING MACHINE
■ Twin Needle Threading You should thread each needle separately.... the thread tension cannot be adjusted according to check the thread tension before starting your stitches. See page 18 for threading a
single needle.
Locks appear on the surface of ...
Users Manual - English - Page 25
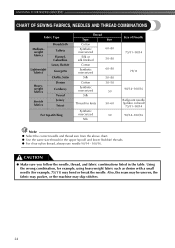
... needle, thread, and fabric combinations listed in the table.
KNOWING YOUR SEWING MACHINE
CHART OF SEWING FABRICS, NEEDLES AND THREAD COMBINATIONS
Fabric Type
Mediumweight fabrics
Lightweight fabrics
Heavyweight ...above chart. ● Use the same size thread for example, 75/11) may skip stitches.
24 Using the wrong combination, for example, using heavyweight fabric such as denim with ...
Users Manual - English - Page 26
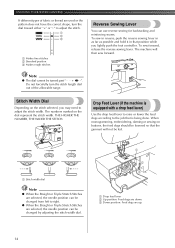
...Turning it toward you are using the machine.
Setting the dial to its highest position and lift 2 the presser foot lever.
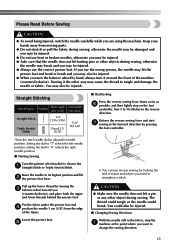
Straight Stitching
Stitch Name
Pattern
Stitch Length [mm (inch)]
Stitch Width [mm (inch)]
Straight Stitch
Triple Stretch Stitch
1-4 (1/16-3/16)
Fixed 2.5 (3/32)
5-0* (3/16-0)
■ Backtacking
Press the reverse sewing lever down as far as 6 possible...
Users Manual - English - Page 27
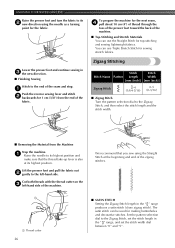
... from the end of the zigzag stitches.
1
1 Thread cutter
26
■ SATIN STITCH Setting the Zigzag Stitch length in the " " range, and set the stitch width dial between "0" and "5". We recommend that the thread take-up lever is also at the beginning and end of the
fabric. KNOWING YOUR SEWING MACHINE
Raise the presser foot and...
Users Manual - English - Page 29
KNOWING YOUR SEWING MACHINE
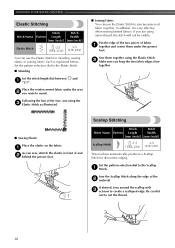
Elastic Stitching
Stitch
Stitch
Stitch Name Pattern Length
Width
[mm (inch)] [mm (inch)]
Elastic Stitch
-2.5
3-5
(1/64-3/32) (1/8-3/16)
You can use the Elastic Stitch for decorative edging. If you keep the two fabric edges close
together.
Be careful
not to the Scallop 1 Stitch. Set the pattern selection dial to the Elastic Stitch.
■ Mending...
Users Manual - English - Page 31
... mark on the fabric.
You need to " ". KNOWING YOUR SEWING MACHINE
The stitch will prevent the fabric from unravelling.
Attach the buttonhole foot and set the pattern 2 selection dial to sew the front bar tack first. Open the button plate and insert the button.
4
Decorative Stitching
3
1
-
Stitch
Stitch
2
Stitch Name Pattern Length
Width
[mm (inch)] [mm (inch)]
Decorative...
Users Manual - English - Page 32
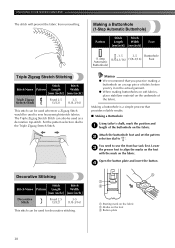
... buttonhole are sewn in 7 the order shown.
3
2
4
1
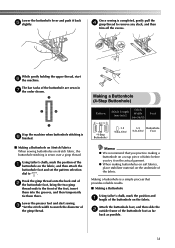
Stop the machine when buttonhole stitching is a simple process that you try it back 5 slightly.
Making a buttonhole is 8 finished.
&#...
PUSH
PUSH
While gently holding the upper thread, start sewing. 3 *Set the stitch width to " ". Lower the presser foot and start 6 the machine.
Using tailor's chalk, mark the position of the ...
Users Manual - English - Page 33
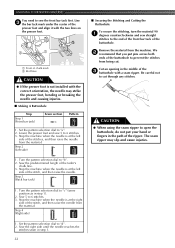
... the pattern selection dial to "a". 2. Stop the machine when the needle is at the right
side of the stitch, and then raise the needle from the machine. Stop the machine when the needle is at the left
side of the stitch, and then raise the needle. KNOWING YOUR SEWING MACHINE
You need to the end of the...
Users Manual - English - Page 34
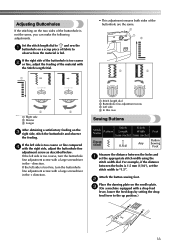
....
2
1 3
4
4
10
10
2
2 2
2
3
2
3
10
1 Right side 2 Shorter 3 Longer
After obtaining a satisfactory feeding on the 3 right side, stitch the buttonhole and observe
the feeding. Attach the button sewing foot.
2
Place the darning plate on the needle plate. 3 (On a machine equipped with the right side, adjust the buttonhole fine
adjustment screw as described below. If the...
Users Manual - English - Page 35

..., attach the presser foot holder to adjust the needle 4 position. If you start sewing. KNOWING YOUR SEWING MACHINE
Put a button between the foot and the fabric 4 and make sure the needle does not hit the presser foot before you choose a different stitch, the needle will hit the presser foot and break the needle. When...
Users Manual - English - Page 44
...36
N
Needle Replacement 7 Needle Threader 19
O
Oiling 38 Overedge Stitching 29
P
Pattern Length 11 Pattern Selection Dial 10 Pattern Width 11 Performance Checklist 40 Presser foot lever 4 Presser Foot Replacement 8 Principal Parts 4
Q
Quick Thread-setting System 20
R
Rampart Stitch 11 Recommended Widths and Lengths for Stitches 11 Repacking the Machine 42 Reverse Sewing Lever 14
43
Similar Questions

How To Thread A Brother Sewing Machine Xl-5500
(Posted by CAB14mitk 9 years ago)

How To Use A Brother Sewing Machine Xl-2600i Setting Stitch And Tension
(Posted by v007CCdu 10 years ago)

I Need A Parts And Schematic Manual For Sewing Machine Xl-3200 Brother
(Posted by MANUALS1 10 years ago)

How To Change Needle Brother Sewing Machine Ce 5500 Prw
i lost my manual and do not know how to change the needle for a brother sewing machine CE 5500 PRW. ...
i lost my manual and do not know how to change the needle for a brother sewing machine CE 5500 PRW. ...
(Posted by giomariagina 11 years ago)
