Brother International SC9500 Support Question
Brother International SC9500 Support Question
Find answers below for this question about Brother International SC9500.Need a Brother International SC9500 manual? We have 4 online manuals for this item!
Question posted by AcaldMa on March 9th, 2014
How To Use Brother Sewing Machine Sc9500
The person who posted this question about this Brother International product did not include a detailed explanation. Please use the "Request More Information" button to the right if more details would help you to answer this question.
Current Answers
Related Brother International SC9500 Manual Pages
Users Manual - English - Page 1
Operation Manual
Sewing Machine
Product Code: 885-V64/V65/V66/V67
KNOWING YOUR SEWING MACHINE
SEWING BASICS
UTILITY STITCHES
APPENDIX
Please visit us at http://solutions.brother.com where you can get product support and answers to frequently asked questions (FAQs).
Users Manual - English - Page 6
... and width ...38 Starting to sew ...39 Thread tension ...41
USEFUL SEWING TIPS ...42
Trial sewing ...42 Changing the sewing direction ...42 Sewing curves ...42 Sewing thick fabrics ...42 Sewing hook-and-loop fastener ...43 Sewing thin fabrics ...44 Sewing stretch fabrics ...44 Stitching cylindrical pieces ...44
4 KNOWING YOUR SEWING MACHINE 6
ACCESSORIES ...6
Included accessories ...6 Optional...
Users Manual - English - Page 8
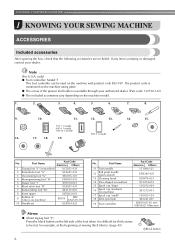
...Foot controller: Model T
This foot controller can be fed, for thick seams to be used on machine)
XC3021-031
2 Buttonhole foot "A"
XC2691-033
3 Overcasting foot "G"
XE6305-101
4 ...on the left side of sewing thick fabrics. (page 43)
aBlack button
6 Note
(For U.S.A. No. KNOWING YOUR SEWING MACHINE
1 KNOWING YOUR SEWING MACHINE
ACCESSORIES
Included accessories
After opening ...
Users Manual - English - Page 10
... (page 40) Pass the threads through the thread cutter to circulate.
Do not cover the air vent while the sewing machine is used when winding the thread onto the bobbin and then threading the machine.
c Bobbin-winding thread guide and pretension disc (page 15) Pass the thread under this thread guide and around the...
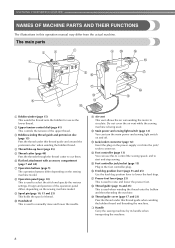
Users Manual - English - Page 11
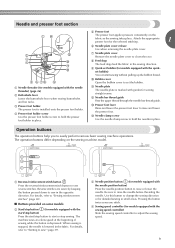
... by keeping the button pressed down to hold the needle in the sewing direction. m Presser foot lever Raise and lower the presser foot lever to easily perform various basic sewing machine operations. d Presser foot holder screw Use the presser foot holder screw to sew in place. c Needle position button (for models equipped with the start...
Users Manual - English - Page 12
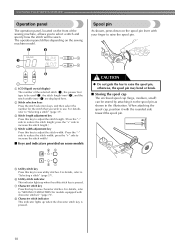
... differs depending on the spool pin lever with your finger to raise the spool pin. a LCD (liquid crystal display)
The number of the sewing machine, allows you wish to use. press the "+" side to increase the stitch length.)
d Stitch width adjustment key Press this key to adjust the stitch length. (Press the "-" side...
Users Manual - English - Page 13
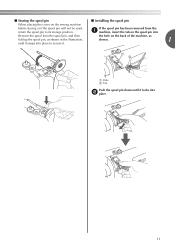
...Remove the spool from the spool pin, and then
the hole on the sewing machine
before storing or if the spool pin will not be used, return the spool pin to its storage position. If the spool pin ...has been removed from the a machine, insert the tab on the spool pin into b place.
11
...
Users Manual - English - Page 14
... in poor condition. ● Turn off .
12
a Main power switch b Jack/socket connector
Set the main power switch to correctly operate the machine.
(For U.S.A.
KNOWING YOUR SEWING MACHINE
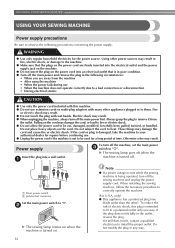
USING YOUR SEWING MACHINE
Power supply precautions
Be sure to heat. Pulling on the cord. Do not place heavy objects on the cord may result in fire, electric...
Users Manual - English - Page 15
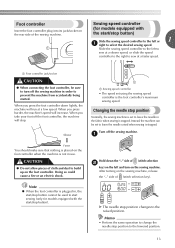
... run at a low speed. Memo
• Perform the same operation to the left and turn off the sewing machine in use.
Slide the sewing speed controller to change the needle stop position
Normally, the sewing machine is stopped.
When you press the foot controller down the "-" side of (stitch selection
b
key) on the foot controller.
After...
Users Manual - English - Page 17

... to raise the spool pin, otherwise, the spool pin may become tangled if the bobbin winder is used without raising the spool pin.
15 Only use the bobbin that have been designed for this sewing machine.
THREADING THE MACHINE
Winding the bobbin
This section describes how to wind the thread onto the bobbin. • For...
Users Manual - English - Page 18
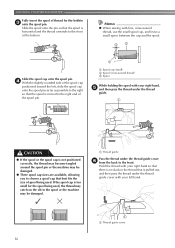
... the bottom. CAUTION
● If the spool or the spool cap is no slack in the spool or the machine may be damaged. KNOWING YOUR SEWING MACHINE
Fully insert the spool of spool being used .
Hold the thread with your left , slide the spool cap onto the spool pin as far as possible to...
Users Manual - English - Page 21
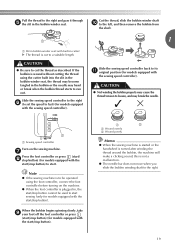
... as described.
If the bobbin is wound without cutting the thread using the foot controller, connect the foot controller before turning on the sewing machine.
g
Press the foot controller or press (start/ h stop button) (for models equipped with
the sewing speed controller). Slide the sewing speed controller to the right f (to set the speed to...
Users Manual - English - Page 22
... the needle.
20
KNOWING YOUR SEWING MACHINE
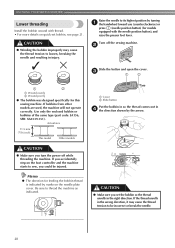
Lower threading
Install the bobbin wound...machine starts to sew, you (counterclockwise) or
press (needle position button) (for this sewing machine. CAUTION
● Make sure you turn the power off the sewing machine. If the thread unrolls in injury.
Raise the needle to be injured.
If bobbins from other models are used, the machine...
Users Manual - English - Page 31
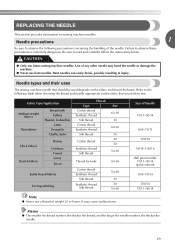
... thread Synthetic thread Silk thread Cotton thread Synthetic thread Silk thread
Cotton thread
Synthetic thread Silk thread
Thread for the fabric that should be used depends on sewing machine needles. Memo
● The smaller the thread number, the thicker the thread; Failure to read and carefully follow the instructions below. Bent needles can...
Users Manual - English - Page 36
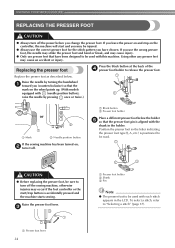
... off the power before you have been designed to turn it off the sewing machine, otherwise injuries may occur if the foot controller or the start and you may be used with this machine. If you leave the power on and step on , b turn off . Using other any presser feet
may cause injury. ● Only...
Users Manual - English - Page 47
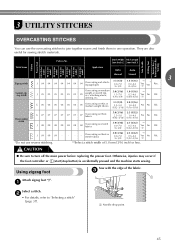
... injuries may occur if the foot controller or (start/stop button) is accidentally pressed and the machine starts sewing. c
Attach zigzag foot "J". a
Select a stitch. Stitch Width Stitch Length [mm (inch... finish them in one operation. CAUTION
● Be sure to "Selecting a stitch" (page 37).
Using zigzag foot
Sew with the edge of 5.0 mm (3/16 inch) or less. b
• For details, refer to...
Users Manual - English - Page 49
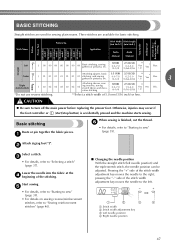
... into the fabric at the d beginning of 5.0 mm (3/16 inch) or less. BASIC STITCHING
Straight stitches are used for sewing plain seams. Three stitches are available for basic stitching.
a
When sewing is accidentally pressed and the machine starts sewing. Application
Stitch Width Stitch Length [mm (inch.)] [mm (inch.)]
Auto Manual
Auto Manual
Left
J
00
00...
Users Manual - English - Page 54
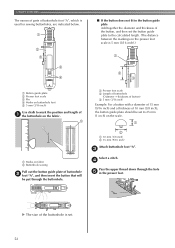
... Presser foot scale c Pin d Marks on buttonhole foot e 5 mm (3/16 inch)
Use chalk to 25 mm (1 inch) on fabric b Buttonhole sewing
Pull out the button guide plate of buttonhole b foot "A", and then insert the button...in the presser foot. UTILITY STITCHES
The names of parts of buttonhole foot "A", which is used for sewing buttonholes, are indicated below.
1
2 5
■ If the button does not fit...
Users Manual - English - Page 63
... may occur if the foot controller or (start/stop button) is accidentally pressed and the machine starts sewing.
61
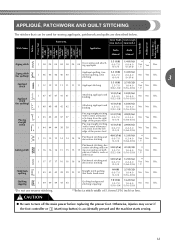
Stitch Width Stitch Length [mm (inch.)] [mm (inch.)]
Stitch Name
Application
Auto...quilting
J
45
45
45
39
39
35
31
Straight stitch quilting that can be used for sewing appliqués, patchwork and quilts are described below. APPLIQUÉ, PATCHWORK AND QUILT STITCHING...
Users Manual - English - Page 95
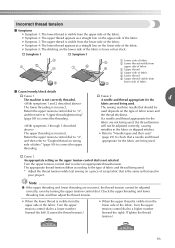
...) to a lower number (toward the right). (Tighten the thread tension.)
54 3
54 3
93 The lower threading is incorrect. The sewing machine needle that a needle and thread
appropriate for the
fabric are being used .
† Cause 3 An appropriate setting on the upper tension-control dial is not selected. The appropriate thread tension differs according...
Similar Questions

Brother Sewing Machine Sc9500 How To Use Auto Threading
(Posted by bhuarmon 9 years ago)

Where Is The Basting Stitch On The Sc9500 Brother Sewing Machine
Where is the basting stitch on the sc9500 brother sewing machine
Where is the basting stitch on the sc9500 brother sewing machine
(Posted by kschroepfer 9 years ago)

How To Use Brother Sewing Machine Lx2500
(Posted by dbrowalf 10 years ago)

How To Use Brother Sewing Machine Xm3700
(Posted by gagebreth 10 years ago)

How To Use Brother Sewing Machine Model Sc9500
(Posted by rec2sta 10 years ago)