
Brother International PE770 Support Question
Brother International PE770 Support Question
Find answers below for this question about Brother International PE770 - Computerized Embroidery Machine.Need a Brother International PE770 manual? We have 3 online manuals for this item!
Question posted by arirj on September 27th, 2013
What Needles To Use On Brother Pe770
The person who posted this question about this Brother International product did not include a detailed explanation. Please use the "Request More Information" button to the right if more details would help you to answer this question.
Current Answers
Related Brother International PE770 Manual Pages
Users Manual - English - Page 1
GETTING READY EMBROIDERY APPENDIX
Computerized Embroidery Machine
Operation Manual
Users Manual - English - Page 2
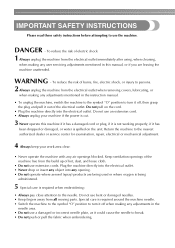
... user servicing adjustments mentioned in the instruction manual.
• To unplug the machine, switch the machine to the symbol "O" position to turn it out of lint, dust, and loose cloth.
• Do not use the machine. Do not use a damaged or incorrect needle plate, as it has
been dropped or damaged, or water is required when...
Users Manual - English - Page 7

... patterns, characters, framed decorations, and designs from optional embroidery cards (page 39).
5
d Embroidery You can start embroiderying without pulling up the bobbin thread (page 28).
c Automatic thread cutting The thread can quickly be accessed for the correct operation of the various functions.
Before using the machine, carefully read the "IMPORTANT SAFETY INSTRUCTIONS", and then...
Users Manual - English - Page 16

..., and hoop it in an embroidery frame. GETTING READY
Embroidery Step by Step
The basic steps for embroidery are as follows.
1
Attaching the embroidery unit
Attach the embroidery unit. (If the embroidery unit is not attached, the machine does not operate.) For details, refer to "Attaching the embroidery unit" (page 15).
↓
2 Checking the needle
Use a needle matched to the pattern...
Users Manual - English - Page 23
...
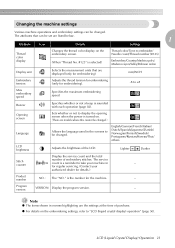
- Changing the machine settings
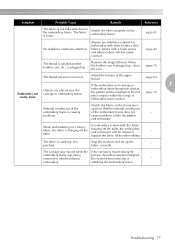
Various machine operations and embroidery settings can be set are listed below.
1
Attribute
Icon
Details
Settings
Thread color display
Changes the thread color display on the embroidery screen.
(When "Thread No. #123" is selected)
Thread color/Time to embroider/ Needle count/Thread number (#123)
Embroidery/Country/Madeira poly/ Madeira rayon/Sulky/Robison...
Users Manual - English - Page 34
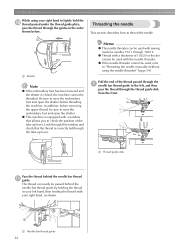
... by holding the thread in the order shown below.
1
a Shutter
Note
z If the embroidery foot has been lowered and the shutter is closed, the machine cannot be used , refer to "Threading the needle manually (without using your right hand, as shown.
1
a Needle bar thread guide
32 Pull the end of 130/20 or thicker cannot be...
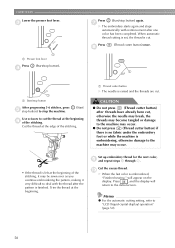
Users Manual - English - Page 36
... button) to raise the needle before using the needle threader.
1
a Pressor foot lever
Pass the thread through the embroidery foot hole.
34
Threading the needle manually (without using special thread, thread with a thickness of 130/20 or thicker which cannot be used with the needle threader, thread the needle as described below. Thread the machine to the needle bar thread a guide...
Users Manual - English - Page 37
Do not use home sewing machine needles.
CAUTION
● Only use a bent needle.
1
1
a Flat surface
Replacing the Needle 35 Before using the needle, place the flat side of the needle on a flat surface and check that the distance between the needle and the flat surface is even.
1 2
a Flat side b Needle type marking
CAUTION
● If the distance between the needle and the flat surface...
Users Manual - English - Page 38
... button) once or a twice to raise the needle.
1
Note
z Before replacing the needle, cover the hole in the needle plate with your left hand, and then e use a screwdriver to turn off the machine.
Replace the needle as described below.
GETTING READY
Replacing the needle
Place fabric or paper under the embroidery d foot to cover the hole in "Checking...
Users Manual - English - Page 42

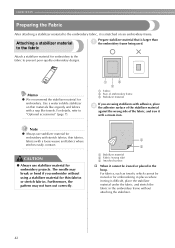
...fabrics. We recommend stabilizer material for embroidery machines. For details, refer to raise the needle.
If there is necessary for embroidering.
■ Stabilizer material Attach a stabilizer material for embroidery to the fabric to the embroidery unit, and use embroidery thread designed for embroidery. EMBROIDERY
Embroidering Neatly
This section describes the preparations...
Users Manual - English - Page 43
..., refer to "Optional accessories" (page 7). Memo
z A 75/11 needle is already installed when the
machine is purchased.
Embroidering Neatly 41
■ Needle Use a 75/11 home sewing machine needle. For details, refer to
"Replacing the needle" (page 36).
2
■ Other Embroidery frames "small", "medium" and "extra large (multi-position)" are optional. When embroidering on thick...
Users Manual - English - Page 44
... be ironed or for thin fabrics or stretch fabrics. Attach a stabilizer material for embroidery.
Furthermore, the pattern may break or bend if you are using a stabilizer material for embroidering in places where ironing is larger than a the embroidery frame being used. The needle may not turn out correctly.
1
2
3
a Stabilizer material b Fabric (wrong side) c Attached surface...
Users Manual - English - Page 58

... steps for use with this machine. Another important point is enough thread in the bobbin. Other embroidery threads may strike the object
and cause a poor finish to "Optional accessories" (page 7). Note
z Before embroidering, check that go into sewing beautiful embroidery. z Do not leave objects in the range of motion of the needle and thread being used. Use embroidery bobbin...
Users Manual - English - Page 60
... 5-6 stitches, press e stop button) to stop the machine.
(Start/
Use scissors to cut .
Press (Start/stop button). g
X The embroidery starts again and stops automatically with the thread after the pattern..., otherwise the needle may break, the threads may become tangled or damage to the machine may occur.
• If the thread is embroidered,
"Finished sewing." CAUTION
●...
Users Manual - English - Page 63
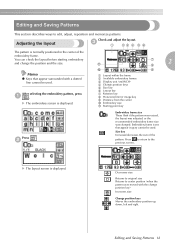
... g Rotation key h Horizontal mirror image key i Distance from the center j Embroidery size k Starting point key
Embroidery frame size These flash if the pattern was resized, the layout was adjusted, or the recommended embroidery frame size was moved with a dotted line cannot be used .
Press to return to edit, adjust, reposition and memorize patterns. Decreases...
Users Manual - English - Page 68

... the screen for selecting the embroidery pattern type is displayed. Turn off the machine. Press
.
Press (Start/stop the a machine.
If the embroidery is stopped before it . Memo
z When the machine is not displayed, press
(Settings key), and then use
to the original setting.
d
If the needle count is turned off, the embroidery size and layout return to...
Users Manual - English - Page 74

... at the back of purchase, the presser foot lever
is accidentally pressed and the machine starts embroidering.
a
1
2
a Embroidery foot bar b Caught by the presser foot holder screw
CAUTION
● Always use the embroidery foot "Q" when embroidering. If the wrong presser foot is used, the needle may occur if (Start/stop button) is up. APPENDIX
Attaching the...
Users Manual - English - Page 75
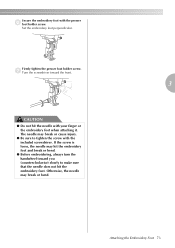
... the screwdriver toward you (counterclockwise) slowly to tighten the screw with your finger or the embroidery foot when attaching it. Attaching the Embroidery Foot 73
Firmly tighten the presser foot holder screw. Otherwise, the needle may hit the embroidery foot and break or bend.
● Before embroidering, always turn the handwheel toward the front...
Users Manual - English - Page 79
...embroidery frame is causing
of the embroidery frame does not
-
attaching the embroidery frame. Stretch the fabric properly on a heavy fabric, the fabric is plugged up . Always use stabilizer material for embroidery... thread. If embroidery is attached. page 64
If the embroidery unit carriage or
3
Embroidery not neatly done. Stop the machine and set up the fabric correctly.
-
USB GUIDE - Multi - Page 3
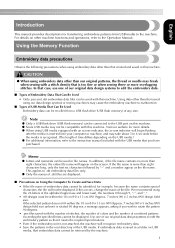
... too fine or when sewing three or more details. If this occurs, change the name of Embroidery Data That Can Be Used • Only .pes and .dst embroidery data files can be compatible with an access indicator, the access indicator will begin flashing
after the media is saved in this machine. If embroidery data is inserted into...
Similar Questions

How To Use Brother Pe770 Usb Download
(Posted by imadpxtoro 9 years ago)

How To Prepare Pen Drive To Use Brother Pe770
(Posted by raschdaic 10 years ago)

What Size Needle For Brother Pe770
(Posted by Jeffmar 10 years ago)

How To Thread Needle On Brother Pe770
(Posted by shaaapo 10 years ago)
How To Repair Scratch On Needle Plate Brother Pe770
(Posted by inson 10 years ago)