
Brother International LX2500 Support Question
Brother International LX2500 Support Question
Find answers below for this question about Brother International LX2500.Need a Brother International LX2500 manual? We have 2 online manuals for this item!
Question posted by Littloxact on August 12th, 2014
Brother Lightweight Lx2500 How To Remove Presser Foot
The person who posted this question about this Brother International product did not include a detailed explanation. Please use the "Request More Information" button to the right if more details would help you to answer this question.
Current Answers
Related Brother International LX2500 Manual Pages
Users Manual - English and Spanish - Page 4

... 4
THE MAIN PARTS 5 Flat bed attachment 5
USING YOUR SEWING MACHINE 6 Connecting plugs 6 Main power and sewing light switch 7 Foot controller 7 Checking the needle 7 Replacing the needle 7 Changing the presser foot 8
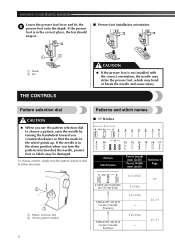
THE CONTROLS 9 Pattern selection dial 9 Patterns and stitch names 9 Reverse sewing lever 10
THREADING THE MACHINE 11 Winding the bobbin 11 Lower threading 13 Upper...
Users Manual - English and Spanish - Page 6

... nearest authorized service center. A Handwheel Used to raise and lower the presser foot. D Foot controller jack / socket (Page 6) Plug in the foot controller plug and connect the machine to 1 open it.
1
2
1 Flat bed attachment 2 Storage compartment
5
B Buttonhole fine-adjustment screw (Page 28)
C Main power and sewing light switch (Page 7) You can use as the lower thread...
Users Manual - English and Spanish - Page 7

....
2
1
Note
● If a power outage occurs while the sewing machine is in fire, electric shock, or damage to install the proper outlet. To reduce the risk of time. Otherwise a fire may result. ● When unplugging the machine, always turn off the main power and remove the plug in the following circumstances:
• When you...
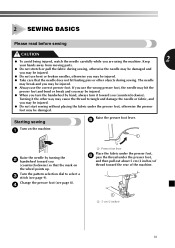
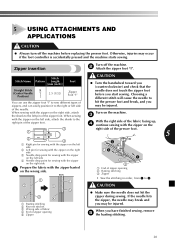
Users Manual - English and Spanish - Page 8

... product code is not in use .
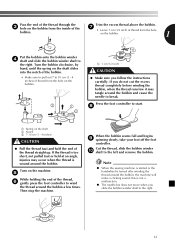
Lower the presser foot lever.
3
1
1 Presser foot lever
7
When you press harder, the machine's speed will run at a low speed.
Other needles may occur if the foot controller is accidentally pressed and the machine starts sewing.
● Only use sewing machine needles for smooth sewing.
1 2
1 Turn on (toward the 'I' mark) 2 Turn off . Dispose...
Users Manual - English and Spanish - Page 9

... back of the sewing machine may be injured.
● Always use the correct presser foot for the stitch pattern you use the wrong presser foot, the needle may strike the presser foot and bend or break, and may be damaged.
● Always turn the
needle clamp screw counterclockwise to
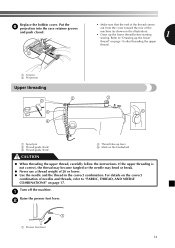
Changing the presser foot
remove the needle. Using any other presser foot may be...
Users Manual - English and Spanish - Page 10
... STITCH (Center Needle Position)
Preset Length (mm (inch)) Preset Width (mm (inch))
0.5 (1/32)
5 (3/16) 1.6 (1/16)
-
1.8 (1/16)
-
Reference Page 27
23, 31
23, 31
9 KNOWING YOUR SEWING MACHINE
Lower the presser foot lever and fix the 5 presser foot onto the shank.
If the needle is not installed with the correct orientation, the needle may strike the...
Users Manual - English and Spanish - Page 13
...and begins 9 spinning slowly, take your foot off the foot
controller. this is wound around the bobbin...remove the bobbin.
Turn the bobbin clockwise, by hand, until the spring on the bobbin.
1
Put the bobbin onto the bobbin winder 4 shaft and slide the bobbin winder shaft to wind
the thread around the bobbin, the machine will make a clicking sound; Note
● When the sewing machine...
Users Manual - English and Spanish - Page 14

...the 2 handwheel toward you.
CAUTION
● Make sure you
(counterclockwise) and raise the presser foot lever.
Remove the bobbin cover by the arrow.
1
2
1 Wound evenly 2 Wound poorly
Lower threading... of the thread, push the 5 bobbin down with thread. KNOWING YOUR SEWING MACHINE
CAUTION
● Not winding the bobbin properly may cause the thread tension to loosen, and may cause...
Users Manual - English and Spanish - Page 15
...tangled or the needle may bend or break.
● Never use a thread weight of the
machine (as shown in the correct combination. Put the 6 projection into the race retainer groove
and ...illustration). • Draw up lever 5 Mark on page 17. Turn off the machine.
1
Raise the presser foot lever.
2
1
1 Presser foot lever
14 For details on the correct
combination of needles and threads, refer to...
Users Manual - English and Spanish - Page 17
...slowly turn the handwheel toward the back of both 3 threads and put them toward
you may cause sewing problems.
1 2
1 Upper thread 2 Lower thread
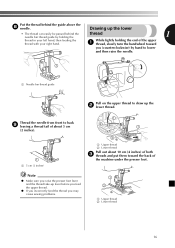
16 Put the thread behind the needle bar...
2
1 Upper thread 2 Lower thread
Pull out about 10 cm (4 inches) of
the machine under the presser foot.
Drawing up the lower
• The thread can easily be passed behind the guide above the 8 needle.
Users Manual - English and Spanish - Page 19
...; When you turn the handwheel by turning the 2 handwheel toward you may be injured.
● Do not start sewing without placing the fabric under the presser foot,
and then pull out about 5 cm (2 inches) of the machine.
1
1 5 cm (2 inches)
18 Turn the pattern selection dial to tangle and damage the needle or fabric, and...
Users Manual - English and Spanish - Page 21
...material under the
● When you
have designed your machine so you .
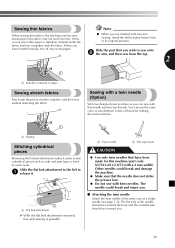
20 You can sew with this machine (part code: X57521-021:2.0/75 with free-arm sewing, install the flat bed attachment back in the same... colors of fabric together, and then sew without stretching the fabric. Slide the part that the needle does not strike the presser foot.
● Do not sew with the fabric.
Users Manual - English and Spanish - Page 26
... 2 Zigzag stitches
Elastic stitching
3
Lower the presser foot lever.
0
Sew at a slow speed holding the fabric a with
the straight stitches sewn on lightweight fabric. Adjust the thread tension so that it is explained below.
■ Mending
Place the reinforcement fabric under the presser foot so 2 that it will be used to sew a picot (lacelike) edge on the...
Users Manual - English and Spanish - Page 27
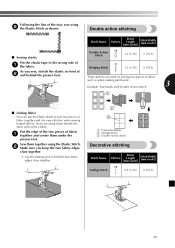
... Stitch
1.2 (1/16) 5 (3/16)
As you are used for joining two pieces of fabric,
such as shown. If you sew, stretch the elastic in front of 2 and behind the presser foot.
Following the line of the tear, sew using 2 the Elastic Stitch as when making patchwork.
3
Example: Patchwork with Double Action Stitch
1
■ Joining fabric...
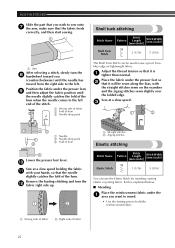
Users Manual - English and Spanish - Page 31
...I "
needle does not touch the zipper foot before replacing the presser foot. Stitch
Stitch Name Pattern Length
Foot
[mm (inch)]
CAUTION
● Turn the handwheel toward you start sewing.
Otherwise, injuries may break and you have finished sewing, remove 5 the basting stitching.
30 Zipper insertion
Turn off the machine before you (counterclockwise) and check that the
Straight...
Users Manual - English and Spanish - Page 32
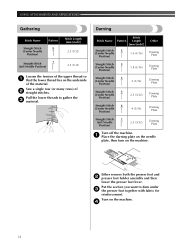
...then turn on the machine.
4
31
Either remove both the presser foot and 2 presser foot holder assembly and then
lower the presser foot lever.
Pull the lower threads to darn under 3 the presser foot together with fabric for
...the underside
of 2 straight stitches.
Turn on the machine. Put the section you want to gather the 3 material. Sew a single row (or many rows) of the material.
Users Manual - English and Spanish - Page 34
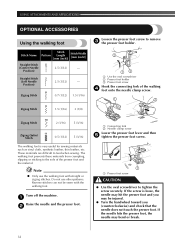
Do not use the walking foot with the walking foot. Turn off the machine.
1
Raise the needle and the presser foot.
2
1 Connecting fork 2 Needle clamp screw
Lower the presser foot lever and then 5 tighten the presser foot screw.
1
1 Presser foot screw
CAUTION
● Use the oval screwdriver to remove 3 the presser foot holder. USING ATTACHMENTS AND APPLICATIONS
OPTIONAL ACCESSORIES
Using...
Users Manual - English and Spanish - Page 36

... on the machine. Sew while moving the fabric slowly. Position the presser foot over
the drawn design.
1
1 Quilting design
The length of fabric 2 Seam 3.2 mm (1/8 inch)
Using the narrow hemmer foot
Stitch Name Pattern
Straight Stitch
5
(Center Needle
Position)
Stitch Length [mm (inch)]
2.5 (3/32)
You can use the narrow hemmer foot for binding lightweight fabrics and for...
Users Manual - English and Spanish - Page 41

...machine stops operating correctly, check the following possible problems before requesting service.
Correctly install the needle.
7
The needle clamp screw is pushed to the Move the bobbin-winder shaft to sew. Correct the upper threading.
14
You have not fitted the spool properly.
Remove any knots or tangles.
-
Visit us at " http://solutions.brother... presser foot ...
Users Manual - English and Spanish - Page 42
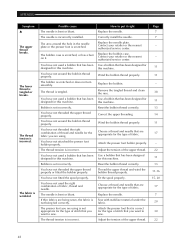
... not threaded the upper thread properly.
Remove the tangled thread and clean the race. Wind the bobbin thread properly. Use a bobbin that has been designed for this machine.
APPENDIX
Symptom ▲ The upper thread breaks.
The area around the hole in the needle plate or the presser foot is wrinkled. The thread tension is...
Similar Questions

How Do I Thread My Brother Ls 2300 Prw Project Runway Sewing Machine
(Posted by 96aurZev 9 years ago)

Brothers Sewing Machine Lx2500 What Are The 4 Quick Change Presser Foots
(Posted by LegMegha 9 years ago)

Presser Foot Sewing Machine Button Won't Lower Presser Foot
(Posted by sentrobe 9 years ago)

Instructions On How To Use A Brother Brand Lx2500 Sewing Machine
(Posted by climadandr 10 years ago)
What Type Of Presser Foot Brother Lx2500
(Posted by paulgguren 10 years ago)