
Brother International CE-5500PRW Support Question
Brother International CE-5500PRW Support Question
Find answers below for this question about Brother International CE-5500PRW.Need a Brother International CE-5500PRW manual? We have 3 online manuals for this item!
Question posted by plstalter on December 9th, 2013
The Machine Started Bird Nesting On The Underside.
Am in the middle of putting together a quilt with flannel fabric, and the machine started birdnesting on the underside of the stitching. Tried cleaning out the bobbin plate, turned up the top tension. Don't know what else to try. Got rid of my last Singer machine for the very same problem.
Current Answers
Related Brother International CE-5500PRW Manual Pages
Users Manual - English - Page 11

... when removing the needle plate cover. g Needle plate cover
Remove the needle plate cover to sew reverse stitches.
j Bobbin cover
Open the bobbin cover to sew" (page 39). k Needle plate The needle plate is lowered in the opposite direction. The operation buttons differ depending on the
fabric as the sewing takes place. For details, refer to "Starting to set the bobbin. Be sure to...
Users Manual - English - Page 31
...
between the needle and the flat
fabrics or fabrics where skipped stitches easily
surface is not even, the needle is bent.
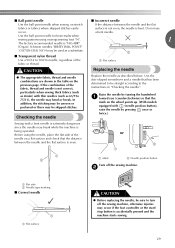
Checking the needle
Replace the needle as a substitute.
1
■ Transparent nylon thread
Use a 90/14 to turn off the sewing machine. Raise the needle by pressing once or twice.)
Sewing with thin needles (such as denim...
Users Manual - English - Page 34
...9679; After adjusting the stitch width, slowly turn the fabric. Start sewing. X Two lines of thread and fabric that the needle does not...Turn on changing the presser foot, refer
to sew" (page 39).
Otherwise the needle may break or the machine may be damaged.
● Do not try turning the fabric with a needle threader ● You cannot use the needle threader to "Adjusting the stitch...
Users Manual - English - Page 35
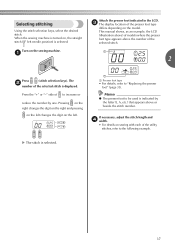
... you have been designed to be used with each stitch appears in the holder.
Raise the needle by pressing once or twice.)
or
a Mark
b Needle position button
If the sewing machine has been turned on the
controller, the machine will start /stop button is accidentally pressed and the machine starts sewing. CAUTION
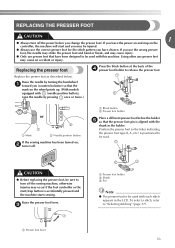
● Before replacing the presser foot, be...
Users Manual - English - Page 39
... right and pressing
on the left changes the digit on , the straight stitch ( left . If necessary, adjust the stitch length and d width.
• For details on sewing with each of the presser foot type
differs depending on the sewing machine. When the sewing machine is turned on the left needle position) is indicated by one. This manual shows...
Users Manual - English - Page 41
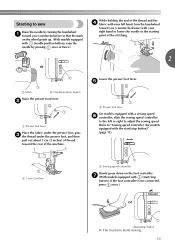
... of the thread and the d fabric with your left or right to the starting point of the machine. a 5 cm (2 inches)
a Sewing speed controller
Slowly press down on the wheel points up. (With models equipped with (needle position button), raise the needle by turning the handwheel a toward you (counterclockwise) with (start /stop button
X The machine starts sewing. 39
g (With models...
Users Manual - English - Page 44
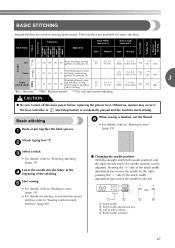
... the needle either by turning the handwheel toward you select a stitch, the machine automatically sets the stitch width and length for the stitch that are described below. However, a trial piece of fabric should be used for your project, and check the thread tension and stitch length and width. For the trial sewing, use a piece of fabric and stitching being sewn, the...
Users Manual - English - Page 49
... accidentally pressed and the machine starts sewing.
Pressing the "+" side of the stitching.
rative stitching
*Rev.: Reverse **Rfc.: Reinforcement ***Do not use reverse stitching.
Attach zigzag foot "J".
c
• For details, refer to sew" (page 39). Lower the needle into the fabric at the d beginning of the stitch width adjustment key moves the needle to the left needle position...
Users Manual - English - Page 50

... the machine starts sewing. Otherwise, injuries may be displayed on stretch fabrics
0 (0)
-3 - 3
2.0 (1/16)
1.0-3.5 (1/16-1/8)
No
No
* Rfc.
*Rfc.: Reinforcement
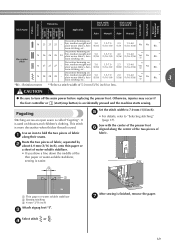
CAUTION
● Be sure to finish the edge of a project, like the hem of a pair of trousers, without the stitch showing.
a a
Fold the fabric along the desired edge of fabric
48
Memo
● When selecting stitch or...
Users Manual - English - Page 70
... **Select a stitch width of fabrics, such as with this sewing machine.
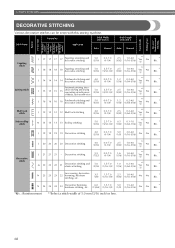
J 19 19 19 19 Decorative stitching
4.0 0.0-7.0 (3/16) (0-1/4)
3.0 (1/8)
2.0-4.0 (1/16-3/16)
No
No
* Rfc. Stitch Width [mm (inch.)]
Stitch Name
Application
Auto Manual
Stitch Length [mm (inch.)]
Auto Manual
Pattern Presser Foot 70 stitches model 60 stitches model 50 stitches model 40 stitches model Twin...
Users Manual - English - Page 71
... stitch width to turn off the main power before replacing the presser foot. e
• For details, refer to fold the two pieces of fabric a along the center of the two pieces of the
thin paper or water-soluble stabilizer, sewing is used . c
Select stitch or . d
After sewing is accidentally pressed and the machine starts sewing. Application
Stitch Width [mm (inch.)]
Stitch...
Users Manual - English - Page 73
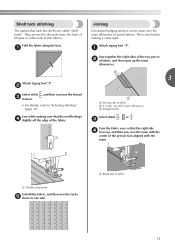
... blouses or cuffs made of thin fabrics. Attach zigzag foot "J".
a
Sew together the right sides of the two pieces b of fabric, and then open up , and then sew over the seam allowance of joined fabrics.
b
Select stitch , and then increase the thread c tension.
• For details, refer to one side.
c
Turn the fabric over so that the needle drops...
Users Manual - English - Page 74

...stitch width, slowly turn the handwheel toward you (counterclockwise) and check that the needle does not touch the presser foot. For details, refer to "Upper threading" (page 22). b
Select stitch , , , , or . d
72
Insert the wing needle. Start sewing...-like decorative stitch.
UTILITY STITCHES
Heirloom stitching
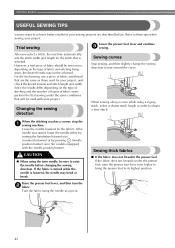
When sewing with the wing needle, otherwise the sewing machine may be used...
Users Manual - English - Page 80

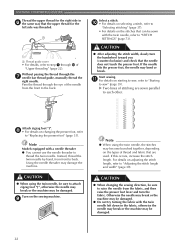
... presser-foot
holder and the needle.
Cleaning the bobbin case
Sewing performance will suffer if dust collects in neutral detergent, squeeze it out.
Cleaning the machine surface
Slide the needle plate cover release toward d you clean it should be injured.
a Cleaning brush b Race
• Do not put oil on the bobbin case.
78 After cleaning it once with a wet cloth, wipe...
Users Manual - English - Page 85
Hold the thread with your right hand so that is not raised, the sewing machine cannot be threaded correctly. or
a Mark b Needle position button
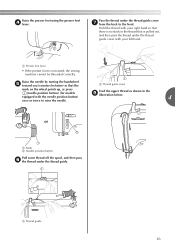
Pull some thread ... slack in the h illustration below.
4
once or twice to the front. a Thread guide
83 Raise the needle by turning the handwheel e toward you (counterclockwise) so that the
a Thread guide cover
mark on the wheel points up, or press...
Users Manual - English - Page 89
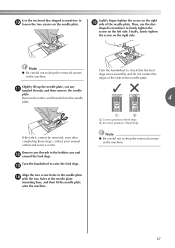
... fabric cannot be removed, even after completing these steps, contact your nearest authorized service center.
Note
● Be careful not to raise the feed dogs. Turn the handwheel to drop the removed screws in the needle plate n with the two holes at the needle plate
mounting base, and then fit the needle plate onto the machine...
Users Manual - English - Page 93
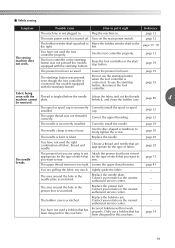
.... Lower the presser foot lever.
below the needle Lift up the fabric and cut the threads
machine cannot plate.
sew. The upper thread tension is pushed to the right.
Replace the needle plate.
authorized service center. Only use the start / stop button, disconnect the foot controller.
Turn on the main power switch.
cap.
page 28
The needle breaks...
Users Manual - English - Page 94
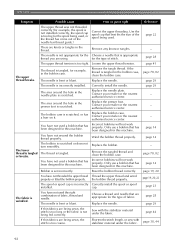
... needle is not appropriate for this machine. The upper thread tension is appropriate
thread you are using. The area around the hole in the thread. Incorrect bobbins will not work properly. The spool or spool cap is scratched. Sew with stabilizer material under the fabric.
Possible cause
How to put it .
Reference
page 22
-
Replace the...
Users Manual - English - Page 95
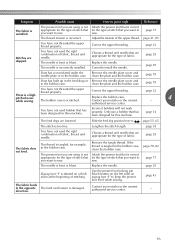
... appropriate for example, in the opposite The feed mechanism is correct for this machine. The thread is not appropriate for the type of stitch that you are appropriate for this machine.
page 43
The fabric feeds in the bobbin case.
clean the plate and the bobbin case. page 78
You have not threaded the upper thread properly.
Incorrect...
Users Manual - English - Page 98
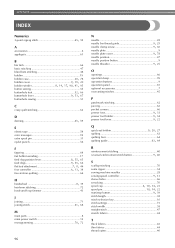
... bobbin 9, 20, 27
quilting 63 quilting foot 64
, quilting guide 63 64
R
reinforcement stitching 40
, reverse/reinforcement stitch button 9 40
S
scallop stitching 70 seam ripper 54 sewing machine needles 28
, sewing speed controller 9 13
sleeve holes 66 smocking 70
spool cap 6 10, 14, 23 spool , pin 10 14, 22 , start/stop button 9 39
stitch length 38 stitch selection key 10 stitch...
Similar Questions

How To Fix The Brother Sewing Machine Problems With Hand Wheel
(Posted by blipslacov 9 years ago)

How To Wind The Bobbin On A Ce5500prw Brother Sewing Machine
(Posted by Jayaabu 9 years ago)

Why Is My Machine Sewing Stitches On The Underside?
(Posted by rfinley81749 10 years ago)

How To Sew With Brother Sewing Machine Ce5500prw
(Posted by testycr 10 years ago)

Brother Ls 2125 Sewing Machine Problems
Hi, I am having bobber problems, and feed dog problems. Feed dog is below plate so wont feed, also c...
Hi, I am having bobber problems, and feed dog problems. Feed dog is below plate so wont feed, also c...
(Posted by joansieirisheyes 12 years ago)