Get support for Boss Audio BV755B

Boss Audio BV755B Support Question

Boss Audio BV755B Support Question

Find answers below for this question about Boss Audio BV755B.
Need a Boss Audio BV755B manual? We have 4 online manuals for this item!
Question posted by Anonymous-169480 on October 8th, 2021

My Volume Control Knob Is Loose And Backwards. How Can I Fix It

The person who posted this question about this Boss Audio product did not include a detailed explanation. Please use the "Request More Information" button to the right if more details would help you to answer this question.

Current Answers

Answer #1: Posted by Troubleshooter101 on October 8th, 2021 9:00 PM
This answer was accepted by the poster of the original question.
Troubleshooter101

Member since:
September 30th, 2015

Points: 2,927,030
1,100
points
The volume control 'encoder' is probably either faulty or dirty.

Try this first, (if you want to).

Disconnect the power from your receiver. Remove the top cover on your VSX-D608. Remove and pull out the black plastic knob (volume control) located on the front of your receiver. Look behind the volume control and you'll see a small board with the encoder mounted on it. Undo the screws holding the board and gently pull out the board. Gently use a small flat head screw driver and push/pry (be careful, you do not want to break them) away the 4 lugs that are holding the top cover on the encoder in place. Then gently pull out the knob which separates the assembly. Using an electronics 'contact cleaner' spray (this can be purchased from electronics stores, do not use WD-40 or similar products), spray and gently clean the inside of the encoder. Be very careful not to bend the small fingers located inside the unit. Sometimes there is some 'gunk' inside that is hard to clean so you need to use the cleaner and spray a few times. When dry, install the volume control back and push the small 4 lugs back into place. Rotate the control back and forth to ensure it moves smoothly. Install the board back into place, replace the top cover on the unit and plug the unit back in. Test it to make sure it works correctly.

If the above seems a bit daunting , buy a new encoder part # ASX7004 (not 100% sure on this point as cannot find out exactly but if AWX7386 is stamped on the encoder it is no longer available and the ASX7004 is the replacement for it. (AWX7836 is the part # used on VSX model # before and after yours, so I made an assumption about your as I couldn't find anything about your particular part) If there is a different number stamped on the encoder 'Google' it to get the correct part). Here is a link, there are others but nearly all say 'out of stock' http://alltronicmarketplace.com.sg/asx70... You'll have to desolder the encoder from the board assembly and then solder in the new one. The link also shows what it looks like.

Hopefully this is of some help.


Thanks


Please respond to my effort to provide you with the best possible solution by using the "Acceptable Solution" and/or the "Helpful" buttons when the answer has proven to be helpful. Please feel free to submit further info for your question, if a solution was not provided. I appreciate the opportunity to serve you!
Troublshooter101
Answer #2: Posted by SonuKumar on October 9th, 2021 6:06 AM
SonuKumar

Member since:
May 9th, 2021

Points: 16,641,150
100
points
There is no proper remedy for it, either replace the control face place unit.


Please respond to my effort to provide you with the best possible solution by using the "Acceptable Solution" and/or the "Helpful" buttons when the answer has proven to be helpful.

Regards,
Sonu
Your search handyman for all e-support needs!!

Related Boss Audio BV755B Manual Pages

User Manual V2 - Page 3

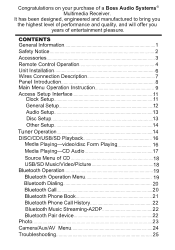
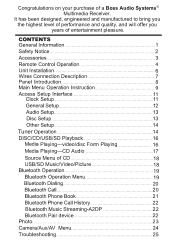
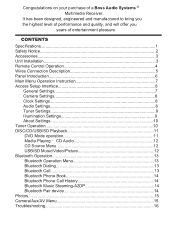
... will offer you years of a Boss Audio Systems R Multimedia Receiver. Congratulations on your purchase of entertainment pleasure. Unit Installation Wires Connection Description 4 Tuner 4 6 Media Playing-video/disc Form Playing 6 Media Playing-CD Audio Source Menu of CD 18 USB/SD Music...
User Manual V2 - Page 9

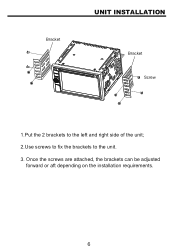
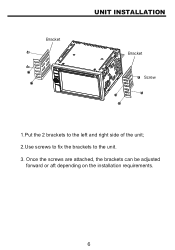
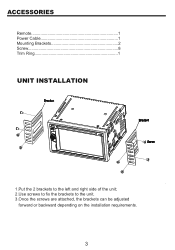
Once the screws are attached, the brackets can be adjusted forward or aft depending on the installation requirements. Bracket UNIT INSTALLATION Bracket Screw 1.Put the 2 brackets to the left and right side of the unit; 2.Use screws to fix the brackets to the unit. 3.
User Manual V2 - Page 10

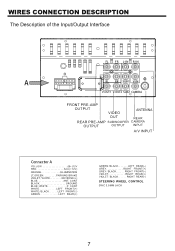
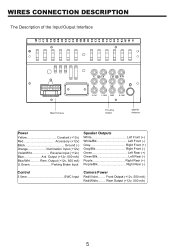
WIRES CONNECTION DESCRIPTION The Description of the Input/Output Interface '- '3 -*/ 3*/ " 3- 33 46# 7*/ 7065 7065 46# $".&3" FRONT PRE-AMP OUTPUT VIDEO ANTENNA OUT REAR REAR PRE-AMP SUBWOOFER CAMERA OUTPUT OUTPUT INPUT A/V INPUT $POOFDUPS" SWC 3.5MM JACK
User Manual V3 - Page 4

... will offer you years of a Boss Audio Systems R Multimedia Receiver. Congratulations on your purchase of entertainment pleasure. Unit Installation Wires Connection Description 4 Tuner 4 6 Media Playing-video/disc Form Playing 6 Media Playing-CD Audio Source Menu of CD 18 USB/SD Music...
User Manual V3 - Page 10

Bracket UNIT INSTALLATION Bracket Screw 1.Put the 2 brackets to the left and right side of the unit; 2.Use screws to fix the brackets to the unit. 3. Once the screws are attached, the brackets can be adjusted forward or aft depending on the installation requirements.
User Manual V3 - Page 11

WIRES CONNECTION DESCRIPTION The Description of the Input/Output Interface '- '3 -*/ 3*/ " 3- 33 46# 7*/ 7065 7065 46# $".&3" FRONT PRE-AMP OUTPUT VIDEO ANTENNA OUT REAR REAR PRE-AMP SUBWOOFER CAMERA OUTPUT OUTPUT INPUT A/V INPUT $POOFDUPS" SWC 3.5MM JACK
User Manual V4 - Page 3

...Boss Audio Systems R Multimedia Receiver. Specifications 1 Safety Notice...2 Accessories...3 Unit Installation 3 Remote Control Operation 4 Wires Connection Description 5 Panel Introduction 6 Main Menu Operation Instruction 7 Access Setup ... Media Playingi CD Audio 12 CD Source Menu 12 USB/SD Music/Video/Picture 12 Bluetooth Operation 13 Bluetooth Operation Menu 13 Bluetooth Dialing 13...
User Manual V4 - Page 4

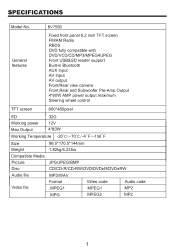
BV755B General features Fixed front panel 6.2 inch TFT screen FM/AM...view camera Front,Rear and Subwoofer Pre-Amp.Output 4*80W AMP power output maximum Steering wheel control TFT screen 800*480pixel SD 32G Working power 12V Max Output 4*80W Working Temperature -20&#...DVD±RW Audio file MP3/WAV Video file Format .MPEG1 Video code MPEG1 Audio code MP2 .MPG MPEG2 MP2 Model No.
User Manual V4 - Page 5

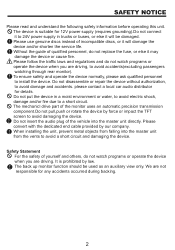
... read and understand the following safety information before operating this unit. To ensure safety and operate the device normally, please ask qualified personnel to avoid damage and accidents. please contact a local car audio distributor for any accidents occurred during backing. Without the guide of the monitor uses an automatic precision transmission component...
User Manual V4 - Page 6

Remote 1 Power Cable 1 Mounting Brackets 2 Screw 8 Trim Ring 1 UNIT INSTALLATION 1.Put the 2 brackets to the left and right side of the unit; 2.Use screws to fix the brackets to the unit. 3.Once the screws are attached, the brackets can be adjusted forward or backward depending on the installation requirements.
User Manual V4 - Page 7

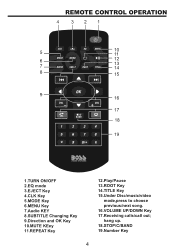
hang up. 18.STOP/C/BAND 19.Number Key 1.TURN ON/OFF 2.EQ mode 3.EJECT Key 4.CLK Key 5.MODE Key 6.MENU Key 7.Audio KEY 8.SUBTITLE Changing Key 9.Direction and OK Key 10.MUTE KEey 11.REPEAT Key 12.Play/Pause 13.ROOT Key 14.TITLE Key 15.Under Disc/music/video mode,press to choose previous/next song. 16.VOLUME UP/DOWN Key 17.Receiving calls/call out;
User Manual V4 - Page 8

... (+) White/Blk Left Front (-) Gray Right Front (+) Gray/Blk Right Front (-) Green Left Rear (+) Green/Blk Left Rear (-) Purple Right Rear (+) Purple/Blk Right Rear (-) Control 3.5mm SWC Input Camera Power Red/Violet.........
User Manual V4 - Page 9

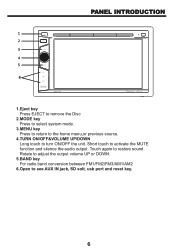
Rotate to adjust the output volume UP or DOWN. 5.BAND key For radio band conversion between FM1/FM2/FM3/AM1/AM2 6.Open to activate the MUTE function and silence the audio ... remove the Disc 2.MODE key Press to select system mode. 3.MENU key Press to return to the home menu,or previous source. 4.TURN ON/OFF&VOLUME UP/DOWN Long touch to restore sound. Touch again to turn ON/OFF the unit.
User Manual V4 - Page 10

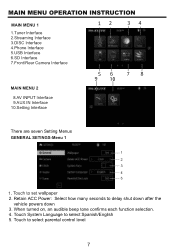
Retain ACC Power: Select how many seconds to select parental control level Touch to delay shut down after the vehicle powers down 3. MAIN MENU 1 1.Tuner Interface 2.Streaming Interface 3.DISC Interface 4.Phone Interface 5.USB Interface 6.SD Interface 7....
User Manual V4 - Page 12

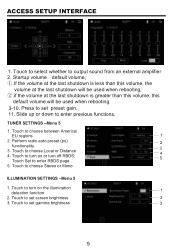
... to choose Local or Distance 4. Startup volumeğdefault volumeĠ æ.If the volume at the last shutdown is less than this volume, the volume at the last shutdown will be used when rebooting; ç.if the volume at the last shutdown is greater than this volume, this default volume will be used when rebooting 3-10 gain...
User Manual V4 - Page 13

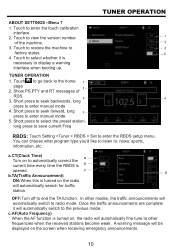
... enter manual mode 4. Once the traffic announcements are complete it is turned on the radio will automatically search for traffic station. Short press to seek backwards, long press to view the version number of RDS 3. a.CT(Clock Time) Turn on to enter the touch calibration interface 2. Show PS,PTY and RT...
User Manual V4 - Page 14

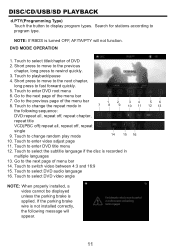
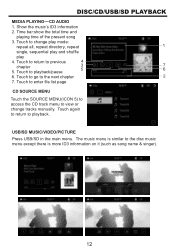
...Touch to the previous page of the menu bar 8. Go to playback/pause 4. Touch to switch video between 4:3 and 16:9 15. Touch to select the subtitle language if the disc is not installed...title VCD(PBC off):repeat all, repeat off, repeat single 9. Search for stations according to enter video adjust page 11. Touch to program type. Touch to enter DVD root menu 6. DVD MODE ...
User Manual V4 - Page 15

... previous chapter 5. Touch again to return to the disc music menu except there is similar to playback. Show the music's ID3 information 2. USB/SD MUSIC/VIDEO/PICTURE Press USB/SD in the main menu. Touch to change tracks manually. MEDIA PLAYING CD AUDIO 1. Time bar:show the total time and playing...
User Manual V4 - Page 18

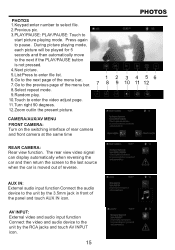
...icon. AV INPUT: External video and audio input function Connect the video and audio device to enter the video adjust page. 11.Turn ...right 90 degrees. 12.Zoom out/in front of rear camera and front camera at the same time REAR CAMERA: Rear view function. The rear view video signal can display automatically when reversing the car...
User Manual V4 - Page 19

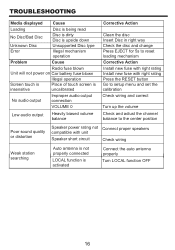
... Illegal mechanism operation Problem Cause Radio fuse blown Unit will not power on Car battery fuse blown Illegal operation Screen touch is Place of touch screen is insensitive uncalibrated No ...RESET button Go to setup menu and set the calibration Check wiring and correct Turn up the volume Check and adiust the channel balance to the center position Poor sound quality or distortion Speaker ...

Similar Questions

System Continnually Shuts Off And On
My new boss bv755 System continnually shuts off and then back on.When I first turn on the ignition s...
(Posted by gdbmytouch 2 years ago)
Why Does It Not Remember The Pairing Of My Phone And Is There Sub Control?
have to repair phone every time it boots also EQ resets everytime can't seem to find a sub gain cont...
(Posted by dgtek2018 2 years ago)
Where Is The Reset Button On My Bv9976b Radio
radio reset buton
(Posted by deansjobapps 5 years ago)
Volume Control Knob Not Working
the volume control knob will only turn the volume up and not down when trying to lower the volume it...
(Posted by jayms1122 8 years ago)
Ask a New Question
Use the box below to post a new question about this Boss Audio product .
Points & Prizes
  • You can earn points for nearly everything you do on HelpOwl.com
  • You can trade in those points for gift cards at leading retailers such as Amazon.com and Walmart
  • It's that simple!
See How it Works
Create a Free Account

Boss Audio Manuals

Find free Boss Audio BV755B manuals and user guides available at ManualOwl.com. Try out our unique manual viewer allowing you to interact with manuals from directly within your browser!

Boss Audio Reviews

View thousands of Boss Audio user reviews and customer ratings available at ReviewOwl.com.

Contact Information

Complete Boss Audio customer service contact information including steps to reach representatives, hours of operation, customer support links and more from ContactHelp.com.

Scoreboard Ratings

See detailed Boss Audio customer service rankings, employee comments and much more from our sister site.