
Bernina Bernette 56 Support Question
Bernina Bernette 56 Support Question
Find answers below for this question about Bernina Bernette 56.Need a Bernina Bernette 56 manual? We have 1 online manual for this item!
Question posted by lcoov43 on July 7th, 2015
Is This Machine The Same As The Bernina Bernette 65?
The person who posted this question about this Bernina product did not include a detailed explanation. Please use the "Request More Information" button to the right if more details would help you to answer this question.
Current Answers


Related Bernina Bernette 56 Manual Pages
Instruction Manual - Page 2

... Replace bulb with any openings. 6. To reduce the risk of electric shock:
1. This sewing machine is intended for grounding be identical to the nearest authorized dealer or service center for Servicing ...the risk of burns, fire, electric shock, or injury to break. 12.
Return the sewing machine to those parts in this manual. Do not use the proper needle plate. Do not...
Instruction Manual - Page 5
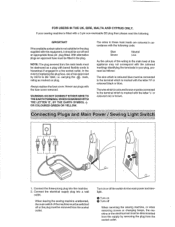
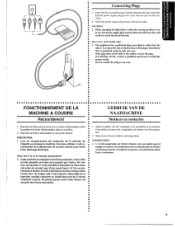
... please read the following code:
Blue Brown
Neutral Live
As the colours of the wiring in your sewing machine is marked with the letter 'L' or coloured red or brown.
1. carrying the ~ mark, rating...for the main power and sewlight.
0 Turn on plug. When leaving the sewing machine unattended, the main switch ofthe machine must be switched off or the plug must be connected ·to the ...
Instruction Manual - Page 6

...Overedge Stitching 50 Triple Zigzag Stitching 51 Zipper Inserting 61
Gathering 61
Darning 63
Appliques 64 Monogrammingand Embroidering 65
.
. . PRINCIPAL PARTS 1
ACCESSORIES 3
OPERATING YOUR SEWING MACHINE 6 Connecting Plugs 6 Main Power and Sewing Light Switches 7 Foot Controller 7 Inserting the Needle 8 Checking the Needle 8 Changing the Presser Foot 9 Converting to Free-Arm...
Instruction Manual - Page 14
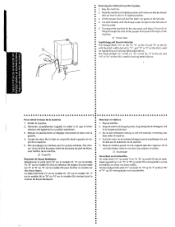
When changing the light bulb or when the sewing machine is intended to
•• fit in a polarized outlet in only one blade is wider...(Pour les E.-U. Deze stekker zit tussen bet voetpedaal en de stekker voor het stopcontact.
2. Steck nude (stroom) stekker in de machine. and Canada only)
• 2. Par me• sure de securite, il n'est possible d'introduire Ia fiche dans ••...
Instruction Manual - Page 15
mark)
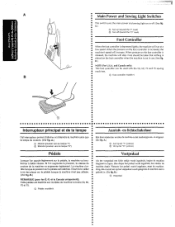
® Turn off . (See fig. A
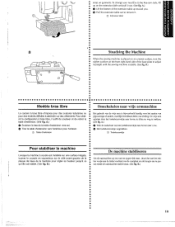
Main Power and Sewing Light Switches
This switch turns the main power and sewing light on (toward the "0" mark)
Foot Controller
When the foot controller is depressed lightly, the ma A.)
(j) Turn on ·or off (toward the"!"
Instruction Manual - Page 17
... le pied sur !'axe.
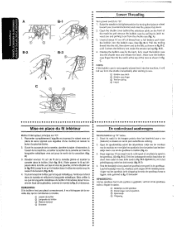
De persvoet vervangen
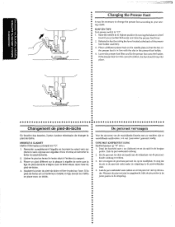
Voor bet uitvoeren van de verschil!ende functies met uw machine, zijn er verschillende naaldvoeten, ook we! 'persvoeten' genoemd, nodig. Draai .het handwiel naar u ... Presser Foot
••• It may be necessary to change the presser foot according to your sew-
• ing needs.
•• SNAP-ON TYPE
• Turn power switch to its ...
Instruction Manual - Page 18
A.}
0 Uft the bottom of the extension table up on garments. areas on the extension fable and pull it To change your machine to the free"arm style, lift up toward you.
8 Pull the extension table out to remove it out. (See fig.
Instruction Manual - Page 33

...;• Reglage de Ia couture en points 81astiques
• a A Ia sortfe d'usfne, Ia machine coudre est r9gl€e de sorte que Ia • a piqOre en points e!astiques se fasse...het gekozen patroon in standaardpositie "B" kan worden genaaid. A.)
Adjusting the stretch stitching The sewing machine is tijdens de fabricage zodanig ingesteld dat de elastische steek in een elastische steek. (...
Instruction Manual - Page 37
...case is , tot in bet spoelhuis. (Zie fig.
A
B-2
8-3
c
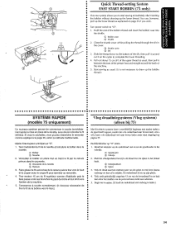
lower Threading
Turn power switch to sew.
Ia fig. 8~2, jusqu'a ce qu'i! Tout en tenant le bo!tier par le loquet meta!lique, l'enfoncer... en plaats bet spoelhuis met spoel in fig. a vette des qu'on the front of the machine and remove the bobbin case by the latch, fully insert the bobbin case into the m.;tchine, it...
Instruction Manual - Page 40

Using the Needle Threader
(75 only)
Turn power switch to "0".
1. Turn the balance wheel toward you {counterclockwise) until the bottom of th~ needle holder aligns with the bottom of the needlethreading-hook holder. Lower the presser foot.lever.
2.
Instruction Manual - Page 42
...up the lower thread. Ot is not necessary to the bottom of
~" •• the machine.
• 5.
de Ia navette et introduire le boitier dans !a
• navette. &#...the bobbin thread and insert the bobbin case into the shuttle. Turn power switch to start sewing immediately after inserting the bobbin without drawing up the bobbin
• thread.)
SYSTEME RAPIDE
•...
Instruction Manual - Page 49
...zet de naald op ongeveer
• I . e•
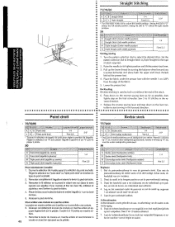
Straight Stitching
position .
50
Starting Sewing 1. Raise the need!~ to 10 stitches in the forward direction.
75/70/60
Rechte steek...-biche.
3. Druk de Achteruitnaaikn()p zo ver mogelijk in zo~ •• dat de machine vooruit begint te naaien. Laat de persvoethendel zakken.
•• Achteruitnaaien
•• Achteruitnaaien...
Instruction Manual - Page 50
... beCindigen (fig. Naai ongeveer 1 em achteruit Piquer jusqu'au bout de Ia couture puis arreter Ia machine. 2. a rement sur Ia pSdale pour coudre sur 1 em en arriSre partir du
bard du tissu...ver mogelijk in en druk voorzichtig bet
voetpedaal een stukje in the fabric.
2. A
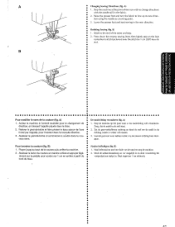
• Changing Sewing Directions (fig. A) • 1. Abaisser le pied-de-biche et commencer coUctre dans le nou...
Instruction Manual - Page 51
Raise the needle to the left side of the machine .
•• To prepare the machine for the next seam, puf! Stop the machine. 2. about 10 em (4'~) of thread through the toes of the presser foot toward the back of the face plate.
5. Cut both ... position and make sure that the thread
take-up lever is also in its highest position. 3. Removing the Material From the Machine 1.
Instruction Manual - Page 52
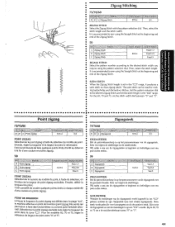
...zigzag. POINT DE BOURDON
Lorsque Ia longueur du point zigzag est dSfinie dans Ia plage "c::J", Ia machine effectue un point de bourdon (point zigzag tres s~rre) qui
a peut servir faire des boutonnieres...). Kies vervolgens de steeklengte en de steekbreedte. Set the pattern selection dial •• to sew using the Straight Stitch at the beginning and
• end of the Zigzag Stitch.
•...
Instruction Manual - Page 56
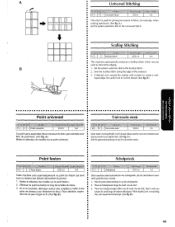
... dial to the Universal Stitch.
• •
• • •
This machine automatically produces a Scallop Stitch which may be used for example, when
making patchwork. {See fig...picots).
1. Stel de patroonkeuzeknop in op de universele steek. A
HII... .IIIL. IIIL w""- SeW the Scallop Stitch along the edge of fabric, for joining two pieces of the material. 3....
Instruction Manual - Page 60
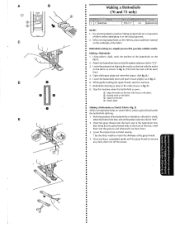
...B.)
5. lower the buttonhole lever and push it on the actual garment. 2. D.
8. E) When sewing buttonholes on the
fabric.
2. Using tailor's chalk, mark the position of fabric before attempting it back ...pattern selection dial to the front of the fabric. Lower the presser foot and start the machine.
7. lower the presser foot aligning the marks on the foot with those on the fabric...
Instruction Manual - Page 62
...; 2. Using tailor's chalk, mark the position and length of the presser foot and aligned with the two red
• lines as possible.
•• 3. When sewing buttonholes on thin fabrics, place stabilizer material
• •
on the underside of the fabric .
•• Buttonhole-making a buttonhole on a scrap piece
• of...
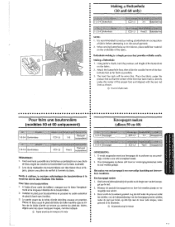
Instruction Manual - Page 63

....
1. Mettre !e s9!ecteur de modele sur 1. 2. Mettre !e s6!ecteur de modele sur 2. 2. Coudre Ia longueur de Ia ligne pr9-d9finie a Ia craie. 3. Coudre 5 6 points.
3. Sew 5 to "2". 2. Set the pattern selection dial to "1 ". 2. Arreter !a machine !orsque l'aiguil!e se trouve a gauche des points
et relever l'aigunle du tissu.
1. Set the pattern selection dial to...
Instruction Manual - Page 85
... 49
Drawing Up Lower Thread 35
Drop Feed Lever 27
s
Scallop Stitching 48
Sewing Direction 42 Sewing Light
Bulb Replacement 67 Switch 7 Shellhem 'stitching 46
Shuttle Hook Removal 69
E
Shuttle Race Cleaning 69
Embroidering 65
F
Spool Installing 30 Steadying the Machine 10 Stitch Length Dial 24
Fagoting Stitch 49
Stitch Width Dial 26
Feed...
Similar Questions

Fixing Pressure Foot Of E56 Bernette Machine
how to fix picot pressure foot
how to fix picot pressure foot
(Posted by meera59 1 year ago)

New Bulb Not Working In Sewing Machine Bernette 12 What Can It Be
(Posted by Anonymous-152221 8 years ago)

How To Thread A Bobbin On A Bernette 56 Sewing Machine
(Posted by scannie2 9 years ago)

How To Sew A Stright Line On Abernina Bernette 56
What is the tension on all 3 dials for the B.B. 56 to sew a striaght line
What is the tension on all 3 dials for the B.B. 56 to sew a striaght line
(Posted by catakuhata 10 years ago)

My Sewing Machine Bernette 15 Stops Working
After 1 day using my Bernette 15 stops working - engine hoots but doesn't rotate spindle and hand wh...
After 1 day using my Bernette 15 stops working - engine hoots but doesn't rotate spindle and hand wh...
(Posted by sgrayxx 12 years ago)