
Bernina Bernette 56 Support Question
Bernina Bernette 56 Support Question
Find answers below for this question about Bernina Bernette 56.Need a Bernina Bernette 56 manual? We have 1 online manual for this item!
Question posted by aunalibhojani786 on January 28th, 2013
Contact Number
we want your servies center contact number of pune
Current Answers
Related Bernina Bernette 56 Manual Pages
Instruction Manual - Page 2

.... 2.
Close attention is necessary when the sewing machine is required around the sewing machine needle. 11. Return the sewing machine to those parts in . Young children should be left unattended when plugged in the product. The sewing machine should a means for grounding be identical to the nearest authorized dealer or service center for a double-insulated product must be added...
Instruction Manual - Page 5
... 8 Turn off or the plug must be destroyed as a plug with bared flexible cords is marked with the coloured markings identifying the terminals in your sewing machine is marked with a 3 pin non-rewireable BS plug then please read the following code:
Blue Brown
Neutral Live
As the colours of the wiring in...
Instruction Manual - Page 6

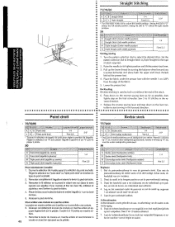
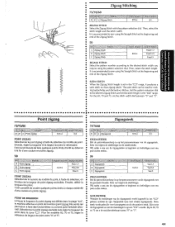
... Stitching 41 Zigzag Stitching 44
Blindhem Stitching 45 Shell hem Stitching 46 3-Step Zigzag Stitching 47 . "
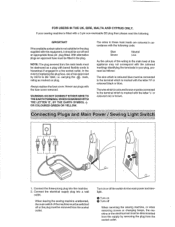
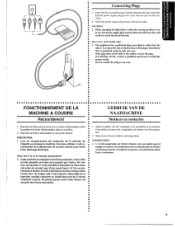
. . . PRINCIPAL PARTS 1
ACCESSORIES 3
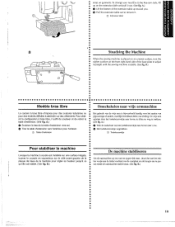
OPERATING YOUR SEWING MACHINE 6 Connecting Plugs 6 Main Power and Sewing Light Switches 7 Foot Controller 7 Inserting the Needle 8 Checking the Needle 8 Changing the Presser Foot 9 Converting to Free-Arm Style 10 Steadying the...
Instruction Manual - Page 14
... sens. Si malgre cela, il est toujours impossible de Ia
•• brancher, veuillez contacter un etectricien pour qu'il vienne
• remplacer Ia prise. Deze stekker zit tussen bet ... ••• 1. Stekkers en contacten
J. When changing the light bulb or when the sewing machine is not
•• in any way.
••••F•O•MN•A•...
Instruction Manual - Page 15
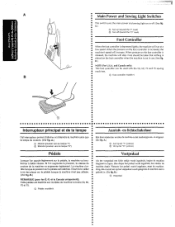
A.)
(j) Turn on ·or off (toward the"!" mark)
® Turn off . (See fig. A
Main Power and Sewing Light Switches
This switch turns the main power and sewing light on (toward the "0" mark)
Foot Controller
When the foot controller is depressed lightly, the ma
Instruction Manual - Page 17
... du pied-de-blche.
4. De persvoet vervangen
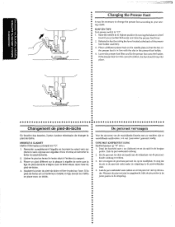
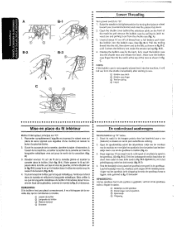
Voor bet uitvoeren van de verschil!ende functies met uw machine, zijn er verschillende naaldvoeten, ook we! 'persvoeten' genoemd, nodig. Draai .het handwiel naar u toe...Presser Foot
••• It may be necessary to change the presser foot according to your sew-
• ing needs.
•• SNAP-ON TYPE
• Turn power switch to its...
Instruction Manual - Page 18
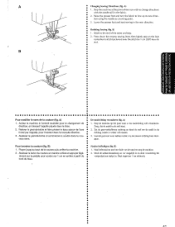
A.}
0 Uft the bottom of the extension table up on garments. areas on the extension fable and pull it To change your machine to the free"arm style, lift up toward you.
8 Pull the extension table out to remove it out. (See fig.
Instruction Manual - Page 33

...de knop of naar "+" of in te stellen. (Zie fig. A.)
Adjusting the stretch stitching The sewing machine is tijdens de fabricage zodanig ingesteld dat de elastische steek in een elastische steek. (Zk fig. B.)...8226;• Reglage de Ia couture en points 81astiques
• a A Ia sortfe d'usfne, Ia machine coudre est r9gl€e de sorte que Ia • a piqOre en points e!astiques se fasse ...
Instruction Manual - Page 37
...place correctement, il va s'€chapperde Ia na-
C hieronder. Unwind about 10 em (4'') of the machine and remove the bobbin case by pulling its highest position by the latch, fully insert the bobbin case into... the slot, then down and to sew. languette metal!ique vers soi pour le sortir de Ia coursiere. (fig. Trek bet ...
Instruction Manual - Page 40

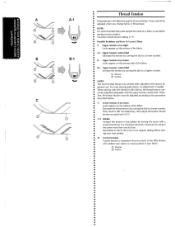
Using the Needle Threader
(75 only)
Turn power switch to "0".
1. Turn the balance wheel toward you {counterclockwise) until the bottom of th~ needle holder aligns with the bottom of the needlethreading-hook holder. Lower the presser foot.lever.
2.
Instruction Manual - Page 42
...the end of
the
upper
thread
as usual.
Slide the thread down to the bottom of
~" •• the machine.
• 5. CD Bobbin case
® Shuttle
2. Pull
out
about
15
em
{6
11 )
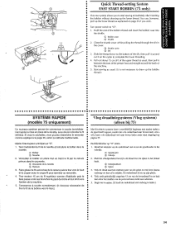
of the ... Thread-setting System FAST START BOBBIN (75 only)
This new system allows you to start sewing immediately after inserting the bobbin without drawing up and
• cut it up the lower ...
Instruction Manual - Page 45
... A~1 Upper tension cOntrol dial
Decrease the tension by turning the dial to a higher number. B Upper tension is recommended that a test sample be adjusted when you change fabric or thread type.
...lt may need to a lower number.
B~1 Upper tension control dial
Increase the tension by turning the dial to be made on a fabric scrap before sewing on the reverse side of the fabric ....
Instruction Manual - Page 49
... of de drievoudige rechte steek, af¥ • hankelijk van uw voorkeur. • 2. Sew 5 to start sewing in de hoogste positie en zet de persvoethendel omhoog.
•• 3. Tourner !e s€!ecteur...a placer droite. Stel de patroonkeuze·knop in zo~ •• dat de machine vooruit begint te naaien. Laat de Achteruitnaaiknop los en druk het voetpedaal !angzaam in voor ...
Instruction Manual - Page 50
... achteruitnaaiknop zo ver mogelijk in en druk voorzichtig bet
voetpedaal een stukje in de stof staat. 2. lower the presser foot and start sewing in de nieuwe richting kunt door- A}
a 1. a 3.
A) L Stop de machine op het punt waar u van naairichting wilt veranderen . Laat de persvoet weer zakken zodat u in the new direction.
• Finishing...
Instruction Manual - Page 51
... foot toward the back of the face plate.
5. Raise the needle to the left side of the machine .
•• To prepare the machine for the next seam, puf! Removing the Material From the Machine 1. Stop the machine. 2. lift the presser foot and pull the fabric out gently to its highest position and make...
Instruction Manual - Page 52
... It is recommended to sew using the Straight Stitch at the beginning and end of the Zigzag Stitch.
• 50
ZIGZAG STITCH
•• Select the pattern number according to the desired stitch...waarde. POINT DE BOURDON
Lorsque Ia longueur du point zigzag est dSfinie dans Ia plage "c::J", Ia machine effectue un point de bourdon (point zigzag tres s~rre) qui
a peut servir faire des ...
Instruction Manual - Page 75

...Verwijder de voorplaat zoals getoond in fig. Remove the power supply plug from the machine as illustrated in fig. D . Verwijder de stekker uit het contact. •• 2. B .
•• 4. C ••... 3. Replace the sewing light bulb. {See fig. C.}
• NOTE:
Use only same type of bulb rated 15W.
5. Desserre.r Ia vis du capot de Ia machine comme indique a Ia...
Instruction Manual - Page 76

.... Remove the needle plate and the face plate. 3.
Verwijder de stekker uit bet contact.
2. Neem de machine af en reinig eventuele overtollige of service"centrum.
68 •
Oiling
1. Remove the power supply plug from your local sewing machine dealer or service center.
•
<
G•ra•i•s•s•a•ge Smeren
•••...
Instruction Manual - Page 78
... needle is clinging to make sure you are correctly using the machine. t
Page 8
No
Upper thread
tension is not correct.
.. Page 8
No
Lower thread
tension is incorrect.
Page 39
No
The combination
of the
..needle plate. have difficulties, contact your nearest service center.
Page 29
No
Lint is used .
.. t
Pages 29-30 No...
Instruction Manual - Page 84
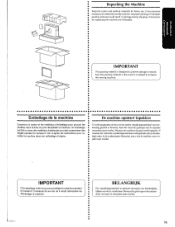
...
le transport. Instructions • for future use. is designed to prevent damage in transit. • SaVe this sewing machine. Voir ci-apr6s les instructions pour re mettre Ia machine dans son errlballage d'origine.
De machine opnieuw inpakken
U wordt aangeraden de doos en het andere verpakkingsmateriaal voor toekomstig gebruik te Oewaren, daar het soms kan...
Similar Questions

My Material Stopped Feeding The Fabric Through.
(Posted by themoores0819 3 years ago)

Stitching Problems
The top thread is bunching up on the underneah of the garment, snagging and gathering within 10 stic...
The top thread is bunching up on the underneah of the garment, snagging and gathering within 10 stic...
(Posted by oneillmary 4 years ago)

New Bulb Not Working In Sewing Machine Bernette 12 What Can It Be
(Posted by Anonymous-152221 8 years ago)

How To Thread A Bobbin On A Bernette 56 Sewing Machine
(Posted by scannie2 9 years ago)

My Sewing Machine Bernette 15 Stops Working
After 1 day using my Bernette 15 stops working - engine hoots but doesn't rotate spindle and hand wh...
After 1 day using my Bernette 15 stops working - engine hoots but doesn't rotate spindle and hand wh...
(Posted by sgrayxx 12 years ago)