
Bernina Bernette 330 Support Question
Bernina Bernette 330 Support Question
Find answers below for this question about Bernina Bernette 330.Need a Bernina Bernette 330 manual? We have 1 online manual for this item!
Question posted by lovekaipara on March 25th, 2020
Stuck In One Place
Help! Can someone tell me how to make the reverse button on my Bernette 330 protrude? The sewing needle is staying put in one place!
Current Answers
Answer #1: Posted by Troubleshooter101 on March 26th, 2020 5:39 AM
Troubleshooter101

Member since:
September 30th, 2015 Points: 2,927,060

Member since:
September 30th, 2015 Points: 2,927,060
I can suggest you to check the user manual of the product
Please check the link below:-
https://media.rainpos.com/4690/bernette_320_330_manual.pdf
Thanks
Please respond to my effort to provide you with the best possible solution by using the "Acceptable Solution" and/or the "Helpful" buttons when the answer has proven to be helpful. Please feel free to submit further info for your question, if a solution was not provided. I appreciate the opportunity to serve you!
Troublshooter101
Answer #2: Posted by HasanChemist on March 27th, 2020 11:10 PM
HasanChemist

Member since:
March 27th, 2020 Points: 250
Member since:
March 27th, 2020 Points: 250
The reverse button has only three parts; 1) the button body, 2) a cylindrical spring, and3) a cap. In this case, the cap seemed to have moved backwards on the shaft of the button body, and that's why it looked like the button was about to fall off. All I had to do to fix the button was to hold the button in, and then push the cap forward.You can do the same way
Related Bernina Bernette 330 Manual Pages
Manual - Page 2

... together with the controls and the functions.
carefully following each step on your complete satisfaction and enjoyment. Your new sewing.moc bine is stage will eliminate errorsand will result in your machine Repeal the process until
you are familiar with funclionol design techniques toachieve
on operating efficiency and many years of dependable...
Manual - Page 3

... OVERLOCK AND OVERLOCK {Not lot Models 3201
26. OVERSEWING EDGES 22. CONNECTING MACHINE TO POWER SUPPLY FOOT CONTROL NEEDLE LIGHT
6. THREAD TENSION 11. COLOUR CODING
25. TROUBLE SHOOTING GUIDE
16. ZIG-ZAG STITCHING
It BUTTONHOLING
19. BOBBIN THREAD TENSION.
9. STRAIGHT STITCHING REVERSE STITCHING REMOVING FABRIC THREAD CUTTER
17. SAFETY REGULATIONS
7. INSERTING BOBBIN AND...
Manual - Page 5
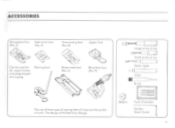
... fool (No el
Zipper fool
Can be used lot all usual >filches including straight and oafag
Darning loot
Button hole fool (No.5)
Blind hem foot (No 91
The use of these speciol sewing feel will improve roe quality al stitch The design of the feet may change
Large screwdriver
Small screw dove...
Manual - Page 6
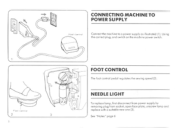
CONNECTING MACHINE TO POWER SUPPLY
Feel control
Connect the machine too power supply as illustroted (1). Using the correct plug, and switch on the machine power switch. FOOT
Manual - Page 7

... TO THE STATUTORY RADIO INTERFERENCE SUPPRESSION REGULATIONS. lotions within the area of movement of the needle, such as follows:
When leaving the sewing machine unottended, the mains switch must be switched
off position). When cleaning or lubricating the machine or chonging the lamp and during interruptions in accordance with the following safety regulations must...
Manual - Page 8
ically co the thread when the bobbin is firmly
engaged.Needle&ire will automat- 0
O
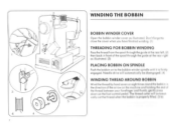
WINDING THE BOBBIN
BOBBIN WINDER COVER
Open the bobbin winder covet ...through the guideat therearleft (21
then bock in the direction of the arrow on the machine end holding the end of the rear right os illustrated (3)
PLACING BOBBIN ON SPINDLE
Push the bobbin on the foot control podol. The thread cutter will ...
Manual - Page 9

... 9/10. 2 %CC:le t t,
r
II
8
()
INSERTING BOBBIN AND CASE INTO MACHINE
INSERTING BOBBIN INTO CASE
Open hook cover as case by the end of the thread.If the...inside the section 14)
Leave about 10cm (4")ofthreadfrom the bobbin case andalways ensure that the needle's raised to the ground or moves down a few Inches looprox. 10 cm). 15...and case into the hook making sure the tinge' "A" is too loose.
Manual - Page 12

... FOOT LIFTER
For extra thick fabrics, tne presser foot can be raised further nv Idling the presser lever o second stage. (2)
DROP FEED CONTROL
For normal sewing the feed dogs should be lowered.
Set the dial at 4 for fabric of the presser foot. use 7. Push 13( * o for heavier fabrics. To regulate the...
Manual - Page 15

turn the hood wheel towards you o rho the needle goes down and up again ill
1 Gently pull the upper thread and the lower thread will be looped over d. (2) Place bark threods uncle, the presser ;ow and to the rear
2 '.
13 BRINGING UP THE BOBBIN THREAD
Hold the upper thread in your left hand.
Manual - Page 16
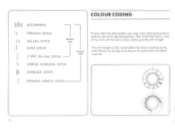
... within the c *low mocking, on the stitch length. COLOUR CODING
Ann BUTTONHOLE
0
STRAIGHT STITCH
1.5 ZIG-ZAG STITCH
Model 320
BLIND STITCH 3 STEP ZIGZAG STITCH
Model 330
STRETCH OVERLOCK STITCH
OVERLOCK STITCH
Simply select the stitch pollens yourequire by rotating the pattern selector dial to the application and effect required.
Manual - Page 17
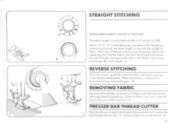
... a scam, push the reverse button and hold it, sewing a few stitches bockwords When the button is contioiled with the stitch length dial (B)
"r while ' 7" or on the dial gives a sum:able stitch length for
ordinary purposes, the stitch length vones with the weight of labrtc, thickness of threod end purpose of the machine. ••
B
C •...
Manual - Page 19

...satin ditch. (I
Afton .nehiCab" f tyr
ei 'mesas MNJ LeM
3
-14 -°\
11A`
330 3
/
BUTTONHOLING
Set the pattern selector dial IA) to its calibrated markings to TeOftle 0 the buttonhole length...tissue, or Other pope underneath the fabric to aid machine feeding.
A
y
310
1
I I ) Sew in the seouence illustrated (21
USER TIPS
Always sew o sample buttonhole on some spore fob...cos settings will...
Manual - Page 20
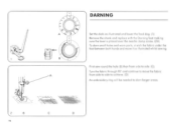
... shank and reploce w,th the Doming fool making sure the lever IS placed over the needle clomp screw. (2A} To darn small ...holes ond worn ports, st.etch the fobnc under rho foot between both bonds and move the fabric from side to dorm larger areas. Turn the fabric through 90' ond continue to move ',OS ollustroied whilst sewi ng
First sew...
Manual - Page 21
... continue
4
3 20
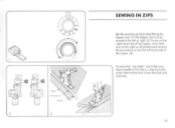
SEWING IN ZIPS
Set the machine os illustroted fitting the Zipper foot (1) The Zipper foot con be moved to sew the left hand side of the way, leave needle in the fabric, raise foot and slide it behind the fool. To move fool over to the right os illustrated and reverse the procedure...
Manual - Page 22

Woof. OVERSEWING EDGES
AA
Oversewing edges prevents the fabric from fraying and creates
r14
a neat edge
Set the machine as illustrated selecting a 'unable stitch width and length. ill
When sewing, the needle should just pass over the edge of the
labac. 12)
I
On fabrics that ate opt to pucker, use the P4r. 8 overcasting loot...
Manual - Page 23
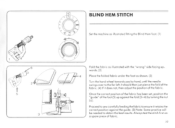
...been set, position the "guide'of the foot (S) upagainst the fold (3.4)by hand, until the needle
swingsover to the for left.
It should then lust pierce the fold of the fabric. Nage:...piece al fabric.
12 wrong" side fixing upwards. (21
4
Place the folded fabric under the fool as shown. BLIND HEM STITCH
Set the machine os illustrated fitting the Blind Horn foot,
Fold the fabric os ...
Manual - Page 24
...side but overtopping slightly on a wide range of sewingoppl
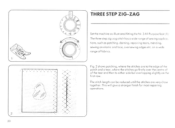
hoes. THREE STEP ZIG-ZAG
Set the machine as patching. such as illustrated fitting the Na 3 All Purpose foot ' I
mc0. repairing ..., mending. The ihr ee slepligizag stitch hose wide range of fabrics. on the fall row. sewing on elastic and lace.
The stitch length con be reduced until the stitches ore very close together...
Manual - Page 25

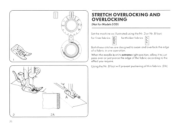
Use it for stretch fabricsmixt for areas of "stress" where a strong stitch is required (2A)
24 STRAIGHT STRETCH STITCH
(Not ler Model 320) Set the machine as illustroted fitting the All Purpose foot. (I) 1he straight stretch sews two stitches forward and one stitch back words. thereby giving "triple" strength.
Manual - Page 26
... or just pierce the edge of its ernenie right position. /".
I for finer fabrics 11
for Models 320)
Set the machine as illust Toted using the Nr. 3 or Ni. 8 foot.
When the needle is of the fabric according to seam and Overlock the edge of thin fabrics. (2Ai
sv. 2
2A
2b Using the...
Manual - Page 27
... fallowing manner Turn the hondwheel until the needle bar reaches its lop position. CMG
rn
➢0C
9
cnoueo.l a
4
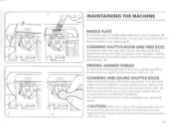
MAINTAINING THE MACHINE
NEEDLE PLATE
To remove snap-on needle plate open hook cover and prise off From...
Cleon and oil the hook in use
26 DO NOT OWROIL.
Take particular tore to make sure every comer has been cleaned. Remove the bobbin case and clean every pod with...
Similar Questions

New Bulb Not Working In Sewing Machine Bernette 12 What Can It Be
(Posted by Anonymous-152221 8 years ago)


What Kind Of Bobbins Does My Bernette 330 Machine Take?
(Posted by arimc 11 years ago)

Where Can I Have My Bernette 330 Serviced In Perth, Western Australia
My Bernette 330 is over 20 years old, and hardly used. Where in Perth WA can I have it serviced and ...
My Bernette 330 is over 20 years old, and hardly used. Where in Perth WA can I have it serviced and ...
(Posted by yasmar65 11 years ago)

My Sewing Machine Bernette 15 Stops Working
After 1 day using my Bernette 15 stops working - engine hoots but doesn't rotate spindle and hand wh...
After 1 day using my Bernette 15 stops working - engine hoots but doesn't rotate spindle and hand wh...
(Posted by sgrayxx 12 years ago)