Bernina 380 Support Question
Bernina 380 Support Question
Find answers below for this question about Bernina 380.Need a Bernina 380 manual? We have 1 online manual for this item!
Question posted by drcarol23 on February 6th, 2014
On 640 Artista, Needle Won't Center.
Worked fine. Today needle stays to left when machine turned on. Can move it to center with buttons that should move it to far right. Never did that before. Sews ok. Have turned on and off and have tried reset. Still on the left.
Supporting Images
You can click the images below to enlarge

Current Answers
Related Bernina 380 Manual Pages
User Guide - Page 2

...is intended for household use , it should never be left unattended when
plugged in this manual.
15. Do not use the sewing computer outdoors. 8.
SERVICING DOUBLE INSULATED PRODUCTS
In a...sewing computer. 6.
Children must be identical to the original parts in the needle area of manufacturing. The wrong stitch plate can cause needle breakage. This sewing computer is not working...
User Guide - Page 4
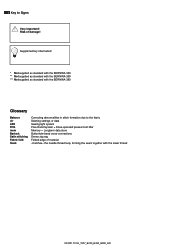
... fabric Deleting settings or data Sewing light system Free-Hand System = Knee-operated presser-foot lifter Memory = Longterm data store Buttonhole-bead cross-connections Dense zig-zag Folded edge of damage! Risk of material «Catches» the needle-thread loop, forming the seam together with the BERNINA 380
Glossary
Balance clr LED...
User Guide - Page 9

...(left) 46 Presser foot lifter 47 Darning hoop connection
(USA/Canada only): The sewing ...sewing light 5 Quick reverse button 6 Start/Stop button 7 Thread take-up cover 8 Thread take-up lever 9 Bobbin winder pre-tension 10 Speed control 11 Screen 12 Needle stop up/down
button 13 Pattern end button 14 Mirror image button */** 15 Stitch length buttons 16 Needle position buttons 17 Stitch width buttons...
User Guide - Page 10

... table increases the sewing surface.
10 Preparation - Attaching the slide-on table █ raise needle and presser foot █ slide over free-arm to the right until it engages Removing the slide-on table █ raise needle and presser foot █ press button down and pull off slide-on table to the left Scale █ «...
User Guide - Page 13
...cut it clicks into place
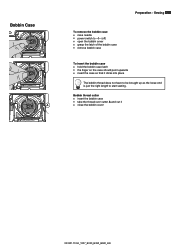
The bobbin thread does not have to be brought up as the loose end is just the right length to «0» (off) █ open the bobbin cover █ grasp the latch of the bobbin case...; insert the case so that it █ close the bobbin cover
033301.70.04_1007_B330_B350_B380_EN Sewing 13
To remove the bobbin case █ raise needle █ power switch to start...
User Guide - Page 14

... guides E and F
C E
F
033301.70.04_1007_B330_B350_B380_EN Sewing
Needle Threader
A
B
1
2
A
1 Press lever down █ raise needle █ lower the presser foot █ hold thread to the left and back █ press lever A down and simultaneously guide the thread around hook B to
the right to the needle
2 Guide thread to front of the needle █ put the thread from the...
User Guide - Page 15

... █ thread sewing computer as usual and thread the right needle
Threading the Second Thread █ place thread spool on the vertical spool pin and thread █ guide the thread to the front in the slit and past the tension disc A on the
left side █ thread the left needle █ threads must not be twisted...
User Guide - Page 16

16 Preparation - Sewing
Thread Cutter
On the left of the head frame █ pull both threads from front to back over the cutter █ the threads release automatically as soon as the first stitch is sewn
Changing the Needle
Removing the needle █ raise needle █ power switch to «0» (off) █ lower the presser...
User Guide - Page 17

Sewing 17
Changing the Presser-Foot Sole
█ raise the needle and the presser foot shaft █ power switch to «0» (off) █ press the button on the shaft to release the...the foot sole will click into position
Changing the Presser Foot
Changing the Presser Foot █ raise the needle and presser foot █ power switch to «0» (off)
Raising the Lever █ raise...
User Guide - Page 18
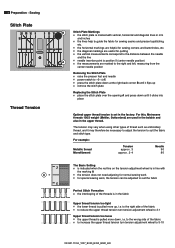
... need adjusting for normal sewing work , the tension can be necessary to adjust the tension to «0» (off) █ press the stitch plate down at the right back corner B until it flips up , i.e. For this, Metrosene threads 100/2 weight (Mettler, Switzerland) are marked to the right and left, measuring from the
center needle position
Removing the...
User Guide - Page 21
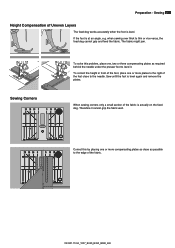
...right of the fabric is level again and remove the plates. Therefore it . when sewing over thick to level it cannot grip the fabric well.
Correct this problem, place one or more compensating plates as close to the edge of Uneven Layers
The feed dog works...possible to the needle. When sewing corners only a small section of the foot close as required
behind the needle under the ...
User Guide - Page 22
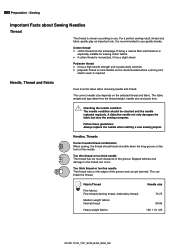
... thread █ cotton thread has the advantage of the needle. The fabric weight and type determine the thread weight, needle size and point form. Needles, Threads
Correct needle/thread combination When sewing, the thread should be taken when choosing needle and thread. This can occur.
Fabric/Thread
Fine fabrics: Fine thread (darning thread, embroidery thread)
Medium weight fabrics...
User Guide - Page 23
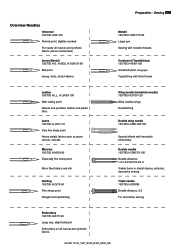
... 130/705 H-Q/75-90 Fine sharp point Straight and topstitching
Wing needle (hemstitch needle) 130/705 HO/100-120 Wide needle (wing) Hemstitching
Double wing needle 130/705 H-ZWI-HO/100
Special effects with hemstitch embroidery
Double needle 130/705 H-ZWI/70-100 Needle distance: 1.0/1.6/2.0/2.5/3.0/4.0 Visible hems in stretch fabrics, pintucks, decorative sewing
Triple needle 130/705 H-DRI/80...
User Guide - Page 24

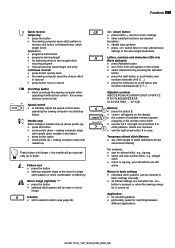
...; press «0» to the right
Altering stitch length █ left █ right button = needle to select stitch number 10 (standard buttonhole)
█ for stitch patterns 11-99: press #-button and enter desired stitch number
█ for stitch patterns 1-10: press the number button of your choice; 24 Functions
Function Buttons on the Sewing Computer
Stitch Selection
█ for...
User Guide - Page 25
... control when
operating the sewing computer via start/stop button
Needle stop Basic setting is needle stop up/down . button is pressed or when the sewing computer is released (max. Pattern end █ press the button █ sewing computer stops at the end of 30) and the cursor blink
█ use the left 1 and right arrow buttons 3 to
3
█
scroll patterns...
User Guide - Page 27

... needle position
can be combined and stored in memory
(capacity of available memory spaces appears █ select the next stitch pattern and program as described, etc.
033301.70.04_1007_B330_B350_B380_EN
Memory buttons █ use the left button 1 to scroll the memory contents backwards █ use the center button 2 to open and close the memory █ use the right button...
User Guide - Page 31
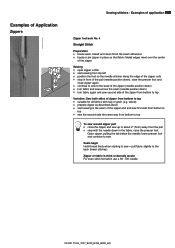
... again █ continue to sew to the base of the zipper (needle position down) █ turn fabric and sew across the seam (needle position down) █ turn fabric again and sew second side of the zipper from...meet over the center
of the zipper
Sewing █ open zipper a little █ start sewing in the seam of the zipper end and sew first side from bottom to
top █ sew the second side...
User Guide - Page 32

...needle in the top left of holes or worn areas Replaces threads along the lengthwise grain in all fabrics █ overcasting █ elastic seams █ decorate sewing
Overcasting edges █ guide edge of fabric into the center...sew the first vertical row and stop the sewing computer █ press the Quick reverse button...not roll █ use a fine darning thread for lightweight fabric
Satin...
User Guide - Page 34

.... 1
Honeycomb stitch
For all fine cotton, synthetic and mixed fiber jersey. 34 Sewing stitches - Preparation █ fold ribbing in half and press █ with Overlock Stitch
Wrong side of fabric
Right side of the fabric
Needle stop down Needle stays in fabric when you stop to adjust the ribbing -
Sewing █ sew from the right at a foot's width from...
User Guide - Page 38

...button is sewn on █ position the work accordingly
Ideal cords █ Perle cotton no. 8 █ strong hand-sewing thread █ fine crochet yarn
Hooking the cord in the buttonhole foot with slide no. 3A █ insert the needle... sole no. 3 insert the needle at the beginning of the buttonhole █ raise the presser foot █ hook the cord over the center pin on the front of the...
Similar Questions

Cleaning Machine
I removed the bobbin case and hook in order to clean my machine, but now I can't seem to figure out ...
I removed the bobbin case and hook in order to clean my machine, but now I can't seem to figure out ...
(Posted by pscoville 8 years ago)

The Needle Position Of My Aurora 450 Is Broken And Breaks Needles On Zig-zag
The machine is 5 years old and this function has never worked. I would like it repaired without char...
The machine is 5 years old and this function has never worked. I would like it repaired without char...
(Posted by bmwhite41 9 years ago)

Bernina Virtuosa 150 Qe
Hi wonder if anyone can help, I have recently become the proud owner of a bernina vietuosa 150qe tje...
Hi wonder if anyone can help, I have recently become the proud owner of a bernina vietuosa 150qe tje...
(Posted by fitzpaul 10 years ago)

What Are The Standard Feet Available When Purchasing Bernina 640 Artista
(Posted by Anonymous-111286 11 years ago)

Needle Adjustment To Center It Evenly…on Bernina #817
Hi, Re:Bernina #817 My needle post is too much to the left and not enough to the right. W...
Hi, Re:Bernina #817 My needle post is too much to the left and not enough to the right. W...
(Posted by Sockcranker 11 years ago)