Bernina 1008 Support Question
Bernina 1008 Support Question
Find answers below for this question about Bernina 1008.Need a Bernina 1008 manual? We have 1 online manual for this item!
Question posted by pjwiddowson on January 31st, 2014
Bernina 807 817 Starts Sewing Before I Use The Foot Control
The person who posted this question about this Bernina product did not include a detailed explanation. Please use the "Request More Information" button to the right if more details would help you to answer this question.
Current Answers
Related Bernina 1008 Manual Pages
Owners Manual - Page 4
... also use one -piece BERNINA® presser feet • Straight stitch throat plate available • Basting - Owner's manual pg.____ - the horizontal lines to the far back and the line in removal of accessories • Attach cords foot control and machine • Power switch - MASTERING YOUR
BERNINA®
BERNINA® Electronic 1008
SECTION A
Care and Feeding of Your Machine
Machine...
Owners Manual - Page 6
... considered for clothing construction on any machine. Made in crooked and looped stitches, puckered seams, frayed thread, and/or needle breakage. loose twist for a soft, shiny look in the left twist. Some commonly used to twist together to form a single ply. Roll - MASTERING YOUR
BERNINA®
BERNINA® Electronic 1008
THREADS
Poor quality or the...
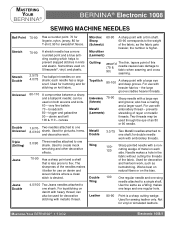
Owners Manual - Page 7

.../705H Needle point - Don't let false economy keep you from hook point;
MASTERING YOUR
BERNINA®
BERNINA® Electronic 1008
NEEDLES
Along with a larger groove should be used.
• Always make a stitch
Need To Know
• Needle should fit in your sewing machine but is : Too small - small size for heavier fabrics
If the needle is...
Owners Manual - Page 8
... to one regular hole.
makes one large and one shaft; Sometimes used through the eye of rayon or metallic threads. as a Wing;
Used for vinyl or simulated leathers.
For use with a large eye and groove; canvas
1.6/70- MASTERING YOUR
BERNINA®
BERNINA® Electronic 1008
SEWING MACHINE NEEDLES
Ball Point Stretch
Stretch Double Universal
Double Universal Triple...
Owners Manual - Page 9

...; Select Straight Stitch.
MASTERING YOUR
BERNINA®
BERNINA® Electronic 1008
NEEDLE POSITIONS
Fabric: Needle: Thread:
Presser Foot:
Firmly woven fabric, 4" x 6" 90/14 Embroidery 30 wt. Leaving the fabric under the foot - The needle position can be set
to the left or right using the knob in half to the right. • Sew about 6 stitches and stop...
Owners Manual - Page 12

...; 1/10/02
Electronic 1008/12 MASTERING YOUR
BERNINA®
BERNINA® Electronic 1008
TOPSTITCHING/EDGESTITCHING
Fabric: Needle: Thread:
Presser Foot:
Firm fabric - 4" x 6" 90/14 Embroidery 30 wt.
cotton embroidery Contrasting color Edgestitch Foot #10 (optional accessory)
Owner's manual pg.____ • Cut fabric in half to create 2 pieces each 2" x 6". • Sew two pieces together...
Owners Manual - Page 14

... center and stitch down this edge about 1". Then widen the stitch back to
0mm. MASTERING YOUR
BERNINA®
BERNINA® Electronic 1008
SATIN STITCH
Fabric: Needle: Thread: Presser Foot:
Firm fabric - 2 pieces, 3" x 6" each 90/14 Embroidery 30 wt.
While continuing to sew, turn the stitch width knob to taper the stitch to maximum. MASTERING YOUR...
Owners Manual - Page 17
... pg.____ • Jeans Foot #8 prevents needle deflection • Non-Stick Straight Stitch Foot #53 • This stitch sews strong seams on the foot, causing the stitch to sink... Can be used for a decorative hem on knits
• Overlock Foot #2 prevents the seam from rolling as denim and canvas. MASTERING YOUR
BERNINA®
BERNINA® Electronic 1008
SECTION B Let's Start With The...
Owners Manual - Page 18
... 1008/18 MASTERING YOUR
BERNINA®
BERNINA® Electronic 1008
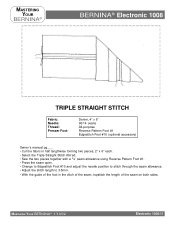
TRIPLE STRAIGHT STITCH
Fabric: Needle: Thread: Presser Foot:
Denim, 4" x 6" 90/14 Jeans All-purpose Reverse Pattern Foot #1 Edgestitch Foot #10 (optional accessory)
Owner's manual pg.___ • Cut the fabric in half lengthwise forming two pieces, 2" x 6" each. • Select the Triple Straight Stitch #9/red. • Sew...
Owners Manual - Page 30

...
BERNINA®
BERNINA® Electronic 1008
WISH LIST Let's Start WIth The Basics
Presser Feet and Attachments: Overlock Foot #2 Embroidery Foot #6 Jeans Foot #8 Edgestitch Foot #10 Straight Stitch Foot #13 Cut and Sew Attachment #80
Feet-ures Double Needles
2.0mm 2.5mm 3.0mm Jeans Needles 90/14 100/16 Double Stitch Witchery - 5/8" roll BERNINA Ironing System Curved Hem Ruler 6" Sewing...
Owners Manual - Page 32
... foot level • Tension Adjustments • Testing: - block and cutter • Tricks: - tie a quilt
Edges • Picot - Feet-ures, Unit A • Fine Edge - for tucks - lingerie
MASTERING YOUR BERNINA® 1/10/02
Electronic 1008/32 with gimp cord - decorative - turn under - couching over - using applique scissors • Height Compensation Tool - with threads
Sewing...
Owners Manual - Page 34

.... Works with any BERNINA® sewing machine
BUTTONHOLE FOOT #3C The standard 9mm buttonhole foot. "A" indicates an "automatic" foot, with a light sensor for machines with a 5mm and 9mm feed system. The descriptions below will help differentiate between the various feet.
AUTOMATIC BUTTONHOLE FOOT #3C The automatic buttonhole foot for BERNINA® sewing machines.
Electronic 1008/34...
Owners Manual - Page 37

... • Sew another corded buttonhole using the optional Buttonhole Foot #3 on wovens and prevents it is on the 5/8" line behind the presser foot. • ...the fabric in half; MASTERING YOUR
BERNINA®
BERNINA® Electronic 1008
Auto Buttonhole Foot with Slide #3A
Standard Buttonhole Foot #3
CORDED BUTTONHOLES
Fabric:
Stabilizer: Needle: Thread: Presser Foot:
Heavy flannel, 6" x 6"...
Owners Manual - Page 38

... YOUR
BERNINA®
BERNINA® Electronic 1008
BUTTON SEW-ON STITCH
Fabric: Stabilizer: Needle: Thread: Presser Foot:
Heavy flannel, 6" x 6" 1 piece, 3" x 6" 90/14 Embroidery 30 weight cotton embroidery Button Sew-On Foot #18 (optional accessory)
Owner's manual pg.____ • Select Universal Stitch #4/green;
You can be made for heavier fabrics such as above. • Use a glue...
Owners Manual - Page 41
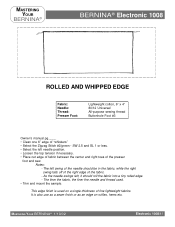
... swing falls off of the right edge of the presser
foot and sew.
This edge finish is also use as a seam finish or as an edge on a single thickness of "whiskers" • Select the Zigzag Stitch #2/green - MASTERING YOUR BERNINA® 1/10/02
Electronic 1008/41 The left needle position. • Loosen the top tension...
Owners Manual - Page 47

... Needles Cotton elastics Accessory Box
MASTERING YOUR BERNINA® 1/10/02
Electronic 1008/47 Simpflex ruler ½" Drafting Tape Marking Pens/Pencils Applique Scissors - MASTERING YOUR
BERNINA®
BERNINA® Electronic 1008
WISH LIST On The Edge
Presser Feet: Edgestitch Foot #10 Embroidery Foot #6 Buttonhole Foot with Slide #3B Button Sew-on Foot #18
Feet-ures Gimp or Pearl Crown...
Owners Manual - Page 51
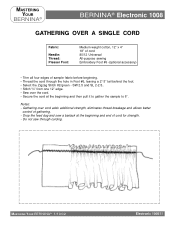
... the cord through cording.
Do not sew through the hole in Foot #6, leaving a 2"-3" tail behind the foot. • Select the Zigzag Stitch #2/green - SW 2.5 and SL 2-2.5.. • Stitch 5/8" from one 12" edge. • Sew over cord adds additional strength, eliminates thread breakage and allows better
control of gathering. -
MASTERING YOUR BERNINA® 1/10/02
Electronic 1008/51
Owners Manual - Page 56
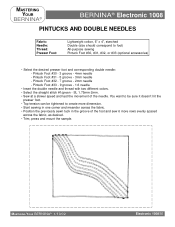
... tension can be tightened to foot) All-purpose sewing Pintuck Foot #30, #31, #32, or #33 (optional accessories)
• Select the desired presser foot and corresponding double needle: - MASTERING YOUR BERNINA® 1/10/02
Electronic 1008/56 Pintuck Foot #30 - 3 groove - 4mm needle - MASTERING YOUR
BERNINA®
BERNINA® Electronic 1008
PINTUCKS AND DOUBLE NEEDLES
Fabric: Needle...
Owners Manual - Page 58
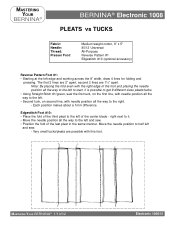
... are possible with needle position all the way to the left and sew. • Position the fold of the center blade - MASTERING YOUR BERNINA® 1/10/02
Electronic 1008/58 MASTERING YOUR
BERNINA®
BERNINA® Electronic 1008
PLEATS vs TUCKS
Fabric: Needle: Thread: Presser Foot:
Medium weight cotton, 8" x 5" 80/12 Universal All-Purpose Reverse Pattern #1 Edgestitch...
Owners Manual - Page 60
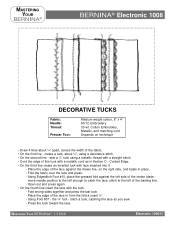
.../12 Embroidery 30 wt. sew a ¼" tuck using a decorative stitch. • On the second line - the ¼" foot - stitch a tuck, catching the lace as in Section C - Corded Edge. • On the third line create an inverted tuck with lace inserted into it.
- Using Foot #37 - MASTERING YOUR BERNINA® 1/10/02
Electronic 1008/60 Place the edge...
Similar Questions

How Do I Set A Pattern And What Must I Do To Start Sewing
I do not know how to set the computer of my Bernette 92c.. I want to write words as well sew pattern...
I do not know how to set the computer of my Bernette 92c.. I want to write words as well sew pattern...
(Posted by magdahiggins 9 years ago)

I Take My Foot Off The Foot And My Bernadette 46 Continues To Sew Won't Ship
(Posted by rr3tersigni 10 years ago)


Does Bernette 56 Have Speed Control Adjustment Other Than The Foot Control?
(Posted by dpregler 11 years ago)