
Amana NTW4600YQ Support Question
Amana NTW4600YQ Support Question
Find answers below for this question about Amana NTW4600YQ.Need a Amana NTW4600YQ manual? We have 4 online manuals for this item!
Question posted by Dirtroadridercs on October 9th, 2015
Lid Lock Light Is Flashing
lid lock light is flashing none stop and won't let us do anything g with it it started after the last load finished
Current Answers
Answer #1: Posted by BusterDoogen on October 9th, 2015 1:58 PM
BusterDoogen

Member since:
October 30th, 2011 Points: 28,565,407

Member since:
October 30th, 2011 Points: 28,565,407
Go here for possible causes & fixes.
I hope this is helpful to you!
Please respond to my effort to provide you with the best possible solution by using the "Acceptable Solution" and/or the "Helpful" buttons when the answer has proven to be helpful. Please feel free to submit further info for your question, if a solution was not provided. I appreciate the opportunity to serve you!
Related Amana NTW4600YQ Manual Pages
Installation Instruction - Page 2
... for installation are in cardboard insert in the top of your washer in a basement, laundry room, closet, or recessed area.
271/2"
27"
(648 ...mm) (686 mm)
42" (1067 mm)
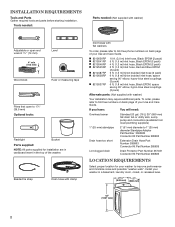
2 INSTALLATION REQUIREMENTS
Tools and Parts Gather required tools and parts before starting installation.
Tools needed:
Parts needed: (Not supplied with washer...
Installation Instruction - Page 3
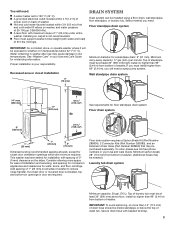
... (Part Number 285863) that may be installed using a floor drain, wall standpipe, floor standpipe, or laundry tub.
Add spacing of 1" (25 mm) on all sides of 315 lbs (143 kgs). n A level floor with water and load) of washer to weather or in .2 (155 cm2)
1" (25 mm)
1" (25 mm)
3" (76 mm)
Dimensions show recommended...
Installation Instruction - Page 4
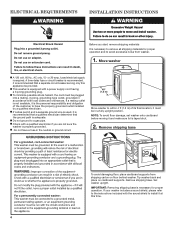
...remove all shipping materials for proper operation. If your washer includes a sound shield, please refer to install it and make sure lid is taped shut.
2.
IMPORTANT: Removing shipping base is...washer is properly grounded. Move washer
n A 120 volt, 60 Hz., AC only, 15- or 20-amp, fused electrical supply is recommended. n This washer is equipped with a qualified electrician if you start...
Installation Instruction - Page 5
... form
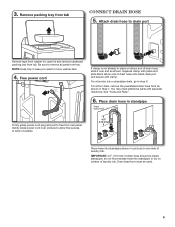
Firmly grasp power cord plug and pull to drain port
Remove tape from washer lid, open lid and remove cardboard packing tray from rear panel. Place drain hose in picture) or over side of laundry tub.
Be sure to back of washer.
4.5" (113 mm)
Place hose into standpipe or lay on elbow end of...
Installation Instruction - Page 6
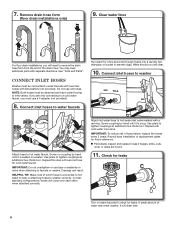
... inlet hoses to water faucets
Run water for a few seconds through hoses into a laundry tub, drainpipe, or bucket to a cold water faucet, you will need additional parts...will drain later.
6 Use pliers to tighten couplings an additional two-thirds turn . You may enter washer.
Use pliers to tighten couplings an additional two-thirds turn . IMPORTANT: Do not overtighten or use...
Installation Instruction - Page 7
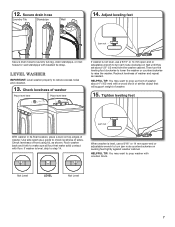
... prop up front of washer about 1/2" (13 mm) from the washer cabinet. Check levelness of sides. Rock washer back and forth to check levelness of front using lid, as shown.
Then turn jam nuts clockwise on leveling feet tightly against washer cabinet.
Not Level
LEVEL
Not Level
7
12. Secure drain hose
Laundry Tub
Standpipe
Wall
14...
Installation Instruction - Page 8

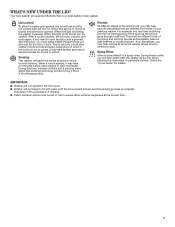
... that all parts are on. q Read "Washer Use" in your tools. Close lid. Select any tape
remaining on some models)....washer is an extra part, go back through steps to complete full cycle.
8
q Check that yellow shipping materials were completely
removed from console and any cycle.
q To test and clean your washer, measure 1/2 of normal
recommended amount of washer. Start washer...
Use and Care - Page 3
Lid Locked
To allow for higher spin speeds, the lid will lock and the Lid Locked light will perform a series of humming and whirring sounds as the washer allows time for the lid to soak. After a cycle is paused. Sensing
This washer will turn on when in fill could take 2-3 minutes.
■■ Fabric Softener option must press START/Pause/Unlock Lid and...
Use and Care - Page 4
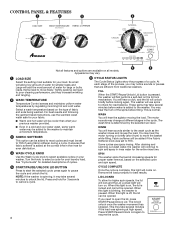
... Lid Locked light will come on .
NOTE: If the washer is spinning, it may take several minutes before filling.
SPIN
The washer spins the load at the correct time in the cycle. When this light will turn on . See "Cycle Guide" for large or bulky loads. You will hear a click, and the lid will unlock once the washer movement has stopped...
Use and Care - Page 5
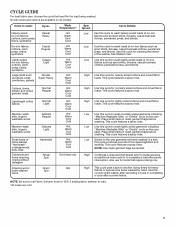
... cleaning the interior of no-iron fabrics such as sport shirts, blouses, casual business clothes, permanent press, and blends. Use this cycle to wash lightly soiled loads of the washer.
High Use this
cycle to the way garments are hand-washed in mesh garment bags before washing. This cycle features a spray rinse. NOTE...
Use and Care - Page 6
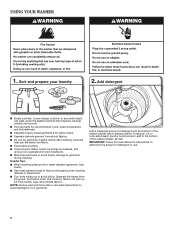
...water-resistant garments, load evenly.
■...to avoid further damage to the bottom of the washer basket before adding clothes. Sort and prepare your .... If using an Oxi or color-safe bleach laundry boost product, add to garments during washing. Loose...and colorfastness.
■■ Separate heavily soiled garments from lightly soiled.
■■ Separate delicate garment from sturdy ...
Use and Care - Page 7
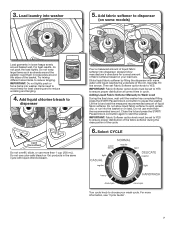
... option knob to choose your load size. Lift the lid and add the measured recommended amount of liquid fabric softener into washer
5. Add fabric softener to ensure proper distribution at correct time in the same cycle with warm water until the washer has completed filling, press the START/Pause/Unlock Lid button to reduce tangling. Try...
Use and Care - Page 8
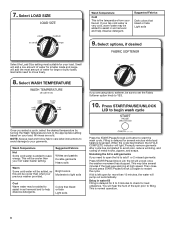
.... Small will add a low amount of water for load unbalance. Press START/PAUSE/UNLOCK
LID to begin wash cycle
Once you select a cycle, select...Light soils
Press the START/Pause/Unlock Lid button to save energy. Garments need to add 1 or 2 missed garments:
Press START/Pause/Unlock Lid;
When the cycle has finished, the CYCLE COMPLETE indicator will unlock once the washer movement has stopped...
Use and Care - Page 9

... for cleaning the inside of the washer. e. Close the washer lid. g. Press the START/Pause/Unlock Lid button to start the cycle. NOTE: Use of detergent to use abrasive products. f. Press the START/Pause/Unlock Lid button to start the cycle.
Use an all-purpose surface cleaner, if needed. IMPORTANT: To avoid damaging the washer's finish, do a better job of controlling...
Use and Care - Page 10
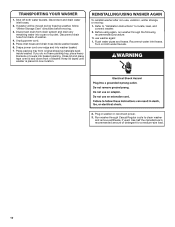
... cord.
5. Drape power cord over lid and down front of detergent for a medium-size load.
10 Place packing tray from original shipping materials back inside washer basket.
6. Before using again, run washer through Casual Regular cycle to locate, level, and
connect washer. 2. TRANSPORTING YOUR WASHER
1. Keep lid taped until washer is placed in washer or reconnect power.
3. Disconnect and...
Use and Care - Page 11
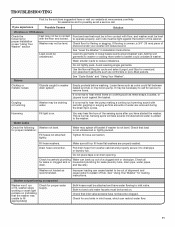
If you have started the washer. Check floor for proper installation:
Fill hoses not attached tightly. See "Level the Washer" in firm contact with periodic gurgling or surging as expected
Washer won't run or fill, washer stops working or wash light remains on .
Load could be draining water. Load dry garments in washer drain system.
You may hear the hum of...
Use and Care - Page 12
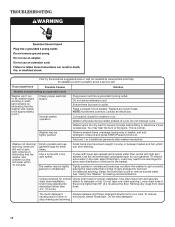
... with lower spin speeds remove less water than 96" (2.4 m) above the floor. See "Using Your Washer" for washer to run or fill, washer stops working or wash light remains on (indicating that the washer was unable to spin correctly, leaving the load wetter than
hose.
4.5" (114 mm). Use drain hose form and securely
drain hose installation. Lower...
Use and Care - Page 13

... with dry items only. Make sure hot and cold inlet hoses are not reversed. Add only 1 or 2 additional garments after washer has started . Select a cycle with a slower wash action and spin speed; Load garments in loose heaps evenly around the basket wall.
Energy saving controlled wash temperatures.
Remove any kinks in loose heaps...
Use and Care - Page 14
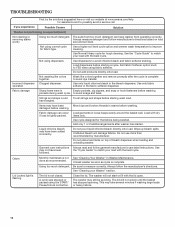
... for tough cleaning.
Garment care instructions may not have tangled.
Using too much detergent can occur if load is not closed. Always follow garment manufacturer's care label instructions.
Lid Locked light is flashing
The lid is tightly packed. The washer will damage fabrics.
Always measure detergent and follow manufacturer's directions based on top of bleach dispenser when...
Use and Care - Page 15
...service or repair of this major appliance other damage to the finish of your major appliance, unless such damage results from defects..., or 800-447-6737 for future reference. WHIRLPOOL CORPORATION LAUNDRY WARRANTY
LIMITED WARRANTY
For one year from the date of ...from state to state or province to repair or replace appliance light bulbs, air filters, or water filters. Replacement parts or...
Similar Questions

Amana Washer Model Number Ntw4600yq Ww
Washer will not fill. I disconnect the lid lock cause it kept flashing
Washer will not fill. I disconnect the lid lock cause it kept flashing
(Posted by Otheahc 8 years ago)


The Fill Water Light Is Blinking And No Water Catching
(Posted by Anonymous-132016 10 years ago)

It Fills When It Goes Into The Wash Cycle The Washer Stops The Light Flashes, It
(Posted by teresapoland9 10 years ago)
When Washer Goes Into Cycle To Fill And Then The Lid Lock Is Suppose To Engage
When you start washer the fill light comes on and then the lid lock is suppose to engage and then fi...
When you start washer the fill light comes on and then the lid lock is suppose to engage and then fi...
(Posted by Cindymbrister 10 years ago)