Acer Aspire 5733Z Support Question
Acer Aspire 5733Z Support Question
Find answers below for this question about Acer Aspire 5733Z.Need a Acer Aspire 5733Z manual? We have 1 online manual for this item!
Question posted by idrabou on March 29th, 2014
How To Restore Acer Aspire S3 With Windows 8
The person who posted this question about this Acer product did not include a detailed explanation. Please use the "Request More Information" button to the right if more details would help you to answer this question.
Current Answers
Answer #1: Posted by waelsaidani1 on March 29th, 2014 11:27 AM
waelsaidani1

Member since:
May 12th, 2013 Points: 19,501,797

Member since:
May 12th, 2013 Points: 19,501,797
If you can still run Windows, follow below instructions to recover/format/reset your Aspire S3:
- Click on Start > All Programs > Acer, then click on Acer Recovery Management. Acer Recovery Management opens.
- Click on the Restore tab, then Restore system to factory default. The Confirm Restoration dialog box opens.
- Click on Yes, then Start. A dialog box displays information about the hard drive that the operating system will be recovered to. Caution: Continuing the process will erase all files on your hard drive.
- Click on OK. The recovery process begins by restarting your computer, then continues by copying files to your hard drive. This process may take a while, but a Acer eRecovery Management screen shows you its progress. When the recovery has finished, a dialog box prompts you to restart your computer.
- Click on OK. Your computer restarts.
- Follow the on-screen prompts for first-time system setup.
This procedures apply if you cannot run Windows and your original hard drive is still working.
- Turn on your computer, then press Alt+F10 during startup. Acer eRecovery Management opens.
- Click on Restore system from factory default. Caution: Continuing the process will erase all files on your hard drive.
- Click on Next. Your hard drive’s original, factory-loaded contents are recovered. This process will take several minutes
C. Format or Reset or Recover from your recovery backup
If you cannot run Windows and your original hard drive has been completely re-formatted or you have installed a replacement hard drive. You can reset/format/recover then reinstall Windows OS and all pre-installed software and drivers by the following instructions:
- Find your recovery backup:
- If you a using optical discs, turn on your computer, insert the first system recovery disc (’Windows Recovery Backup’) into your optical disc drive, then restart your computer.
- If you a using a USB disk, plug in the USB drive and turn on your computer. Caution: Continuing the process will erase all files on your hard drive.
- If it is not already enabled, you must enable the F12 Boot Menu:
- Press F2 when starting your computer.
- Use the left or right arrow keys to select the Main menu.
- Press the down key until F12 Boot Menu is selected, press F5 to change this setting to Enabled.
- Use the left or right arrow keys to select the Exit menu.
- Select Save Changes and Exit and press Enter. Select OK to
confirm. - Your computer will restart.
- During startup, press F12 to open the boot menu. The boot menu
allows you to select which device to start from, such as the hard drive
or an optical disc. - Use your arrow keys to select the line CDROM/DVD or USB HDD, then
press Enter. Windows installs from the recovery backup instead of the
normal startup process. - Follow the on-screen prompts to complete the recovery.
Related Acer Aspire 5733Z Manual Pages
Acer Aspire 5333, 5733, 5733Z Notebook Service Guide - Page 9
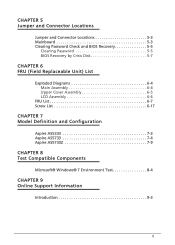
... (Field Replaceable Unit) List
Exploded Diagrams 6-4 Main Assembly 6-4 Upper Cover Assembly 6-5 LCD Assembly 6-6
FRU List 6-7 Screw List 6-17
CHAPTER 7 Model Definition and Configuration
Aspire AS5333 7-3 Aspire AS5733 7-4 Aspire AS5733Z 7-9
CHAPTER 8 Test Compatible Components
Microsoft® Windows® 7 Environment Test 8-4
CHAPTER 9 Online Support Information
Introduction 9-3
5
Acer Aspire 5333, 5733, 5733Z Notebook Service Guide - Page 15
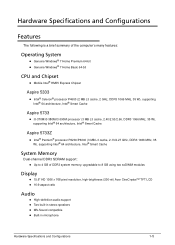
...Windows® 7 Home Premium 64-bit Genuine Windows® 7 Home Basic 64-bit
CPU and Chipset 0 Mobile Intel® HM55 Express Chipset
Aspire... Intel® 64 architecture, Intel® Smart Cache
Aspire 5733Z
0
Intel® Pentium® processor ... 768 pixel resolution, high-brightness (200-nit) Acer CineCrystal™ TFT LCD 16:9...
Acer Aspire 5333, 5733, 5733Z Notebook Service Guide - Page 19
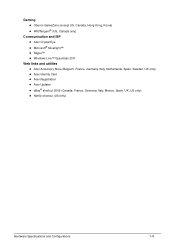
..., Korea) WildTangent® (US, Canada only)
Communication and ISP Acer Crystal Eye Microsoft® Silverlight™ Skype™ Windows Live™ Essentials 2011
Web links and utilities Acer Accessory Store (Belgium, France, Germany, Italy, Netherlands, Spain, Sweden, UK only) ...
Acer Aspire 5333, 5733, 5733Z Notebook Service Guide - Page 37
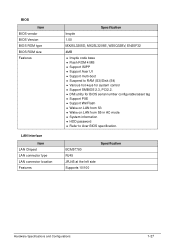
...
Insyde
1.00
MX25L3205D, MX25L3206E, W25Q32BV, EN25F32
4MB
Insyde code base Flash ROM 4 MB Support ISIPP Support Acer UI Support multi-boot Suspend to RAM (S3)/Disk (S4) Various hot-keys for system control Support SMBIOS 2.3, PCI2.2. DMI utility for BIOS serial number configurable...
Acer Aspire 5333, 5733, 5733Z Notebook Service Guide - Page 38
Keyboard
Item Type Total number of keypads Windows logo key Internal & external keyboard work simultaneously Features
Specification New Acer TM7T flat keyboard 105-US/106-UK keys Yes Plug USB keyboard to the USB port directly: Yes
Phantom key auto detect Overlay ...
Acer Aspire 5333, 5733, 5733Z Notebook Service Guide - Page 143
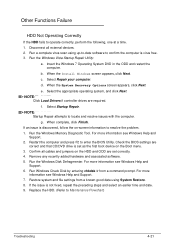
....
1.
If an issue is set correctly. 4. Restart the computer and press F2 to locate and resolve issues with the computer. Restore system and file settings from a command prompt. Insert the Windows 7 Operating System DVD in the ODD and restart the computer. NOTE: NOTE:
Startup Repair attempts to enter the BIOS Utility. Check...
Acer Aspire 5333, 5733, 5733Z Notebook Service Guide - Page 145
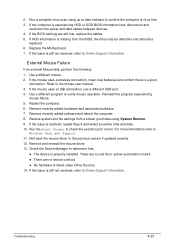
... to the mouse user manual. 3. Remove recently added software and reboot the computer. 8. Restore system and file settings from the BIOS, the drive may be defective and should be
replaced... a different program to determine that:
The device is still not resolved, refer to
Windows Help and Support. 11. Remove and reinstall the mouse driver. 13. Check the Device Manager to...
Acer Aspire 5333, 5733, 5733Z Notebook Service Guide - Page 153
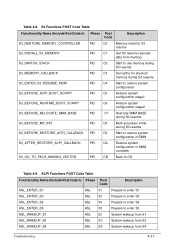
... system
configuration stage2
S3_BEFORE_RELOCATE_SMM_BASE
PEI
C7 Relocate SMM BASE
during S3 resume
S3_BEFORE_MP_INIT
PEI
C8
Multi-processor initial
during S3 resume
S3_BEFORE_RESTORE_ACPI_CALLBACK PEI
C9
Start to restore system
configuration in SMM
S3_AFTER_RESTORE_ACPI_CALLBACK
PEI CA Restore system configuration in SMM complete
S3_GO_TO_FACS_WAKING_VECTOR
PEI
CB
Back to...
Acer Aspire 5333, 5733, 5733Z Notebook Service Guide - Page 159
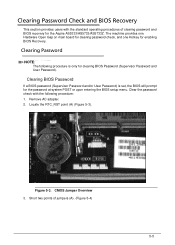
... (A) (Figure 5-3).
Clear the password check with the standard operating procedures of jumpers (A). (Figure 5-4)
5-5 A
A
A
Figure 5-3. Short two points of clearing password and BIOS recovery for the Aspire AS5333/AS5733/AS5733Z. Clearing Password 0
NOTE: NOTE:
The following procedure:
1. Remove AC adapter. 2. The machine provides one Hardware Open Gap on main board for clearing...
Acer Aspire 5333, 5733, 5733Z Notebook Service Guide - Page 161
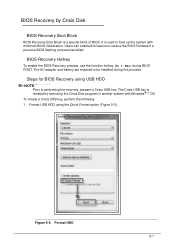
... following:
1.
Format HDD 5-7
Format USB HDD using USB HDD
0
NOTE: NOTE:
Prior to restore the BIOS firmware if a previous BIOS flashing process has failed.
The AC adapter and battery are required to boot up the system with Windows® 7 OS. Steps for BIOS Recovery using the Quick Format option (Figure 5-5). Figure 5-5. The...
Acer Aspire 5333, 5733, 5733Z Notebook Service Guide - Page 165
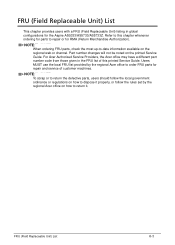
... not be noted on how to order FRU parts for the Aspire AS5333/AS5733/AS5733Z. For Acer Authorized Service Providers, the Acer office may have a different part number code from those given ...for RMA (Return Merchandise Authorization). Users MUST use the local FRU list provided by the regional Acer office on the printed Service Guide.
NOTE: NOTE:
To scrap or to return the defective ...
Acer Aspire 5333, 5733, 5733Z Notebook Service Guide - Page 171

FRU List (Continued)
Category
Description
CASE/COVER/BRACKET ASSEMBLY
UPPER CASE ASSY INCL TP & NAMEPLATE ASPIRE
P/N 60.RJW02.001
LOWER CASE-UMA FOR AS5333,AS5733,AS5733Z 60.RJW02.002
UNILOAD DOOR-UMA HDD CARRIER-UMA
42.R4F02.001 33.R4F02.001
...
Acer Aspire 5333, 5733, 5733Z Notebook Service Guide - Page 175
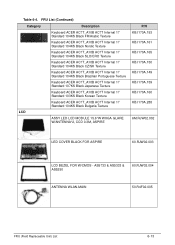
... ACER AC7T_A10B AC7T Internal 17 Standard 103KS Black Korean Texture
Keyboard ACER AC7T_A10B AC7T Internal 17 Standard 104KS Black Bulgaria Texture
LCD
ASSY LED LCD MODULE 15.6''W WXGA GLARE W/ANTENNA*2, CCD 0.3M, ASPIRE
...I170A.149 KB.I170A.159 KB.I170A.160 KB.I170A.288
6M.RJW02.002
LED COVER BLACK FOR ASPIRE
60.RJW02.003
LCD BEZEL FOR W/CMOS - Table 6-4. AS5733 & AS5333 & AS5250
60.RJW02...
Acer Aspire 5333, 5733, 5733Z Notebook Service Guide - Page 182

Aspire AS5333 7-3 Aspire AS5733 7-4 Aspire AS5733Z 7-9
7-2
Acer Aspire 5333, 5733, 5733Z Notebook Service Guide - Page 199
... and verified by the Acer Mobile System Testing Department. Regarding configuration, combination and test procedures, please refer to the following lists for components, adapter cards, and peripherals which have passed these tests. Compatibility Test Report released by Acer's internal testing department. All of its system functions are tested under Windows® 7 environment. Test...
Acer Aspire 5333, 5733, 5733Z Notebook Service Guide - Page 200
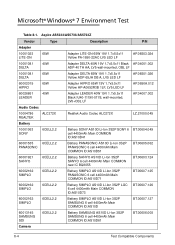
Microsoft® Windows® 7 Environment Test 0
Table 8-1. Aspire AS5333/AS5733/AS5733Z
Vendor
Type
Description
P/N
Adapter
10001023 LITE-ON
65W
Adapter LITE-ON 65W 19V 1.7x5.5x11 Yellow PA-1650-22AC LV5 LED LF
...
Acer Aspire 5333, 5733, 5733Z Notebook Service Guide - Page 201

Aspire AS5333/AS5733/AS5733Z (Continued)
Vendor
Type
Description
P/N
10001023 LITE-ON
0.3M
Liteon 0.3M LT7675AL
AM.21400.078
PLM00012 Suyin
0.3M
Suyin 0.3M SY_7675_AL
AM.21400....
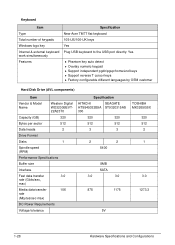
Acer Aspire 5333, 5733, 5733Z Notebook Service Guide - Page 202

Aspire AS5333/AS5733/AS5733Z (Continued)
Vendor
Type
Description
60001994 WD
N640GB5.4KS HDD WD 2.5" 5400rpm 640GB
_4K
WD6400BPVT-22HXZT1, ML375M SATA
8MB LF F/W: 01.01A01
60001994 ...
Acer Aspire 5333, 5733, 5733Z Notebook Service Guide - Page 203

...
KH.75001.011
Keyboard
60004864 DARFON
AC7T_A10B
Keyboard ACER AC7T_A10B AC7T Internal 17 Standard Black NONE Y2010 Acer Texture
KB.I170A.143
LAN
610112
BCM57780
BROADCOM
Broadcom...-DJ-F LF 256*8 46nm
KN.2GB09.010
Test Compatible Components
8-7 Table 8-1. Aspire AS5333/AS5733/AS5733Z (Continued)
Vendor
Type
Description
P/N
60002036 SEAGATE
N750GB5.4KS _4K
HDD SEAGATE 2.5" 5400rpm...
Acer Aspire 5333, 5733, 5733Z Notebook Service Guide - Page 204

Aspire AS5333/AS5733/AS5733Z (Continued)
Vendor
Type
Description
P/N
60004668 ELPIDA
SO4GBIII10
Memory NONE SO-DIMM DDRIII 1066 4GB dummy P/N LF... EAST
NSM8XS
ODD HLDS Super-Multi DRIVE 12.7mm Tray DL 8X GT34N LF W/O bezel SATA Zero Power Supported, PCC LD (HF + Windows 7)
KU.0080D.057
610105 HLDS
NSM8XS
ODD HLDS Super-Multi DRIVE 12.7mm Tray DL 8X GT32N (R5-2) LF W/O bezel SATA with ...
Similar Questions

How To Factory Restore Acer Aspire 5733z Windows 7
(Posted by seglianep 9 years ago)


How To Restore Acer Aspire 5733z Laptop To Factory Default
(Posted by Glencar 10 years ago)

How To Restore Acer Aspire 5733z To Factory Settings Windows 7
(Posted by Phiscam 10 years ago)
