
User Guide
Page 3
... 8 2.4 LED Status Indicator 9 3 Installation...10 3.1 Connecting Your IPC-4605N 10 3.2 Wireless ...11 3.3 Wall and Ceiling Mounting 12 4 Initial Setup ...13 5 Accessing your camera 14 5.1 CloudEnabled™ Viewing 15 5.2 Direct Viewing of your Camera (For Advanced Users 17 6 Configuration ...25 ...Settings 25 6.2 Camera Settings 26 6.3 Audio Settings 28 6.4 User Settings 28 6.5 Network Settings 30 6.6 PTZ Control ...36 6.7 Event Setup...39 6.8 Recording Setup 45 6.9 Recording History 47 6.10 Date ...47 6.11 Multi-Camera 48 7 Event Viewer ...49 8 Maintenance ...50 8.1 Information ...
... 8 2.4 LED Status Indicator 9 3 Installation...10 3.1 Connecting Your IPC-4605N 10 3.2 Wireless ...11 3.3 Wall and Ceiling Mounting 12 4 Initial Setup ...13 5 Accessing your camera 14 5.1 CloudEnabled™ Viewing 15 5.2 Direct Viewing of your Camera (For Advanced Users 17 6 Configuration ...25 ...Settings 25 6.2 Camera Settings 26 6.3 Audio Settings 28 6.4 User Settings 28 6.5 Network Settings 30 6.6 PTZ Control ...36 6.7 Event Setup...39 6.8 Recording Setup 45 6.9 Recording History 47 6.10 Date ...47 6.11 Multi-Camera 48 7 Event Viewer ...49 8 Maintenance ...50 8.1 Information ...

User Guide
Page 6
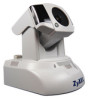
2 Getting to know your IPC-4605N 2.1 Package Contents Before setup, ensure your distributor. Number Contents IPC-4605N Network Camera Ethernet Cable Power Adapter Quick Installation Guide Install Disk Wall/Ceiling Mount Plate Camera Pad x4, Screw Mount x3, Screw x3 USB wireless adapter If anything is missing, contact your package contains all contents.
2 Getting to know your IPC-4605N 2.1 Package Contents Before setup, ensure your distributor. Number Contents IPC-4605N Network Camera Ethernet Cable Power Adapter Quick Installation Guide Install Disk Wall/Ceiling Mount Plate Camera Pad x4, Screw Mount x3, Screw x3 USB wireless adapter If anything is missing, contact your package contains all contents.
User Guide
Page 13
4 Initial Setup Before running the setup utility, make sure you during the installation process of the viewing PC, and the eaZy Wizard utility will start and guide you have the IP Camera properly connected. To begin setup, insert the installation CD supplied with the camera into the CD-ROM drive of the hardware and software for your IP camera.
4 Initial Setup Before running the setup utility, make sure you during the installation process of the viewing PC, and the eaZy Wizard utility will start and guide you have the IP Camera properly connected. To begin setup, insert the installation CD supplied with the camera into the CD-ROM drive of the hardware and software for your IP camera.
User Guide
Page 14
... on the go. Motion-JPEG mode only offers live viewing function.) 4) View the live Motion-JPEG video streaming, you created during setup. When you first setup your camera using the included CD, it will register your camera with the username and password you can also download the iSecurity+ app... from a smartphone or tablet. Through live video stream on the web browser of any other mobile phones with a built-in order to http://zyxel....
... on the go. Motion-JPEG mode only offers live viewing function.) 4) View the live Motion-JPEG video streaming, you created during setup. When you first setup your camera using the included CD, it will register your camera with the username and password you can also download the iSecurity+ app... from a smartphone or tablet. Through live video stream on the web browser of any other mobile phones with a built-in order to http://zyxel....

User Guide
Page 15
From the login screen, simply enter the username and password you can be located on your ZyXEL camera, you configured during the camera's initial setup (For more information, see the eaZy Setup Wizard). The following screen will appear: To configure your camera's settings, click the Configure button beneath the video display. The iSecurity+ can...
From the login screen, simply enter the username and password you can be located on your ZyXEL camera, you configured during the camera's initial setup (For more information, see the eaZy Setup Wizard). The following screen will appear: To configure your camera's settings, click the Configure button beneath the video display. The iSecurity+ can...

User Guide
Page 19
.... Changing the preset point allows you to bring up digital zoom control. Allows you to full-screen mode by right- You can be configured in [setup] > [PTZ control]) Click on the magnifier icon to change between single, multi, and auto scan.
.... Changing the preset point allows you to bring up digital zoom control. Allows you to full-screen mode by right- You can be configured in [setup] > [PTZ control]) Click on the magnifier icon to change between single, multi, and auto scan.

User Guide
Page 20
...camera's brightness. Right-click and choose 'Save Image As...' Triggers the alarm and siren connected to the preset position. Microphone Volume Setup Speaker Volume Control Patrol Mode Locate Snapshot Communicate Digital Out Record Adjust microphone volume. Click this screen. Predefined positions can be defined...Adjust the camera's position on the Y-Axis 5.2.1.2 Icons The following table describes the icons found on this icon to mute the built-in [Setup] > [PTZ control] > [Patrol mode] Shows your PC. See the Voice Communication section for returning to the Digital Out port of...
...camera's brightness. Right-click and choose 'Save Image As...' Triggers the alarm and siren connected to the preset position. Microphone Volume Setup Speaker Volume Control Patrol Mode Locate Snapshot Communicate Digital Out Record Adjust microphone volume. Click this screen. Predefined positions can be defined...Adjust the camera's position on the Y-Axis 5.2.1.2 Icons The following table describes the icons found on this icon to mute the built-in [Setup] > [PTZ control] > [Patrol mode] Shows your PC. See the Voice Communication section for returning to the Digital Out port of...

User Guide
Page 22
...). Supported Platforms: Windows - Firefox Mobile Devices - Note: When using a mobile web browser: 1) Use a PC to log on to the camera, then go to [Setup] > [Video Settings], then check the [Enable 2nd Stream (include 3GPP)] box to view the live video feed in web browser can be used to enable...
...). Supported Platforms: Windows - Firefox Mobile Devices - Note: When using a mobile web browser: 1) Use a PC to log on to the camera, then go to [Setup] > [Video Settings], then check the [Enable 2nd Stream (include 3GPP)] box to view the live video feed in web browser can be used to enable...

User Guide
Page 24
... connection, and your mobile web browser. There are also several steps which must be taken to ensure 3GPP functionality. 1) The second video stream (located at [Setup] > [Video Settings]) must be enabled, with a valid DDNS address. 3) An active internet connection must be available for both the IP camera and the mobile device...
... connection, and your mobile web browser. There are also several steps which must be taken to ensure 3GPP functionality. 1) The second video stream (located at [Setup] > [Video Settings]) must be enabled, with a valid DDNS address. 3) An active internet connection must be available for both the IP camera and the mobile device...

User Guide
Page 25
...) The codec used to 15. MPEG-4 can configure detailed settings of all the basic settings options. The following table describes the labels found on the setup button at a lower resolution This enables the second stream for viewing from external devices, while H.264 uses less bandwidth. This mode provides 30FPS at the... screen. You can be viewed from mobile devices. 6 Configuration 6.1 Video Settings The Video Settings screen consists of your IP camera here. To access the main setup page, click on this screen. Resolution settings.
...) The codec used to 15. MPEG-4 can configure detailed settings of all the basic settings options. The following table describes the labels found on the setup button at a lower resolution This enables the second stream for viewing from external devices, while H.264 uses less bandwidth. This mode provides 30FPS at the... screen. You can be viewed from mobile devices. 6 Configuration 6.1 Video Settings The Video Settings screen consists of your IP camera here. To access the main setup page, click on this screen. Resolution settings.

User Guide
Page 32
... the diagnostic tool for your browser to prompt the installation of a java plug-in. For further information on the left menu to start. 2. Go to [Setup] > [Network], and click on [Network Bandwidth] located on error messages, please refer to the troubleshooting section. 6.5.4 Network Bandwidth This automatic network connection test helps users...
... the diagnostic tool for your browser to prompt the installation of a java plug-in. For further information on the left menu to start. 2. Go to [Setup] > [Network], and click on [Network Bandwidth] located on error messages, please refer to the troubleshooting section. 6.5.4 Network Bandwidth This automatic network connection test helps users...

User Guide
Page 33
This message indicates that the currently connected network has the capacity to support up to adjust advanced network settings. If the message shows a less favorable result, go to [Setup] > [Video] to select a lower bitrate. 6.5.5 Advanced This page allows you to 10 network cameras of identical bit rate settings (either on Stream 1 or Stream 2). To access this pane, navigate to [Setup] > [Network] > [Advanced]. The following screen will appear.
This message indicates that the currently connected network has the capacity to support up to adjust advanced network settings. If the message shows a less favorable result, go to [Setup] > [Video] to select a lower bitrate. 6.5.5 Advanced This page allows you to 10 network cameras of identical bit rate settings (either on Stream 1 or Stream 2). To access this pane, navigate to [Setup] > [Network] > [Advanced]. The following screen will appear.
User Guide
Page 34
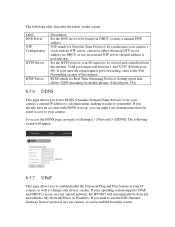
... your camera, it easier to be viewed and controlled from this screen. Setting a port here allows 3GPP streaming for Network Time Protocol. If your network setup requires port forwarding, refer to [Settings] > [Network] > [DDNS]. If your operating system supports UPnP, and DHCP is pool.ntp.org) Set the HTTP port for...
... your camera, it easier to be viewed and controlled from this screen. Setting a port here allows 3GPP streaming for Network Time Protocol. If your network setup requires port forwarding, refer to [Settings] > [Network] > [DDNS]. If your operating system supports UPnP, and DHCP is pool.ntp.org) Set the HTTP port for...

User Guide
Page 39
...information in this function, navigate to your full e-mail address (ie. and send a snapshot directly to [Setup] > [Event Setup] > [Event Server Setup] > [Email Event Server Setup]. smtp.gmail.com) Enter your SMTP server's port information Enter your e-mail account, ftp server, image server..., notification server, HTTP server, or SMS server in this page, your camera can be programmed to respond to [Setup] > [Event Setup] > [Event Server Setup]. The following screen will appear. 6.7.1.1 E-Mail Server Your camera supports standard SMTP on SSL-protected webmail platforms such ...
...information in this function, navigate to your full e-mail address (ie. and send a snapshot directly to [Setup] > [Event Setup] > [Event Server Setup] > [Email Event Server Setup]. smtp.gmail.com) Enter your SMTP server's port information Enter your e-mail account, ftp server, image server..., notification server, HTTP server, or SMS server in this page, your camera can be programmed to respond to [Setup] > [Event Setup] > [Event Server Setup]. The following screen will appear. 6.7.1.1 E-Mail Server Your camera supports standard SMTP on SSL-protected webmail platforms such ...

User Guide
Page 40
... Server This page allows you to set up your Password here Enter the file path of the folder where you want alert emails to [Setup] > [Event Server Setup] > [FTP Server]. The following table describes the labels found within this page, navigate to have. [email protected]) Enter your full username (ie. To...
... Server This page allows you to set up your Password here Enter the file path of the folder where you want alert emails to [Setup] > [Event Server Setup] > [FTP Server]. The following table describes the labels found within this page, navigate to have. [email protected]) Enter your full username (ie. To...

User Guide
Page 41
To access this page, navigate to [Setup] > [Event Setup] > [Event Server Setup] > [SMS Server]. The following screen will be integrated with a third-party web-based SMS gateway service provider. This feature requires no additional hardware - This ... was triggered. 6.7.1.3 Image Server This page allows you to set your NVR that there's an event being triggered. To access this page, navigate to [Setup] > [Event Setup] > [Event Server Setup] > [Image]. users need only to have an account with video management software. 6.7.1.5 HTTP Server The HTTP Server page allows you to...
To access this page, navigate to [Setup] > [Event Setup] > [Event Server Setup] > [SMS Server]. The following screen will be integrated with a third-party web-based SMS gateway service provider. This feature requires no additional hardware - This ... was triggered. 6.7.1.3 Image Server This page allows you to set your NVR that there's an event being triggered. To access this page, navigate to [Setup] > [Event Setup] > [Event Server Setup] > [Image]. users need only to have an account with video management software. 6.7.1.5 HTTP Server The HTTP Server page allows you to...

User Guide
Page 43
The following screen will appear. This page will allow you to input the message that will appear. To access the Trigger Setup page, navigate to create, modify, or delete event triggers. This page allows you to test your message, then click [Next]. Click [Finish] to complete setup. 6.7.2 Trigger Setup This page allows you to [Setup] > [Event Setup] > [Trigger Setup]. The following screen will be sent when an event is triggered. Enter your camera's SMS functionality. To send yourself a test SMS, click the [Send me a SMS message via the SMS Gateway] button.
The following screen will appear. This page will allow you to input the message that will appear. To access the Trigger Setup page, navigate to create, modify, or delete event triggers. This page allows you to test your message, then click [Next]. Click [Finish] to complete setup. 6.7.2 Trigger Setup This page allows you to [Setup] > [Event Setup] > [Trigger Setup]. The following screen will be sent when an event is triggered. Enter your camera's SMS functionality. To send yourself a test SMS, click the [Send me a SMS message via the SMS Gateway] button.

User Guide
Page 44
..., I /O port you wish to the next page Cancel Upon clicking [Next], users will appear. Check the [Enable] box if you want events to complete trigger setup. The following screen will be triggered. Select the actions to be taken, then click [Finish] to be able to define actions to trigger an event...
..., I /O port you wish to the next page Cancel Upon clicking [Next], users will appear. Check the [Enable] box if you want events to complete trigger setup. The following screen will be triggered. Select the actions to be taken, then click [Finish] to be able to define actions to trigger an event...
User Guide
Page 45
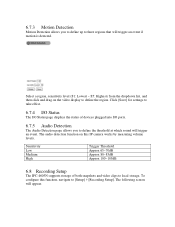
... configure this IP camera works by measuring volume levels. Sensitivity Low Medium High Trigger Threshold Approx 65~70dB Approx 80~85dB Approx 100~105dB 6.8 Recording Setup The IPC-4605N supports storage of devices plugged into I /O Status page displays the status of both snapshots and video clips to define the region. The...
... configure this IP camera works by measuring volume levels. Sensitivity Low Medium High Trigger Threshold Approx 65~70dB Approx 80~85dB Approx 100~105dB 6.8 Recording Setup The IPC-4605N supports storage of devices plugged into I /O Status page displays the status of both snapshots and video clips to define the region. The...

User Guide
Page 46
... recording to the SD card will appear. Users may also schedule recording, or disable recording entirely. Click [Save] to continue. Click [Next] to complete recording setup. When the SD card is detected, when digital input(s) are detected, and the duration of the recording in the event of detected motion to the...
... recording to the SD card will appear. Users may also schedule recording, or disable recording entirely. Click [Save] to continue. Click [Next] to complete recording setup. When the SD card is detected, when digital input(s) are detected, and the duration of the recording in the event of detected motion to the...