
User Guide
Page 4
... device must accept any changes or modifications not expressly approved by the party responsible for a Class B digital device, pursuant to protect your IP camera by hand. If this equipment. Important Notices Regulatory Notice This device complies with Part 15 of the FCC Rules. To assure continued compliance,... turning the equipment off if it out of the following two conditions: (1) This device may cause damage to the camera. Do not drop the IP camera, this camera, please read and follow the steps below to Part 15 of the FCC Rules. However, there is encouraged to...
... device must accept any changes or modifications not expressly approved by the party responsible for a Class B digital device, pursuant to protect your IP camera by hand. If this equipment. Important Notices Regulatory Notice This device complies with Part 15 of the FCC Rules. To assure continued compliance,... turning the equipment off if it out of the following two conditions: (1) This device may cause damage to the camera. Do not drop the IP camera, this camera, please read and follow the steps below to Part 15 of the FCC Rules. However, there is encouraged to...

User Guide
Page 9
... indicator consists of a blue status indicator and red IR LEDs. The LEDs appear as follows: Red IR LEDs (Left), Blue Status LED (Right) When the IP camera is turned on, the LEDs will light in the following patterns: Red LEDs On Off On Off Blinking (Every 0.5 seconds) Off Off Blinking Blue LED...
... indicator consists of a blue status indicator and red IR LEDs. The LEDs appear as follows: Red IR LEDs (Left), Blue Status LED (Right) When the IP camera is turned on, the LEDs will light in the following patterns: Red LEDs On Off On Off Blinking (Every 0.5 seconds) Off Off Blinking Blue LED...

User Guide
Page 10
... into the USB port on your camera by hand. Important! The Camera's USB port only supports the bundled ZyXEL Wireless adapter. Do not rotate your camera for wireless reception. Use the bundled Ethernet cable to connect the LAN port of the IP camera to the LAN port of your ...IPC-4605N camera: The following table describes the ...
... into the USB port on your camera by hand. Important! The Camera's USB port only supports the bundled ZyXEL Wireless adapter. Do not rotate your camera for wireless reception. Use the bundled Ethernet cable to connect the LAN port of the IP camera to the LAN port of your ...IPC-4605N camera: The following table describes the ...

User Guide
Page 11
... While using the ZyXEL Wireless adapter, you can only have one active connection at any given time - Attempt to your camera away from such devices. Important! Obstacles between your camera and wireless access point, particularly if made of materials like wood, cement, or metal, will weaken the strength of your IP camera closer to...
... While using the ZyXEL Wireless adapter, you can only have one active connection at any given time - Attempt to your camera away from such devices. Important! Obstacles between your camera and wireless access point, particularly if made of materials like wood, cement, or metal, will weaken the strength of your IP camera closer to...

User Guide
Page 12
Use a screwdriver to its original position. Return fastening bracket to tighten the fastening bracket firmly back in place. Insert the tips of the fastening bracket into the mounting surface Secure the IP camera to the mounting plate Loosen the top screw on the trapezoid-shaped fastening bracket. 3.3 Wall and Ceiling Mounting Screw the mounting plate into the IP camera as shown.
Use a screwdriver to its original position. Return fastening bracket to tighten the fastening bracket firmly back in place. Insert the tips of the fastening bracket into the mounting surface Secure the IP camera to the mounting plate Loosen the top screw on the trapezoid-shaped fastening bracket. 3.3 Wall and Ceiling Mounting Screw the mounting plate into the IP camera as shown.
User Guide
Page 13
To begin setup, insert the installation CD supplied with the camera into the CD-ROM drive of the hardware and software for your IP camera. 4 Initial Setup Before running the setup utility, make sure you during the installation process of the viewing PC, and the eaZy Wizard utility will start and guide you have the IP Camera properly connected.
To begin setup, insert the installation CD supplied with the camera into the CD-ROM drive of the hardware and software for your IP camera. 4 Initial Setup Before running the setup utility, make sure you during the installation process of the viewing PC, and the eaZy Wizard utility will start and guide you have the IP Camera properly connected.
User Guide
Page 14
... feeds can be accessed in a number of the IP camera and requires little learning time. You can also download the iSecurity+ app from iTunes or the Android Market to view the camera remotely. (Note: This functionality requires that a secondary video stream be enabled. Motion-JPEG mode only offers live ... browser of your iPhone/iPod, Android phone, BlackBerry, PDA, or any other mobile phones with a built-in order to view your ZyXEL IP camera while on the mobile web browser of any computer. This may require advanced configuration of your home router in order to view the video...
... feeds can be accessed in a number of the IP camera and requires little learning time. You can also download the iSecurity+ app from iTunes or the Android Market to view the camera remotely. (Note: This functionality requires that a secondary video stream be enabled. Motion-JPEG mode only offers live ... browser of your iPhone/iPod, Android phone, BlackBerry, PDA, or any other mobile phones with a built-in order to view your ZyXEL IP camera while on the mobile web browser of any computer. This may require advanced configuration of your home router in order to view the video...

User Guide
Page 18
Click the icon to enable ports 80 and 554 in your web browser. 7) You're now ready to view and manage your camera from your firewall and link them to the internal IP address of the camera. Should you have more than one, increase the values above by 1 (For example, the second camera would have ports 81 and 555.) 5.2.1.1 Page Layout On the first page, you will need to collapse control panels. Note: If your IP camera falls behind a firewall, you can see the basic control panel on the top and left, and live video on the right hand side.
Click the icon to enable ports 80 and 554 in your web browser. 7) You're now ready to view and manage your camera from your firewall and link them to the internal IP address of the camera. Should you have more than one, increase the values above by 1 (For example, the second camera would have ports 81 and 555.) 5.2.1.1 Page Layout On the first page, you will need to collapse control panels. Note: If your IP camera falls behind a firewall, you can see the basic control panel on the top and left, and live video on the right hand side.

User Guide
Page 21
... zoom button. Then set the desired zoom by dragging the black square shown above. To talk through the external speaker connected to the IP camera, place your cursor on the [X] button or press the [Esc] key to save the changes and/or close the previous window. 5.2.1.4 Voice... Communication Pressing the button allows you to move your PC microphone and broadcast through the camera's speaker or audio line out. The arrow moves the camera in the direction of the mouse click. 5.2.1.3 Enable Digital Zoom To enable the digital zoom feature: 1) Click on...
... zoom button. Then set the desired zoom by dragging the black square shown above. To talk through the external speaker connected to the IP camera, place your cursor on the [X] button or press the [Esc] key to save the changes and/or close the previous window. 5.2.1.4 Voice... Communication Pressing the button allows you to move your PC microphone and broadcast through the camera's speaker or audio line out. The arrow moves the camera in the direction of the mouse click. 5.2.1.3 Enable Digital Zoom To enable the digital zoom feature: 1) Click on...

User Guide
Page 22
... the router to which the IP camera is supported by Android and iPhone devices, as well as a variety of your network environment. 5.2.2 Accessing via iPhone/Smartphone Web Browser Any smartphone with a built-in web browser can be heard from the camera for 90 seconds. Viewing of...M-JPEG format (video only). Firefox Mobile Devices - Supported Platforms: Windows - Then follow these steps to view your camera using the voice communication feature, you to enable a secondary video stream. With the device configured, clicking the will allow you may experience various...
... the router to which the IP camera is supported by Android and iPhone devices, as well as a variety of your network environment. 5.2.2 Accessing via iPhone/Smartphone Web Browser Any smartphone with a built-in web browser can be heard from the camera for 90 seconds. Viewing of...M-JPEG format (video only). Firefox Mobile Devices - Supported Platforms: Windows - Then follow these steps to view your camera using the voice communication feature, you to enable a secondary video stream. With the device configured, clicking the will allow you may experience various...

User Guide
Page 24
.... 2) DDNS functionality must be enabled, with a valid DDNS address. 3) An active internet connection must be available for both the IP camera and the mobile device. 4) Port forwarding must be properly configured (as detailed in section 4.2) Having taken the above steps, enter the... camera's RTSP streaming address into the address field of "rtsp://ipcamera-ip/medias2", wherein "ipcamera-ip" is the IP address located above the [save] and [reset] buttons in [Setup] > [Video Settings]. There ...
.... 2) DDNS functionality must be enabled, with a valid DDNS address. 3) An active internet connection must be available for both the IP camera and the mobile device. 4) Port forwarding must be properly configured (as detailed in section 4.2) Having taken the above steps, enter the... camera's RTSP streaming address into the address field of "rtsp://ipcamera-ip/medias2", wherein "ipcamera-ip" is the IP address located above the [save] and [reset] buttons in [Setup] > [Video Settings]. There ...

User Guide
Page 25
... view screen. Options are QQVGA, QVGA, VGA, and 1080x720 (720p) The codec used to 15. 6 Configuration 6.1 Video Settings The Video Settings screen consists of your IP camera here. You can be viewed from mobile devices.
... view screen. Options are QQVGA, QVGA, VGA, and 1080x720 (720p) The codec used to 15. 6 Configuration 6.1 Video Settings The Video Settings screen consists of your IP camera here. You can be viewed from mobile devices.
User Guide
Page 34
...refer to the Port Forwarding section of your IP camera, as well as change your camera's clock with DDNS or no-ip, you to use on your camera's current IP address to a domain name, making it can input your domain name here for easier access to your IP camera to use an external NTP server (default ...address is pool.ntp.org) Set the HTTP port for your camera. Valid port ranges fall between 1 and 32767 (Default port: 80). Setting a port here ...
...refer to the Port Forwarding section of your IP camera, as well as change your camera's clock with DDNS or no-ip, you to use on your camera's current IP address to a domain name, making it can input your domain name here for easier access to your IP camera to use an external NTP server (default ...address is pool.ntp.org) Set the HTTP port for your camera. Valid port ranges fall between 1 and 32767 (Default port: 80). Setting a port here ...

User Guide
Page 37
.... 6.6.1.2 Delete Preset Points To delete a preset point, select a preset point from the "Available Preset Points" list, click [Go To] to be sure this as your IP camera to the desired position 2) Enter a position name into the "Position Name" field. 3) Press the "Add" button. a. b. If you would like the... camera to always return to this position after moving, check the "Auto return to "Home" position" box, then enter a period of time you would like to ...
.... 6.6.1.2 Delete Preset Points To delete a preset point, select a preset point from the "Available Preset Points" list, click [Go To] to be sure this as your IP camera to the desired position 2) Enter a position name into the "Position Name" field. 3) Press the "Add" button. a. b. If you would like the... camera to always return to this position after moving, check the "Auto return to "Home" position" box, then enter a period of time you would like to ...

User Guide
Page 41
...> [Event Setup] > [Event Server Setup] > [Image]. This feature requires no additional hardware - The following screen will appear. 6.7.1.6 SMS Server Your IP camera is triggered. The following screen will appear. 6.7.1.4 Notify Server This page allows you to set the file name that will be integrated with a third-party...HTTP server used when snapshots are taken. The following screen will appear. 6.7.1.3 Image Server This page allows you to set your camera to input the URL of sending SMS notifications to one or more pre-defined recipients in order to signal your NVR that there...
...> [Event Setup] > [Event Server Setup] > [Image]. This feature requires no additional hardware - The following screen will appear. 6.7.1.6 SMS Server Your IP camera is triggered. The following screen will appear. 6.7.1.4 Notify Server This page allows you to set the file name that will be integrated with a third-party...HTTP server used when snapshots are taken. The following screen will appear. 6.7.1.3 Image Server This page allows you to set your camera to input the URL of sending SMS notifications to one or more pre-defined recipients in order to signal your NVR that there...
User Guide
Page 45
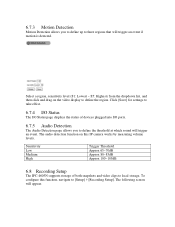
To configure this IP camera works by measuring volume levels. 6.7.3 Motion Detection Motion Detection allows you to define the threshold at which sound will trigger an event. Select a region, sensitivity ...
To configure this IP camera works by measuring volume levels. 6.7.3 Motion Detection Motion Detection allows you to define the threshold at which sound will trigger an event. Select a region, sensitivity ...

User Guide
Page 48
... screen will be identified Enter the camera's IP address here Enter the username used to access the new camera in this field Enter the password used to add, modify, or delete additional IP cameras on your camera list. 6.11 Multi-Camera This page allows you to access the new camera in this camera will appear. To access this screen...
... screen will be identified Enter the camera's IP address here Enter the username used to access the new camera in this field Enter the password used to add, modify, or delete additional IP cameras on your camera list. 6.11 Multi-Camera This page allows you to access the new camera in this camera will appear. To access this screen...
User Guide
Page 50
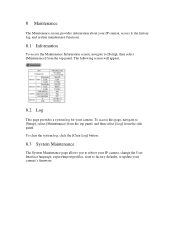
... clear the system log, click the [Clear Log] button. 8.3 System Maintenance The System Maintenance page allows you to reboot your IP camera, change the User Interface language, export/import profiles, reset to [Setup], select [Maintenance] from the top panel, and then ...] from the top panel. The following screen will appear. 8.2 Log This page provides a system log for your camera. 8 Maintenance The Maintenance screen provides information about your IP camera, access to the history log, and system maintenance functions. 8.1 Information To access the Maintenance Information screen, navigate to...
... clear the system log, click the [Clear Log] button. 8.3 System Maintenance The System Maintenance page allows you to reboot your IP camera, change the User Interface language, export/import profiles, reset to [Setup], select [Maintenance] from the top panel, and then ...] from the top panel. The following screen will appear. 8.2 Log This page provides a system log for your camera. 8 Maintenance The Maintenance screen provides information about your IP camera, access to the history log, and system maintenance functions. 8.1 Information To access the Maintenance Information screen, navigate to...

User Guide
Page 53
...procedures to help you need to launch the eaZy Wizard configuration tool. During the configuration, the eaZy Wizard will see if your IP camera, you might encounter various issues. Scanning generally takes around 1 minute to complete, and once it completes, you will automatically scan...your cables: 1) Check that your IP camera has been connected to the LAN network and powered on for all available IP cameras populate the list. 9.2 Cabling Check If your router's settings. 9 Troubleshooting During the course of the available ZyXEL IP surveillance products installed on your LAN ...
...procedures to help you need to launch the eaZy Wizard configuration tool. During the configuration, the eaZy Wizard will see if your IP camera, you might encounter various issues. Scanning generally takes around 1 minute to complete, and once it completes, you will automatically scan...your cables: 1) Check that your IP camera has been connected to the LAN network and powered on for all available IP cameras populate the list. 9.2 Cabling Check If your router's settings. 9 Troubleshooting During the course of the available ZyXEL IP surveillance products installed on your LAN ...

User Guide
Page 56
If your browser is returning a "213 file not found in C:\Program Files. (If using 64-bit windows, look in C:\Program Files (x86)), then open your browser, log into your computer. If you've gone through all above steps but still can't obtain video/audio on your browser, close all browser windows and delete the 'IPSurveillance Embedded" folder found " error, try rebooting your IP camera, and reinstall the ActiveX client.
If your browser is returning a "213 file not found in C:\Program Files. (If using 64-bit windows, look in C:\Program Files (x86)), then open your browser, log into your computer. If you've gone through all above steps but still can't obtain video/audio on your browser, close all browser windows and delete the 'IPSurveillance Embedded" folder found " error, try rebooting your IP camera, and reinstall the ActiveX client.