
User Guide
Page 1
IPC-4605N The First Consumer-Friendly Network Camera Edition 1.1, 2/2012 www.zyxel.com Copyright © 2011 ZyXEL Communications Corporation
IPC-4605N The First Consumer-Friendly Network Camera Edition 1.1, 2/2012 www.zyxel.com Copyright © 2011 ZyXEL Communications Corporation

User Guide
Page 3
...Wall and Ceiling Mounting 12 4 Initial Setup ...13 5 Accessing your camera 14 5.1 CloudEnabled™ Viewing 15 5.2 Direct Viewing of your Camera (For Advanced Users 17 6 Configuration ...25 6.1 Video Settings 25 6.2 Camera Settings 26 6.3 Audio Settings 28 6.4 User Settings 28 6.5 Network ...Settings 30 6.6 PTZ Control ...36 6.7 Event Setup...39 6.8 Recording Setup 45 6.9 Recording History 47 6.10 Date ...47 6.11 Multi-Camera 48 7 Event Viewer ...49 8 Maintenance ...50 8.1 Information ...50 8.2 Log...50 8.3 System Maintenance 50 9 Troubleshooting ...53 9.1 Reconfiguring ...
...Wall and Ceiling Mounting 12 4 Initial Setup ...13 5 Accessing your camera 14 5.1 CloudEnabled™ Viewing 15 5.2 Direct Viewing of your Camera (For Advanced Users 17 6 Configuration ...25 6.1 Video Settings 25 6.2 Camera Settings 26 6.3 Audio Settings 28 6.4 User Settings 28 6.5 Network ...Settings 30 6.6 PTZ Control ...36 6.7 Event Setup...39 6.8 Recording Setup 45 6.9 Recording History 47 6.10 Date ...47 6.11 Multi-Camera 48 7 Event Viewer ...49 8 Maintenance ...50 8.1 Information ...50 8.2 Log...50 8.3 System Maintenance 50 9 Troubleshooting ...53 9.1 Reconfiguring ...

User Guide
Page 4
...energy and, if not installed and used in accordance with the instructions, may result in a residential installation. Operation Safety Before using this camera, please read and follow the steps below to provide reasonable protection against harmful interference in the malfunction of direct sunlight Keep the ...that may not cause harmful interference, and (2) This device must accept any changes or modifications not expressly approved by one of the camera. Do not disassemble or remodel the product, it can cause damage or fire. Do not shake, move, or disturb ...
...energy and, if not installed and used in accordance with the instructions, may result in a residential installation. Operation Safety Before using this camera, please read and follow the steps below to provide reasonable protection against harmful interference in the malfunction of direct sunlight Keep the ...that may not cause harmful interference, and (2) This device must accept any changes or modifications not expressly approved by one of the camera. Do not disassemble or remodel the product, it can cause damage or fire. Do not shake, move, or disturb ...

User Guide
Page 5
Important! Conventions in order to help the user operate the product. Note: This symbol indicates additional information or tips to complete a task. Information provided with this manual, pay attention to symbols and notations used to draw attention to special situations, such as: Caution! This symbol indicates instructions that a user must follow in this Manual While using this symbol is indented only for users of the ZyXEL IPC-4605N network camera. About This Manual This manual is critical to prevent damage to the product or injury to the user.
Important! Conventions in order to help the user operate the product. Note: This symbol indicates additional information or tips to complete a task. Information provided with this manual, pay attention to symbols and notations used to draw attention to special situations, such as: Caution! This symbol indicates instructions that a user must follow in this Manual While using this symbol is indented only for users of the ZyXEL IPC-4605N network camera. About This Manual This manual is critical to prevent damage to the product or injury to the user.

User Guide
Page 6
If anything is missing, contact your package contains all contents. Number Contents IPC-4605N Network Camera Ethernet Cable Power Adapter Quick Installation Guide Install Disk Wall/Ceiling Mount Plate Camera Pad x4, Screw Mount x3, Screw x3 USB wireless adapter 2 Getting to know your IPC-4605N 2.1 Package Contents Before setup, ensure your distributor.
If anything is missing, contact your package contains all contents. Number Contents IPC-4605N Network Camera Ethernet Cable Power Adapter Quick Installation Guide Install Disk Wall/Ceiling Mount Plate Camera Pad x4, Screw Mount x3, Screw x3 USB wireless adapter 2 Getting to know your IPC-4605N 2.1 Package Contents Before setup, ensure your distributor.

User Guide
Page 7
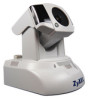
2.2 Features ZyXEL's IPC-4605N sports an advanced 340-degree pan and 100-degree tilt mechanical design, ideal for deployment in warehouses, offices, restaurant, lobby area, or anywhere ... microphone Two-way audio communication Video recording to local microSD/SDHC or remote NAS Upgradable I/O module Mobile connectivity Import & Export camera profiles
2.2 Features ZyXEL's IPC-4605N sports an advanced 340-degree pan and 100-degree tilt mechanical design, ideal for deployment in warehouses, offices, restaurant, lobby area, or anywhere ... microphone Two-way audio communication Video recording to local microSD/SDHC or remote NAS Upgradable I/O module Mobile connectivity Import & Export camera profiles

User Guide
Page 8
2.3 Camera Layout Number Contents IR LEDs x6 (12 in total) Light Sensor Lens IR LEDs x6 (12 in total) Microphone LED Status Indicator USB wireless adapter connector Power connector Ethernet Port I/O box connector Audio output microSD/SDHC card slot Reset button Microphone input
2.3 Camera Layout Number Contents IR LEDs x6 (12 in total) Light Sensor Lens IR LEDs x6 (12 in total) Microphone LED Status Indicator USB wireless adapter connector Power connector Ethernet Port I/O box connector Audio output microSD/SDHC card slot Reset button Microphone input

User Guide
Page 9
... consists of a blue status indicator and red IR LEDs. The LEDs appear as follows: Red IR LEDs (Left), Blue Status LED (Right) When the IP camera is turned on, the LEDs will light in the following patterns: Red LEDs On Off On Off Blinking (Every 0.5 seconds) Off Off Blinking Blue LED...
... consists of a blue status indicator and red IR LEDs. The LEDs appear as follows: Red IR LEDs (Left), Blue Status LED (Right) When the IP camera is turned on, the LEDs will light in the following patterns: Red LEDs On Off On Off Blinking (Every 0.5 seconds) Off Off Blinking Blue LED...

User Guide
Page 10
...the LAN port of the IP camera to the LAN port of your IPC-4605N camera: The following table describes the numbered items: Number Contents Ethernet cable from router to hub/router. Doing so can damage the camera After unplugging the camera's power cable, wait at ...least 4 seconds before restoring power to a power outlet. Important! The Camera's USB port only supports the bundled ZyXEL Wireless adapter. Do not rotate your camera for wireless reception. 3 Installation 3.1 Connecting Your IPC-4605N The picture below illustrates the basic connection of...
...the LAN port of the IP camera to the LAN port of your IPC-4605N camera: The following table describes the numbered items: Number Contents Ethernet cable from router to hub/router. Doing so can damage the camera After unplugging the camera's power cable, wait at ...least 4 seconds before restoring power to a power outlet. Important! The Camera's USB port only supports the bundled ZyXEL Wireless adapter. Do not rotate your camera for wireless reception. 3 Installation 3.1 Connecting Your IPC-4605N The picture below illustrates the basic connection of...

User Guide
Page 11
... using the ZyXEL Wireless adapter, you can only have one active connection at any given time - Note: If the wireless connection drops or seems slow, try moving your network via WiFi. Attempt to the wireless access point for an improved signal. Important! Obstacles between your camera and wireless ...if made of materials like wood, cement, or metal, will weaken the strength of your camera away from such devices. Keep in mind that you 'll be able to connect your camera to your IP camera closer to keep your wireless signal. Other 2.4 GHz devices such as microwaves and...
... using the ZyXEL Wireless adapter, you can only have one active connection at any given time - Note: If the wireless connection drops or seems slow, try moving your network via WiFi. Attempt to the wireless access point for an improved signal. Important! Obstacles between your camera and wireless ...if made of materials like wood, cement, or metal, will weaken the strength of your camera away from such devices. Keep in mind that you 'll be able to connect your camera to your IP camera closer to keep your wireless signal. Other 2.4 GHz devices such as microwaves and...

User Guide
Page 12
Return fastening bracket to tighten the fastening bracket firmly back in place. Use a screwdriver to its original position. 3.3 Wall and Ceiling Mounting Screw the mounting plate into the IP camera as shown. Insert the tips of the fastening bracket into the mounting surface Secure the IP camera to the mounting plate Loosen the top screw on the trapezoid-shaped fastening bracket.
Return fastening bracket to tighten the fastening bracket firmly back in place. Use a screwdriver to its original position. 3.3 Wall and Ceiling Mounting Screw the mounting plate into the IP camera as shown. Insert the tips of the fastening bracket into the mounting surface Secure the IP camera to the mounting plate Loosen the top screw on the trapezoid-shaped fastening bracket.

User Guide
Page 13
4 Initial Setup Before running the setup utility, make sure you during the installation process of the viewing PC, and the eaZy Wizard utility will start and guide you have the IP Camera properly connected. To begin setup, insert the installation CD supplied with the camera into the CD-ROM drive of the hardware and software for your IP camera.
4 Initial Setup Before running the setup utility, make sure you during the installation process of the viewing PC, and the eaZy Wizard utility will start and guide you have the IP Camera properly connected. To begin setup, insert the installation CD supplied with the camera into the CD-ROM drive of the hardware and software for your IP camera.
User Guide
Page 14
...can also download the iSecurity+ app from iTunes or the Android Market to http://zyxel.isecurityplus.com and login with the username and password you created during setup. Simply point your web browser to view your camera from any PC running a modern web browser with a built-in web browser.... after a VLC plug-in installation.) 3) View the live Motion-JPEG video streaming, you can view your ZyXEL IP camera while on the web browser of any computer. When you first setup your camera using the included CD, it will register your camera with all Desktops, Laptops, or Tablets modern browser.
...can also download the iSecurity+ app from iTunes or the Android Market to http://zyxel.isecurityplus.com and login with the username and password you created during setup. Simply point your web browser to view your camera from any PC running a modern web browser with a built-in web browser.... after a VLC plug-in installation.) 3) View the live Motion-JPEG video streaming, you can view your ZyXEL IP camera while on the web browser of any computer. When you first setup your camera using the included CD, it will register your camera with all Desktops, Laptops, or Tablets modern browser.

User Guide
Page 15
From the login screen, simply enter the username and password you can be located on your ZyXEL camera, you configured during the camera's initial setup (For more information, see the eaZy Setup Wizard). 5.1 CloudEnabled™ Viewing 5.1.1 Accessing via iSecurity+ Smartphone App iSecurity+...The following screen will appear: To configure your video feeds. The iSecurity+ can use the iSecurity+ web app to http://zyxel.isecurityplus.com/login in your web browser. To access the app, simply navigate to view your camera's settings, click the Configure button beneath the video display.
From the login screen, simply enter the username and password you can be located on your ZyXEL camera, you configured during the camera's initial setup (For more information, see the eaZy Setup Wizard). 5.1 CloudEnabled™ Viewing 5.1.1 Accessing via iSecurity+ Smartphone App iSecurity+...The following screen will appear: To configure your video feeds. The iSecurity+ can use the iSecurity+ web app to http://zyxel.isecurityplus.com/login in your web browser. To access the app, simply navigate to view your camera's settings, click the Configure button beneath the video display.

User Guide
Page 16
This page allows you to easily adjust your camera's time zone, display and audio settings, and infrared lighting. Sharing options can be accessed from the Sharing tab at the top of the screen.
This page allows you to easily adjust your camera's time zone, display and audio settings, and infrared lighting. Sharing options can be accessed from the Sharing tab at the top of the screen.

User Guide
Page 17
... to access your browser will appear. If you're running a 64-bit Operating System, you'll still have to run the 32-Bit version of camera software from ZyXEL Communications Corporation. Click on the warning message, and choose to Install ActiveX 5) A confirmation dialogue box will prompt installation of your browser in your...
... to access your browser will appear. If you're running a 64-bit Operating System, you'll still have to run the 32-Bit version of camera software from ZyXEL Communications Corporation. Click on the warning message, and choose to Install ActiveX 5) A confirmation dialogue box will prompt installation of your browser in your...

User Guide
Page 18
Click the icon to collapse control panels. Note: If your IP camera falls behind a firewall, you can see the basic control panel on the top and left, and live video on the right hand side. Should you have more than one, increase the values above by 1 (For example, the second camera would have ports 81 and 555.) 5.2.1.1 Page Layout On the first page, you will need to enable ports 80 and 554 in your web browser. 7) You're now ready to view and manage your camera from your firewall and link them to the internal IP address of the camera.
Click the icon to collapse control panels. Note: If your IP camera falls behind a firewall, you can see the basic control panel on the top and left, and live video on the right hand side. Should you have more than one, increase the values above by 1 (For example, the second camera would have ports 81 and 555.) 5.2.1.1 Page Layout On the first page, you will need to enable ports 80 and 554 in your web browser. 7) You're now ready to view and manage your camera from your firewall and link them to the internal IP address of the camera.

User Guide
Page 19
... on the video window to adjust Brightness, Speaker volume, and microphone volume. Changing the preset point allows you to pan/tilt. Allows you move the camera to a pre-defined point. (Preset points can switch to full-screen mode by right- Live video stream. Click any spot on a scale of 1 to 10...
... on the video window to adjust Brightness, Speaker volume, and microphone volume. Changing the preset point allows you to pan/tilt. Allows you move the camera to a pre-defined point. (Preset points can switch to full-screen mode by right- Live video stream. Click any spot on a scale of 1 to 10...

User Guide
Page 20
... 5.2.1.2 Icons The following table describes the icons found on this icon to mute the built-in speaker Direction control buttons to rotate the camera, and a home button for returning to the preset position. Predefined positions can be defined in microphone Click the [Setup] button to the... original size Brightness Adjusts the camera's brightness. to save the snapshot to your browser window Actual size Resizes the live video pane to access the settings for details. ...
... 5.2.1.2 Icons The following table describes the icons found on this icon to mute the built-in speaker Direction control buttons to rotate the camera, and a home button for returning to the preset position. Predefined positions can be defined in microphone Click the [Setup] button to the... original size Brightness Adjusts the camera's brightness. to save the snapshot to your browser window Actual size Resizes the live video pane to access the settings for details. ...

User Guide
Page 21
... to switch channel Crosshair/Arrow The crosshair allows you to speak into your PC microphone and broadcast through the external speaker connected to the IP camera, place your cursor over a point on the live view and make that point the new center of view. To talk through the... or audio line out. The digital zoom control window will appear. 2) Check [Enable Digital Zoom], and set the area to be enlarged by the camera Digital zoom button. Click on the [X] button or press the [Esc] key to save the changes and/or close the previous window. 5.2.1.4 Voice Communication Pressing ...
... to switch channel Crosshair/Arrow The crosshair allows you to speak into your PC microphone and broadcast through the external speaker connected to the IP camera, place your cursor over a point on the live view and make that point the new center of view. To talk through the... or audio line out. The digital zoom control window will appear. 2) Check [Enable Digital Zoom], and set the area to be enlarged by the camera Digital zoom button. Click on the [X] button or press the [Esc] key to save the changes and/or close the previous window. 5.2.1.4 Voice Communication Pressing ...