
Owners Manual
Page 3
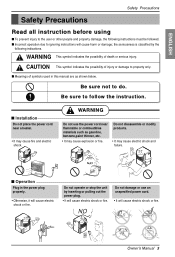
... or fire. Do not disassemble or modify products. • It may cause fire and electric shock. Bucket full I Installation Do not place the power cord near flammable or combustibles materials such as shown below. Bucket full WARNING Do not use an unspecified power cord. • It will cause harm or damage; the...
... or fire. Do not disassemble or modify products. • It may cause fire and electric shock. Bucket full I Installation Do not place the power cord near flammable or combustibles materials such as shown below. Bucket full WARNING Do not use an unspecified power cord. • It will cause harm or damage; the...
Owners Manual
Page 4
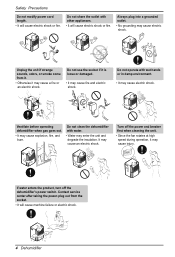
...a fire or an electric shock. Do not share the outlet with other appliances. • It will cause electric shock or fire. Bucket full HuCmoindtirtoyl Bucket full Turn off the power and breaker first when cleaning the unit. • Since the fan rotates at high speed during operation, it...unit if strange sounds, odors, or smoke come from the socket. • It will cause machine failure or electric shock. 4 Dehumidifier HuCmoindtirtoyl Bucket full Ventilate before operating defumidifier when gas goes out. • It may cause fire and electric shock. Do not use the socket if ...
...a fire or an electric shock. Do not share the outlet with other appliances. • It will cause electric shock or fire. Bucket full HuCmoindtirtoyl Bucket full Turn off the power and breaker first when cleaning the unit. • Since the fan rotates at high speed during operation, it...unit if strange sounds, odors, or smoke come from the socket. • It will cause machine failure or electric shock. 4 Dehumidifier HuCmoindtirtoyl Bucket full Ventilate before operating defumidifier when gas goes out. • It may cause fire and electric shock. Do not use the socket if ...
Owners Manual
Page 5
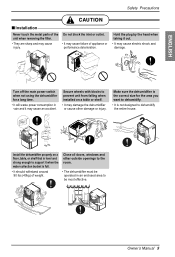
... or cause other outside openings to the room. • The dehumidifier must be most effective. Timer 2h4r.hOr.nO/Onf/fOff Fan Speed LoHwigh CHounmtriodlity Bucket full Install the dehumidifier properly on a table or shelf. • It may cause an accident. Close all doors, windows and other damage or injury.... the unit when removing the filter. • They are sharp and may cause electric shock and damage. 2 h4r.hOr.nO/Onf/Of ff Timer Bucket full Turn off the main power switch when not using the dehumidifier for the area you want to dehumidify. • It is the correct size...
... or cause other outside openings to the room. • The dehumidifier must be most effective. Timer 2h4r.hOr.nO/Onf/fOff Fan Speed LoHwigh CHounmtriodlity Bucket full Install the dehumidifier properly on a table or shelf. • It may cause an accident. Close all doors, windows and other damage or injury.... the unit when removing the filter. • They are sharp and may cause electric shock and damage. 2 h4r.hOr.nO/Onf/Of ff Timer Bucket full Turn off the main power switch when not using the dehumidifier for the area you want to dehumidify. • It is the correct size...
Owners Manual
Page 6
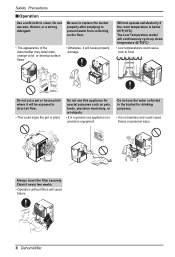
...a strong detergent. Clean it every two weeks. • Operation without filters will be exposed to frost. 4hr2.hOr.nO/Onf/fOff CHounmtriodlity Bucket full Wax Thinner Do not put a pet or house plant where it will cause property damage. The Low Temperature model will continuously cycle up... injury. Do not use this appliance for drinking purposes. • It is below 65°F(18°C). Be sure to replace the bucket properly after emptying to clean. Do not use appliance not precision equipment. Safety Precautions ■Operation Use a soft cloth to prevent water ...
...a strong detergent. Clean it every two weeks. • Operation without filters will be exposed to frost. 4hr2.hOr.nO/Onf/fOff CHounmtriodlity Bucket full Wax Thinner Do not put a pet or house plant where it will cause property damage. The Low Temperature model will continuously cycle up... injury. Do not use this appliance for drinking purposes. • It is below 65°F(18°C). Be sure to replace the bucket properly after emptying to clean. Do not use appliance not precision equipment. Safety Precautions ■Operation Use a soft cloth to prevent water ...
Owners Manual
Page 8
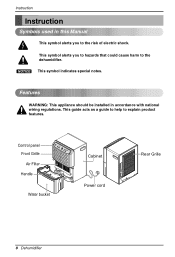
... explain product features. Control panel Front Grille Air Filter Handle 2 h4r.hOr.nO/Onf/Of ff Timer Fan Speed LoHwigh Auto Restart CoHnutmroidl ity Bucket full Water bucket Cabinet Power cord Rear Grille 8 Dehumidifier Instruction Instruction Symbols used in accordance with national wiring regulations. NOTICE This symbol indicates special notes. This guide...
... explain product features. Control panel Front Grille Air Filter Handle 2 h4r.hOr.nO/Onf/Of ff Timer Fan Speed LoHwigh Auto Restart CoHnutmroidl ity Bucket full Water bucket Cabinet Power cord Rear Grille 8 Dehumidifier Instruction Instruction Symbols used in accordance with national wiring regulations. NOTICE This symbol indicates special notes. This guide...
Owners Manual
Page 11
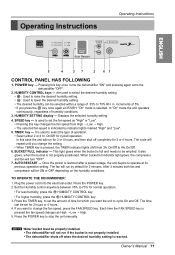
...8594; High. 5. Displays the selected humidity setting. 4. TIMER key --- The cycle will run by indicator lights marked "High" and "Low". 5. BUCKET FULL Indicator --- The fan will repeat until you want to cycle On and Off. After 3 minutes both fan and compressor will turn "OFF". ...control anywhere between 35% to stop the unit manually. The time can be properly installed. • The dehumidifier will run if the bucket is not properly installed. • The dehumidifier shuts off completely for cycled operation. Owner's Manual 11 It is reached. HUMIDITY CONTROL ...
...8594; High. 5. Displays the selected humidity setting. 4. TIMER key --- The cycle will run by indicator lights marked "High" and "Low". 5. BUCKET FULL Indicator --- The fan will repeat until you want to cycle On and Off. After 3 minutes both fan and compressor will turn "OFF". ...control anywhere between 35% to stop the unit manually. The time can be properly installed. • The dehumidifier will run if the bucket is not properly installed. • The dehumidifier shuts off completely for cycled operation. Owner's Manual 11 It is reached. HUMIDITY CONTROL ...
Owners Manual
Page 12
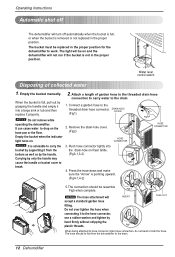
... supporting it from the bottom as well as by grasping the handle and empty it into the drain-hole on . Empty the bucket manually. Push hose connector tightly into a large sink or tub and then replace it to work. Fig4-1 Fig4-2 NOTICE The hose attachment will turn off ... in the proper position for the dehumidifier to the hose connector, use a rubber washer and tighten by only the handle may cause the handle or bucket cover to drop on and the dehumidifier will be resemble Fig5 when complete. Attach a length of collected water 1. Do not over tighten the hose when...
... supporting it from the bottom as well as by grasping the handle and empty it into the drain-hole on . Empty the bucket manually. Push hose connector tightly into a large sink or tub and then replace it to work. Fig4-1 Fig4-2 NOTICE The hose attachment will turn off ... in the proper position for the dehumidifier to the hose connector, use a rubber washer and tighten by only the handle may cause the handle or bucket cover to drop on and the dehumidifier will be resemble Fig5 when complete. Attach a length of collected water 1. Do not over tighten the hose when...
Owners Manual
Page 13
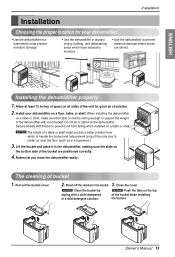
...12" 2 h4r.hOr.nO/Onf/Of ff Timer Fan Speed LoHwigh Auto Restart CoHnutmroidl ity Bucket full 12" The cleaning of the bucket when installing the bucket. NOTICE Clean the bucket by wiping with a cloth dampened in laundry drying, bathing, and dishwashing areas which to help... Installation Choosing the proper location for good air circulation. 2. Install your dehumidifier • Use the dehumidifier in a basement to handle the bucket and help prevent moisture damage. • Use the dehumidifier in a mild detergent solution. Brush off the residue in the dehumidifier, making ...
...12" 2 h4r.hOr.nO/Onf/Of ff Timer Fan Speed LoHwigh Auto Restart CoHnutmroidl ity Bucket full 12" The cleaning of the bucket when installing the bucket. NOTICE Clean the bucket by wiping with a cloth dampened in laundry drying, bathing, and dishwashing areas which to help... Installation Choosing the proper location for good air circulation. 2. Install your dehumidifier • Use the dehumidifier in a basement to handle the bucket and help prevent moisture damage. • Use the dehumidifier in a mild detergent solution. Brush off the residue in the dehumidifier, making ...
Owners Manual
Page 14
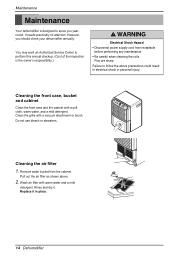
... with warm water and a mild detergent. Do not use bleach or abrasives. 2h4r.hOr.nO/Onf/fOff Timer Fan Speed LowHigh CHounmtriodlity Bucket full Cleaning the air filter 1. Remove water bucket from receptacle before performing any maintenance. • Be careful when cleaning the coils. Wash air filter with a soft cloth, warm water...
... with warm water and a mild detergent. Do not use bleach or abrasives. 2h4r.hOr.nO/Onf/fOff Timer Fan Speed LowHigh CHounmtriodlity Bucket full Cleaning the air filter 1. Remove water bucket from receptacle before performing any maintenance. • Be careful when cleaning the coils. Wash air filter with a soft cloth, warm water...
Owners Manual
Page 15
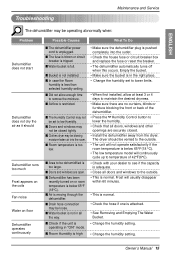
...This is below 65°F (18°C). s Room temperature is moving through the dehumidifier. s Air is too low. s Water bucket is not installed. s Bucket is full. s The Humidity Control may be blowing moisture-laden air into the outlet. • Check the house fuse or circuit ...8226; Install the dehumidifier away from the dryer. s Doors and windows may be loose. Empty the bucket. • Make sure the bucket is attached. • See Removing and Emptying The Water Bucket. • Change the humidity setting. • Change the humidity setting. s Drain hose connection may ...
...This is below 65°F (18°C). s Room temperature is moving through the dehumidifier. s Air is too low. s Water bucket is not installed. s Bucket is full. s The Humidity Control may be blowing moisture-laden air into the outlet. • Check the house fuse or circuit ...8226; Install the dehumidifier away from the dryer. s Doors and windows may be loose. Empty the bucket. • Make sure the bucket is attached. • See Removing and Emptying The Water Bucket. • Change the humidity setting. • Change the humidity setting. s Drain hose connection may ...


