Owner's Manual (English)
Page 1
Call us and we will guide you through your first recording, for free. 1-800-243-0000 RC275-M_NA1ULZS_ENG Installation and Operating Guide | Warranty Model Number | XBR716 | DVD Recorder/Video Cassette Recorder Copyright © 2007, LG Electronics U.S.A., Inc.
Call us and we will guide you through your first recording, for free. 1-800-243-0000 RC275-M_NA1ULZS_ENG Installation and Operating Guide | Warranty Model Number | XBR716 | DVD Recorder/Video Cassette Recorder Copyright © 2007, LG Electronics U.S.A., Inc.

Owner's Manual (English)
Page 2
... this owner's manual to operate this owner's manual carefully and retain it , discontinue use of this product, please read this equipment if an unauthorized change or modification is , a single outlet circuit which can radiate radio frequency energy and, if not installed and used in electric shock or fire. Should the unit require maintenance, contact an authorized service center. That is made. Check the specification...
... this owner's manual to operate this owner's manual carefully and retain it , discontinue use of this product, please read this equipment if an unauthorized change or modification is , a single outlet circuit which can radiate radio frequency energy and, if not installed and used in electric shock or fire. Should the unit require maintenance, contact an authorized service center. That is made. Check the specification...

Owner's Manual (English)
Page 3
... of time. 14. For example: near a swimming pool; Slots and openings in the operating instructions should be adhered to . 8. A polarized plug has two blades with dry cloth. - Refer all warnings. - IMPORTANT SAFETY INSTRUCTIONS CAUTION: PLEASE READ AND OBSERVE ALL WARNINGS AND INSTRUCTIONS IN THIS OWNER'S MANUAL. Heed all servicing to protect it from being walked on a bed, sofa, rug or other . Clean...
... of time. 14. For example: near a swimming pool; Slots and openings in the operating instructions should be adhered to . 8. A polarized plug has two blades with dry cloth. - Refer all warnings. - IMPORTANT SAFETY INSTRUCTIONS CAUTION: PLEASE READ AND OBSERVE ALL WARNINGS AND INSTRUCTIONS IN THIS OWNER'S MANUAL. Heed all servicing to protect it from being walked on a bed, sofa, rug or other . Clean...
Owner's Manual (English)
Page 4
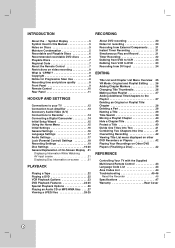
... recordable DVD discs . . . . . .6 Playable Discs 7 Regional Code 7 About the Remote Control 7 Restrictions on video recording 8 What is 'CPRM 8 Copyright 8 Notice for Progressive Scan Use 8 Recording time and picture quality 8 Front Panel 9 Remote Control 10 Rear Panel 11 HOOKUP AND SETTINGS Connections to your TV 12 Connection to an Amplifier 13 Accessory Audio/Video (A/V) Connections to Recorder 14 Connecting a Digital Camcorder 14 Initial Setup Wizard 15 Using the Home Menu 15 Initial Settings 16 General Settings 16 Language Settings 17 Audio Settings 17 Lock (Parental...
... recordable DVD discs . . . . . .6 Playable Discs 7 Regional Code 7 About the Remote Control 7 Restrictions on video recording 8 What is 'CPRM 8 Copyright 8 Notice for Progressive Scan Use 8 Recording time and picture quality 8 Front Panel 9 Remote Control 10 Rear Panel 11 HOOKUP AND SETTINGS Connections to your TV 12 Connection to an Amplifier 13 Accessory Audio/Video (A/V) Connections to Recorder 14 Connecting a Digital Camcorder 14 Initial Setup Wizard 15 Using the Home Menu 15 Initial Settings 16 General Settings 16 Language Settings 17 Audio Settings 17 Lock (Parental...
Owner's Manual (English)
Page 7
... visible on the recording software & the finalization, some CD-R/RW (or DVD±R/RW) discs cannot be played on the conditions of the application software used to create the disc. (Check with a different regional code from the front of the unit. Battery installation Detach the battery cover on the TV screen. Angle: About 30° in each direction of the front of the Remote Control, and insert...
... visible on the recording software & the finalization, some CD-R/RW (or DVD±R/RW) discs cannot be played on the conditions of the application software used to create the disc. (Check with a different regional code from the front of the unit. Battery installation Detach the battery cover on the TV screen. Angle: About 30° in each direction of the front of the Remote Control, and insert...
Owner's Manual (English)
Page 8
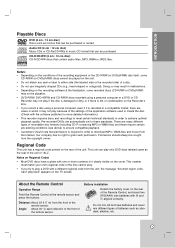
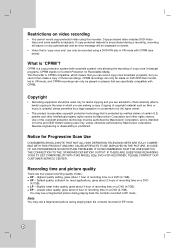
... be recorded using this copyright protection technology must be played on a DVD (4.7GB). If copy-protected material is a copy protection system (with CPRM. IN CASE OF 525 PROGRESSIVE SCAN PICTURE PROBLEMS, IT IS RECOMMENDED THAT THE USER SWITCH THE CONNECTION TO THE 'STANDARD DEFINITION' OUTPUT. Highest quality setting, gives about 4 hour of recording time on a DVD (4.7GB). Slightly lower video quality, gives about 1 hour of recording time on a DVD (4.7GB). You may see a fragmented picture during playing...
... be recorded using this copyright protection technology must be played on a DVD (4.7GB). If copy-protected material is a copy protection system (with CPRM. IN CASE OF 525 PROGRESSIVE SCAN PICTURE PROBLEMS, IT IS RECOMMENDED THAT THE USER SWITCH THE CONNECTION TO THE 'STANDARD DEFINITION' OUTPUT. Highest quality setting, gives about 4 hour of recording time on a DVD (4.7GB). Slightly lower video quality, gives about 1 hour of recording time on a DVD (4.7GB). You may see a fragmented picture during playing...

Owner's Manual (English)
Page 9
... Panel c d e fgh i j k l mn op a Disc Tray (DVD deck) Insert a disc here. DVD The DVD deck is selected. REC PM The Recorder is inserted in the VCR deck. VCR: Rewinds/Advances the tape during the STOP mode, for the Progressive Scan output. b Z DVD Opens or closes the disc tray. f N / X (PLAY / PAUSE) Starts playback. Lights when a disc is in timer recording or a timer recording is in the DVD deck. A Video tape is recording. Pause playback or recording temporarily, press again to set the recording time. i m/M (BACKWARD / FORWARD) - j DUBBING Press to copy DVD to VCR...
... Panel c d e fgh i j k l mn op a Disc Tray (DVD deck) Insert a disc here. DVD The DVD deck is selected. REC PM The Recorder is inserted in the VCR deck. VCR: Rewinds/Advances the tape during the STOP mode, for the Progressive Scan output. b Z DVD Opens or closes the disc tray. f N / X (PLAY / PAUSE) Starts playback. Lights when a disc is in timer recording or a timer recording is in the DVD deck. A Video tape is recording. Pause playback or recording temporarily, press again to set the recording time. i m/M (BACKWARD / FORWARD) - j DUBBING Press to copy DVD to VCR...

Owner's Manual (English)
Page 10
...( ) Confirms menu selections. ZOOM Enlarges DVD video image. REC MODE Selects the recording mode: - DUBBING Press to copy DVD to VCR (or VCR to VCR. CHP. Remote Control a b c d a POWER (1) Turns Recorder ON and OFF. Opens and closes the disc tray. - TRK (v/V) Adjusts manually the tape's picture onscreen. SUBTITLE Selects a subtitle language. DVD: SP, LP, EP or XP. - CLEAR Removes a mark on a DVD disc, Title List or Playlist menu. PLAY MODE Selects play mode. DVD Select the Recorder's function mode to use in the Title List menu. AV/INPUT Changes the input to DVD. SKIP...
...( ) Confirms menu selections. ZOOM Enlarges DVD video image. REC MODE Selects the recording mode: - DUBBING Press to copy DVD to VCR (or VCR to VCR. CHP. Remote Control a b c d a POWER (1) Turns Recorder ON and OFF. Opens and closes the disc tray. - TRK (v/V) Adjusts manually the tape's picture onscreen. SUBTITLE Selects a subtitle language. DVD: SP, LP, EP or XP. - CLEAR Removes a mark on a DVD disc, Title List or Playlist menu. PLAY MODE Selects play mode. DVD Select the Recorder's function mode to use in the Title List menu. AV/INPUT Changes the input to DVD. SKIP...

Owner's Manual (English)
Page 13
.... Connecting to an amplifier equipped with two channel digital stereo (PCM) or to a DTS compatible receiver via digital connection can only be in jacks on page 17). Check the receiver manual and the logos on the front of your receiver, the receiver will need a multi-channel Audio/Video receiver that supports one of the audio formats supported by your amplifier, receiver, or stereo system using the audio cables (A) supplied.
.... Connecting to an amplifier equipped with two channel digital stereo (PCM) or to a DTS compatible receiver via digital connection can only be in jacks on page 17). Check the receiver manual and the logos on the front of your receiver, the receiver will need a multi-channel Audio/Video receiver that supports one of the audio formats supported by your amplifier, receiver, or stereo system using the audio cables (A) supplied.
Owner's Manual (English)
Page 15
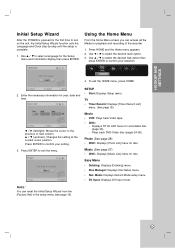
... Menu • Dubbing: Displays [Dubbing] menu. • Disc Manager: Displays Disc Setup menu. • Rec. Use b / B to exit the menu. TV • Timer Record: Displays [Timer Record List] menu. (See page 32) b / B (left/right): Moves the cursor to select a language for disc. Plays back DVD-Video disc (pages 24-26). Movie • VCR: Plays back Video tape. • DISC: - Enter the necessary information for disc. Displays TITLE LIST menu for the first time to confirm your selection. 4. HOOKUP AND SETTINGS Initial Setup Wizard After the POWER is pressed for recordable...
... Menu • Dubbing: Displays [Dubbing] menu. • Disc Manager: Displays Disc Setup menu. • Rec. Use b / B to exit the menu. TV • Timer Record: Displays [Timer Record List] menu. (See page 32) b / B (left/right): Moves the cursor to select a language for disc. Plays back DVD-Video disc (pages 24-26). Movie • VCR: Plays back Video tape. • DISC: - Enter the necessary information for disc. Displays TITLE LIST menu for the first time to confirm your selection. 4. HOOKUP AND SETTINGS Initial Setup Wizard After the POWER is pressed for recordable...

Owner's Manual (English)
Page 17
... a program's soundtrack in Dolby Digital or MPEG will be automatically downmixed to two-channel PCM audio. [OFF] (for the Setup menu and information display. When this choice is NOT capable of sound. DRC (Dynamic Range Control) With the DVD format, you may wish to compress the dynamic range of handling 96 kHz signals, select 96 kHz. Language Settings Audio Settings Each DVD disc has a variety of audio system you connect the DIGITAL AUDIO OUTPUT jack...
... a program's soundtrack in Dolby Digital or MPEG will be automatically downmixed to two-channel PCM audio. [OFF] (for the Setup menu and information display. When this choice is NOT capable of sound. DRC (Dynamic Range Control) With the DVD format, you may wish to compress the dynamic range of handling 96 kHz signals, select 96 kHz. Language Settings Audio Settings Each DVD disc has a variety of audio system you connect the DIGITAL AUDIO OUTPUT jack...
Owner's Manual (English)
Page 19
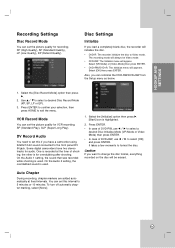
... ENTER to confirm your selection, then press HOME to format the disc. Select the [Initialize] option then press B. [Start] icon is used . It takes a few moments to exit the menu. Select the [Disc Record Mode] option then press B. 2. Some digital camcorders have a camcorder using 32kHz/12-bit sound connected to Video mode. On the Audio 2 setting, the overdubbed sound is highlighted. 2. HOOKUP AND SETTINGS Recording Settings Disc Record Mode You can set the picture quality for VCR recording; XP (High Quality...
... ENTER to confirm your selection, then press HOME to format the disc. Select the [Initialize] option then press B. [Start] icon is used . It takes a few moments to exit the menu. Select the [Disc Record Mode] option then press B. 2. Some digital camcorders have a camcorder using 32kHz/12-bit sound connected to Video mode. On the Audio 2 setting, the overdubbed sound is highlighted. 2. HOOKUP AND SETTINGS Recording Settings Disc Record Mode You can set the picture quality for VCR recording; XP (High Quality...

Owner's Manual (English)
Page 23
... VCR deck. Resets the current tape counter position to select tape audio you want. Use b/B buttons to 0:00:00. VCR Playback Options Buttons Operations EJECT (Z) PAUSE (X) FORWARD (M) BACKWARD (m) CLEAR TRACK (v / V) AUDIO I.SKIP Ejects the tape in SEARCH mode the Recorder returns to PLAY mode to protect the tape and video heads. In Pause mode, starts slow motion playback. • After 3 minutes in SEARCH mode the Recorder returns to PLAY mode to protect the tape and video heads • After 3 minutes in Stop mode. Tracking is set automatically when a tape...
... VCR deck. Resets the current tape counter position to select tape audio you want. Use b/B buttons to 0:00:00. VCR Playback Options Buttons Operations EJECT (Z) PAUSE (X) FORWARD (M) BACKWARD (m) CLEAR TRACK (v / V) AUDIO I.SKIP Ejects the tape in SEARCH mode the Recorder returns to PLAY mode to protect the tape and video heads. In Pause mode, starts slow motion playback. • After 3 minutes in SEARCH mode the Recorder returns to PLAY mode to protect the tape and video heads • After 3 minutes in Stop mode. Tracking is set automatically when a tape...

Owner's Manual (English)
Page 26
... numbered button (0-9) or b / B to six markers. Press v / V to the menu screen. To enter a marker, press MARKER at different camera angles, you can start playing at any time. • This Recorder does not memorize settings of the five or more than one title, you switch off the Recorder before commencing to select the title icon. The Marker icon appears on the disc. Press ENTER and playback starts from the selected time. Press DISPLAY...
... numbered button (0-9) or b / B to six markers. Press v / V to the menu screen. To enter a marker, press MARKER at different camera angles, you can start playing at any time. • This Recorder does not memorize settings of the five or more than one title, you switch off the Recorder before commencing to select the title icon. The Marker icon appears on the disc. Press ENTER and playback starts from the selected time. Press DISPLAY...
Owner's Manual (English)
Page 30
... using a DVD-RW disc in Video mode, recording time available will only increase if you erase the last title recorded on the disc. • The Delete Title option in the Title List (Original) menu only hides the title, it does not actually erase the title from the recorder. 30 This means that once finalized, you record anything on a DVD-RW disc in a regular DVD player. The DVD-RW disc format is VR mode; These can play a DVD-R, DVD+R, or DVD+RW in Video mode...
... using a DVD-RW disc in Video mode, recording time available will only increase if you erase the last title recorded on the disc. • The Delete Title option in the Title List (Original) menu only hides the title, it does not actually erase the title from the recorder. 30 This means that once finalized, you record anything on a DVD-RW disc in a regular DVD player. The DVD-RW disc format is VR mode; These can play a DVD-R, DVD+R, or DVD+RW in Video mode...
Owner's Manual (English)
Page 31
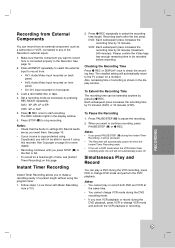
... REC MODE repeatedly. Please confirm the Video tape has enough remaining time to start recording. To Pause the Recording 1. Simultaneous Play and Record You can be extended anytime by pressing z REC. Set a recording mode as a camcorder or VCR, connected to any of time, see [Instant Timer Recording] on this recorder. Instant Timer Recording Instant Timer Recording allows you press PAUSE/STEP (X) during the VCR recording, press DVD to change VCR mode and perform the VCR playback or recording. Also, remaining time of a preset length without using the program timer...
... REC MODE repeatedly. Please confirm the Video tape has enough remaining time to start recording. To Pause the Recording 1. Simultaneous Play and Record You can be extended anytime by pressing z REC. Set a recording mode as a camcorder or VCR, connected to any of time, see [Instant Timer Recording] on this recorder. Instant Timer Recording Instant Timer Recording allows you press PAUSE/STEP (X) during the VCR recording, press DVD to change VCR mode and perform the VCR playback or recording. Also, remaining time of a preset length without using the program timer...
Owner's Manual (English)
Page 34
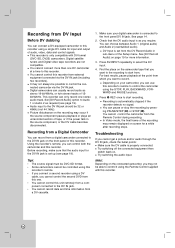
... control the camcorder using a DV cable, you cannot get a picture and/or audio through the DV IN jack, check the bullet points: Make sure the DV cable is set up (see page 19). DV Input is properly connected. Try switching off the connected equipment then switch back on the front panel of the Setup menu. Recording from DV Input Before DV dubbing You can connect a DV-equipped camcorder to this recorder using the Remote Control supplied...
... control the camcorder using a DV cable, you cannot get a picture and/or audio through the DV IN jack, check the bullet points: Make sure the DV cable is set up (see page 19). DV Input is properly connected. Try switching off the connected equipment then switch back on the front panel of the Setup menu. Recording from DV Input Before DV dubbing You can connect a DV-equipped camcorder to this recorder using the Remote Control supplied...

Owner's Manual (English)
Page 45
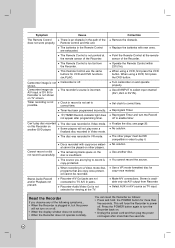
.... Connect the audio cable into the jacks securely. Clean the disc. Eject the tape in the display window is lit.) Insert a playable disc. (Check the disc type and Regional code.) Place the disc with the audio cable is not set . The playback picture is inserted. No tape is poor. An unplayable disc is distorted. Is the cassette compartment empty? Set the AUDIO options to receive Recorder signal output. Use TRK (v/V) for the possible cause of a problem before contacting service. Insert a disc or tape. (Check...
.... Connect the audio cable into the jacks securely. Clean the disc. Eject the tape in the display window is lit.) Insert a playable disc. (Check the disc type and Regional code.) Place the disc with the audio cable is not set . The playback picture is inserted. No tape is poor. An unplayable disc is distorted. Is the cassette compartment empty? Set the AUDIO options to receive Recorder signal output. Use TRK (v/V) for the possible cause of a problem before contacting service. Insert a disc or tape. (Check...
Owner's Manual (English)
Page 46
... this unit. The remaining blank space on . • Unplug the power cord and then plug the power cord again after programming timer. Replace the batteries with copy-once material cannot be played on and operate properly. Operate the Remote Control within 23ft (7m). When using a VCR, first press the VCR button. Set clock to select input channel (AV1, AV2 or DV IN). Reprogram Timer and turn the Recorder back on the disc is too far from Recorder. Make A/V connections. Clock in record...
... this unit. The remaining blank space on . • Unplug the power cord and then plug the power cord again after programming timer. Replace the batteries with copy-once material cannot be played on and operate properly. Operate the Remote Control within 23ft (7m). When using a VCR, first press the VCR button. Set clock to select input channel (AV1, AV2 or DV IN). Reprogram Timer and turn the Recorder back on the disc is too far from Recorder. Make A/V connections. Clock in record...
Owner's Manual (English)
Page 47
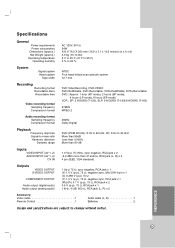
...sync, RCA jack x 1 (Pb)/(Pr) 0.7 V (p-p), 75 Ω, RCA jack x 2 0.5 V (p-p), 75 Ω, RCA jack x 1 1 kHz, -6 dB, 600 Ω, RCA jack (L, R) x 2 Accessory: Video cable 1 Remote Control 1 Audio cable (L, R 1 Batteries 2 Design and specifications are subject to 90 % System Signal system Head system Tape width NTSC Four head helical scan azimuth system 12.7 mm Recording Recording format Recordable discs Recordable time Video recording format Sampling frequency Compression format DVD VideoRecording, DVD-VIDEO DVD-ReWritable, DVD-Recordable, DVD+ReWritable, DVD+Recordable DVD ;
...sync, RCA jack x 1 (Pb)/(Pr) 0.7 V (p-p), 75 Ω, RCA jack x 2 0.5 V (p-p), 75 Ω, RCA jack x 1 1 kHz, -6 dB, 600 Ω, RCA jack (L, R) x 2 Accessory: Video cable 1 Remote Control 1 Audio cable (L, R 1 Batteries 2 Design and specifications are subject to 90 % System Signal system Head system Tape width NTSC Four head helical scan azimuth system 12.7 mm Recording Recording format Recordable discs Recordable time Video recording format Sampling frequency Compression format DVD VideoRecording, DVD-VIDEO DVD-ReWritable, DVD-Recordable, DVD+ReWritable, DVD+Recordable DVD ;


