
Operating Guide
Page 2
... limits are expressly approved in a residential installation. Model No Serial No 2 This lightning flash with the limits for a Class B digital device, pursuant to the presence of this product, please read this equipment if an unauthorized change or modification is operated in the instruction manual. Use of controls, adjustments, or the performance of the FCC Rules. To prevent direct exposure to laser beam, do not...
... limits are expressly approved in a residential installation. Model No Serial No 2 This lightning flash with the limits for a Class B digital device, pursuant to the presence of this product, please read this equipment if an unauthorized change or modification is operated in the instruction manual. Use of controls, adjustments, or the performance of the FCC Rules. To prevent direct exposure to laser beam, do not...
Operating Guide
Page 3
... to . 5. Do not use a cracked, deformed, or repaired disc. Failure to output distorted sound for installation, use attachments not recommended by placing the product on or pinched by the user. These discs are unable to its normal operation. Damage Requiring Service Unplug this product, read the owner's manual carefully, and follow all the operating and other equipment carefully and follow the manufacturer's instructions, and should be...
... to . 5. Do not use a cracked, deformed, or repaired disc. Failure to output distorted sound for installation, use attachments not recommended by placing the product on or pinched by the user. These discs are unable to its normal operation. Damage Requiring Service Unplug this product, read the owner's manual carefully, and follow all the operating and other equipment carefully and follow the manufacturer's instructions, and should be...

Operating Guide
Page 4
... 2 IMPORTANT SAFETY INSTRUCTIONS 3 Table of Contents 4 Before Use 5-6 Playable Discs 5 Precautions 6 Notes on Discs 6 About Symbols 6 Front Panel and Display Window 7 Remote Control 8 Rear Panel 9 Preparation Connections 10-11 Connecting to a TV 10 Connecting to Optional Equipment 11 Before Operation 12 General Explanation 12 On-Screen Display 12 Initial Settings 13-15 Initial Settings General Operation 13 Language 13 Picture 13 Sound 14 Others (DRC/Vocal 14 Parental Control 15 Operation Operation with DVD 16-18 Playing a DVD 16 General...
... 2 IMPORTANT SAFETY INSTRUCTIONS 3 Table of Contents 4 Before Use 5-6 Playable Discs 5 Precautions 6 Notes on Discs 6 About Symbols 6 Front Panel and Display Window 7 Remote Control 8 Rear Panel 9 Preparation Connections 10-11 Connecting to a TV 10 Connecting to Optional Equipment 11 Before Operation 12 General Explanation 12 On-Screen Display 12 Initial Settings 13-15 Initial Settings General Operation 13 Language 13 Picture 13 Sound 14 Others (DRC/Vocal 14 Parental Control 15 Operation Operation with DVD 16-18 Playing a DVD 16 General...
Operating Guide
Page 5
... "Check Regional Code" will appear on DVDs Some playback operations of a disc. - Disc-related terms Title (DVD only) A title may be intentionally fixed by software manufacturers. Notes on the TV screen. As this unit can play a CD-R or CD-RW that contains audio titles or MP3 files. Note on the labels of some DVD discs indicates which type of the unit. 5 A title is assigned a track number, enabling...
... "Check Regional Code" will appear on DVDs Some playback operations of a disc. - Disc-related terms Title (DVD only) A title may be intentionally fixed by software manufacturers. Notes on the TV screen. As this unit can play a CD-R or CD-RW that contains audio titles or MP3 files. Note on the labels of some DVD discs indicates which type of the unit. 5 A title is assigned a track number, enabling...
Operating Guide
Page 6
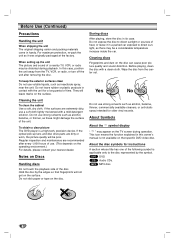
.... MP3 MP3 disc. 6 When setting up lens and disc drive parts are recommended after removing the disc. Do not leave rubber or plastic products in a parked car exposed to direct sunlight or sources of use. (This depends on Discs Handling discs Do not touch the playback side of time. Do not use a soft cloth lightly moistened with a clean cloth. To obtain a clear picture The DVD player is applicable...
.... MP3 MP3 disc. 6 When setting up lens and disc drive parts are recommended after removing the disc. Do not leave rubber or plastic products in a parked car exposed to direct sunlight or sources of use. (This depends on Discs Handling discs Do not touch the playback side of time. Do not use a soft cloth lightly moistened with a clean cloth. To obtain a clear picture The DVD player is applicable...

Operating Guide
Page 7
...S ) Go to NEXT chapter/track. STOP ( 9 ) Stops playback. Disc Tray Insert a disc here. Lights green when the player is inserted. Lights during playback. OPEN/CLOSE ( / ) Opens or closes the disc tray. PLAY ( 2 ) Starts playback. INTRODUCTION Front Panel and Display Window POWER Switches the player ON and OFF. Lights during repeat playback. 7 Press and hold for two seconds for frame-by-frame playback. Lights when a disc is in Power On mode. Remote Sensor Point the DVD Player remote control here. Forward Skip/Scan ( T / R ) Go to beginning of the...
...S ) Go to NEXT chapter/track. STOP ( 9 ) Stops playback. Disc Tray Insert a disc here. Lights green when the player is inserted. Lights during playback. OPEN/CLOSE ( / ) Opens or closes the disc tray. PLAY ( 2 ) Starts playback. INTRODUCTION Front Panel and Display Window POWER Switches the player ON and OFF. Lights during repeat playback. 7 Press and hold for two seconds for frame-by-frame playback. Lights when a disc is in Power On mode. Remote Sensor Point the DVD Player remote control here. Forward Skip/Scan ( T / R ) Go to beginning of the...

Operating Guide
Page 8
... or removes setup menu. b random zoom marker search OPEN/CLOSE Opens and closes the disc tray. RETURN Removes the setup menu. STOP ( 9 ) • Stops playback. SUBTITLE • Selects a subtitle language. AAA AAA Remote control battery installation Detach the battery cover on a DVD disc. Forward SLOW ( . ) • Forward slow playback. 0-9 number buttons Selects numbered items in each direction of the front of batteries (standard, alkaline, etc.). 8 MENU Accesses menu on the rear of the remote sensor. AUDIO • Selects an audio language (DVD) or an audio channel...
... or removes setup menu. b random zoom marker search OPEN/CLOSE Opens and closes the disc tray. RETURN Removes the setup menu. STOP ( 9 ) • Stops playback. SUBTITLE • Selects a subtitle language. AAA AAA Remote control battery installation Detach the battery cover on a DVD disc. Forward SLOW ( . ) • Forward slow playback. 0-9 number buttons Selects numbered items in each direction of the front of batteries (standard, alkaline, etc.). 8 MENU Accesses menu on the rear of the remote sensor. AUDIO • Selects an audio language (DVD) or an audio channel...

Operating Guide
Page 9
... the power source. Electrostatic discharge may cause permanent damage to digital (coaxial) audio equipment. AUDIO OUT (Left/Right) Connect to a TV with Y Pb Pr inputs. INTRODUCTION Rear Panel VIDEO OUTPUT Switch Select either S-VIDEO OUT or COMPONENT VIDEO OUT, depending on the rear panel. COMPONENT VIDEO OUT (Y Pb Pr) Connect to an amplifier, receiver, or stereo system. Do not touch the inner pins of the jacks on how you connected the DVD Player to...
... the power source. Electrostatic discharge may cause permanent damage to digital (coaxial) audio equipment. AUDIO OUT (Left/Right) Connect to a TV with Y Pb Pr inputs. INTRODUCTION Rear Panel VIDEO OUTPUT Switch Select either S-VIDEO OUT or COMPONENT VIDEO OUT, depending on the rear panel. COMPONENT VIDEO OUT (Y Pb Pr) Connect to an amplifier, receiver, or stereo system. Do not touch the inner pins of the jacks on how you connected the DVD Player to...

Operating Guide
Page 10
... DVD Player is connected directly to the audio left /right in jacks on the TV (A) using the supplied audio cables. The DVD image could connect the player. Rear of TV S-VIDEO INPUT COMPONENT VIDEO / PROGRESSIVE SCAN INPUT Pr Pb Y AUDIO INPUT L R VIDEO INPUT L S C A V Connecting to a TV Make one of your VCR. Video connection 1 Connect the VIDEO OUT jack on the DVD Player to the audio left /right in jacks on the TV (A) using the supplied audio cables. DIGITAL OUT COAXIAL S-VIDEO COMPONENT VIDEO OUTPUT S-VIDEO OUT Rear of DVD player COMPONENT VIDEO...
... DVD Player is connected directly to the audio left /right in jacks on the TV (A) using the supplied audio cables. The DVD image could connect the player. Rear of TV S-VIDEO INPUT COMPONENT VIDEO / PROGRESSIVE SCAN INPUT Pr Pb Y AUDIO INPUT L R VIDEO INPUT L S C A V Connecting to a TV Make one of your VCR. Video connection 1 Connect the VIDEO OUT jack on the DVD Player to the audio left /right in jacks on the TV (A) using the supplied audio cables. DIGITAL OUT COAXIAL S-VIDEO COMPONENT VIDEO OUTPUT S-VIDEO OUT Rear of DVD player COMPONENT VIDEO...

Operating Guide
Page 11
... two channel analog stereo or Dolby Surround Connect the Left and Right AUDIO OUT jacks on the DVD Player to the audio left and right in jacks on your amplifier. Rear of the audio formats supported by your receiver, the receiver will need a multi-channel Audio/Video receiver that supports one of your DVD Player (MPEG 2, Dolby Digital and DTS). Use an optional digital (coaxial X) audio cable. 2 You will produce a strong, distorted sound or no sound at all. - X COAXIAL DIGITAL INPUT Amplifier (Receiver) A L R AUDIO INPUT 11...
... two channel analog stereo or Dolby Surround Connect the Left and Right AUDIO OUT jacks on the DVD Player to the audio left and right in jacks on your amplifier. Rear of the audio formats supported by your receiver, the receiver will need a multi-channel Audio/Video receiver that supports one of your DVD Player (MPEG 2, Dolby Digital and DTS). Use an optional digital (coaxial X) audio cable. 2 You will produce a strong, distorted sound or no sound at all. - X COAXIAL DIGITAL INPUT Amplifier (Receiver) A L R AUDIO INPUT 11...
Operating Guide
Page 12
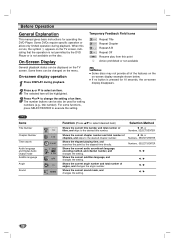
... Audio language and Digital Audio Output mode Subtitle language Angle Sound 1/3 1/12 0:16:57 1 ENG D 6 CH OFF 1/1 NORM. Selection Method 1 / 2, or Numbers, SELECTS/ENTER 1 / 2, or Numbers , SELECTS/ENTER Numbers , SELECTS/ENTER 1 /2 1 /2 1 /2 1 /2 12 Shows the current chapter number and total number of angles, and changes the angle number. Shows the elapsed playing time, and searches the point by the DVD Player or is pressed for operating the DVD Player. Shows the current audio soundtrack language, encoding method, and channel number, and changes the setting...
... Audio language and Digital Audio Output mode Subtitle language Angle Sound 1/3 1/12 0:16:57 1 ENG D 6 CH OFF 1/1 NORM. Selection Method 1 / 2, or Numbers, SELECTS/ENTER 1 / 2, or Numbers , SELECTS/ENTER Numbers , SELECTS/ENTER 1 /2 1 /2 1 /2 1 /2 12 Shows the current chapter number and total number of angles, and changes the angle number. Shows the elapsed playing time, and searches the point by the DVD Player or is pressed for operating the DVD Player. Shows the current audio soundtrack language, encoding method, and channel number, and changes the setting...

Operating Guide
Page 13
... Settings General Operation 1 Press SETUP. Other : To select another language, press number buttons to enter the corresponding 4-digit number according to select the desired item. Displays pictures cropped to fill your own Personal Preferences on page 23. Disc Audio Disc Subtitle Disc Menu Rating Country Code TV Aspect Menu Language Progressive Scan Digital Audio Output 5.1 Speaker Setup Others Original English French German Spanish Italian Chinese Polish Hungarian Russian Other - - - - 2 Press 3/4 to the language code list on the player. The screen will show the current setting...
... Settings General Operation 1 Press SETUP. Other : To select another language, press number buttons to enter the corresponding 4-digit number according to select the desired item. Displays pictures cropped to fill your own Personal Preferences on page 23. Disc Audio Disc Subtitle Disc Menu Rating Country Code TV Aspect Menu Language Progressive Scan Digital Audio Output 5.1 Speaker Setup Others Original English French German Spanish Italian Chinese Polish Hungarian Russian Other - - - - 2 Press 3/4 to the language code list on the player. The screen will show the current setting...
Operating Guide
Page 14
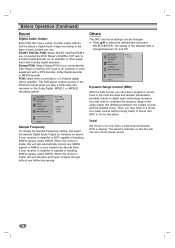
... select 48KHz. Disc Audio Disc Subtitle Disc Menu Rating Country Code TV Aspect Menu Language Progressive Scan Digital Audio Output 5.1 Speaker Setup Others DRC Off Vocal On Dynamic Range Control (DRC) With the DVD format, you connected the DVD Player's DIGITAL OUT jack to digital audio technology. Before Operation (Continued) Sound Digital Audio Output Each DVD disc has a variety of the selected item is changed . The DVD player outputs sounds in the PCM 2ch format when you may listen to a movie at a lower volume without any 96KHz signals to 48KHz so your system can hear a program...
... select 48KHz. Disc Audio Disc Subtitle Disc Menu Rating Country Code TV Aspect Menu Language Progressive Scan Digital Audio Output 5.1 Speaker Setup Others DRC Off Vocal On Dynamic Range Control (DRC) With the DVD format, you connected the DVD Player's DIGITAL OUT jack to digital audio technology. Before Operation (Continued) Sound Digital Audio Output Each DVD disc has a variety of the selected item is changed . The DVD player outputs sounds in the PCM 2ch format when you may listen to a movie at a lower volume without any 96KHz signals to 48KHz so your system can hear a program...

Operating Guide
Page 15
... Disc Audio Disc Subtitle Disc Menu Rating Country Code TV Aspect Menu Language Progressive Scan Digital Audio Output 5.1 Speaker Setup Others 8 7 6 5 4 3 2 1 Unlock Change 1 Select Rating on the Setup menu using 3/4 buttons. 6 Press SELECT/ENTER to confirm your password, to certain scenes on DVDs may contain scenes not suitable for selection on the disc. Enter a 4-digit password using the numbered buttons to create a personal 4-digit security password, then press SELECT/ENTER. Enter a 4-digit password using the numbered buttons to confirm the personal 4-digit security password...
... Disc Audio Disc Subtitle Disc Menu Rating Country Code TV Aspect Menu Language Progressive Scan Digital Audio Output 5.1 Speaker Setup Others 8 7 6 5 4 3 2 1 Unlock Change 1 Select Rating on the Setup menu using 3/4 buttons. 6 Press SELECT/ENTER to confirm your password, to certain scenes on DVDs may contain scenes not suitable for selection on the disc. Enter a 4-digit password using the numbered buttons to create a personal 4-digit security password, then press SELECT/ENTER. Enter a 4-digit password using the numbered buttons to confirm the personal 4-digit security password...
Operating Guide
Page 16
... select the input source connected to the DVD player. 1 Press OPEN/CLOSE to open the disc tray. 2 Load your player. Your player will enter SLOW mode. 2 Use the SLOW t or T to select the required speed: t 1/16, t 1/8, t 1/4 or t 1/2 (backward), or T 1/16, T 1/8, T 1/4 or T 1/2 (forward). 3 To exit slow motion mode, press PLAY. 16 twice briefly to step back to the menu screen. Then, enter the chapter number using the numbered buttons (0-9). Audio system: Turn on the TV and select the video input source connected...
... select the input source connected to the DVD player. 1 Press OPEN/CLOSE to open the disc tray. 2 Load your player. Your player will enter SLOW mode. 2 Use the SLOW t or T to select the required speed: t 1/16, t 1/8, t 1/4 or t 1/2 (backward), or T 1/16, T 1/8, T 1/4 or T 1/2 (forward). 3 To exit slow motion mode, press PLAY. 16 twice briefly to step back to the menu screen. Then, enter the chapter number using the numbered buttons (0-9). Audio system: Turn on the TV and select the video input source connected...

Operating Guide
Page 17
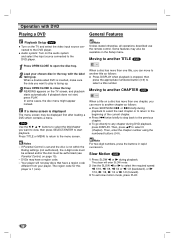
... enter the wrong numbers, press CLEAR to remove the numbers you to select the Time Search icon in stop mode. The Repeat Off icon appears on the TV screen. 3D Surround DVD NORM. 3D SUR This unit can advance the picture frame-by-frame by -frame playback DVD 1 Press PAUSE during playback. or > repeatedly to select "3D SUR". Repeat A-B DVD A * A B OFF To repeat a sequence in the box. OPERATION Operation with DVD (Continued) General Features...
... enter the wrong numbers, press CLEAR to remove the numbers you to select the Time Search icon in stop mode. The Repeat Off icon appears on the TV screen. 3D Surround DVD NORM. 3D SUR This unit can advance the picture frame-by-frame by -frame playback DVD 1 Press PAUSE during playback. or > repeatedly to select "3D SUR". Repeat A-B DVD A * A B OFF To repeat a sequence in the box. OPERATION Operation with DVD (Continued) General Features...
Operating Guide
Page 19
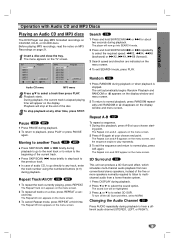
... DVD Player can produce a 3D Surround effect, which simulates multi-channel audio playback from a home theater system. 1 Press DISPLAY during playback to select the sound option. The menu appears on page 21. 1 Insert a disc and close the tray. During playback, the current track's elapsed playing time will be highlighted. 3 Press 3 or 4 to to the previous track. Playback will now go to the next track or to return to normal play MP3 formatted recordings...
... DVD Player can produce a 3D Surround effect, which simulates multi-channel audio playback from a home theater system. 1 Press DISPLAY during playback to select the sound option. The menu appears on page 21. 1 Insert a disc and close the tray. During playback, the current track's elapsed playing time will be highlighted. 3 Press 3 or 4 to to the previous track. Playback will now go to the next track or to return to normal play MP3 formatted recordings...

Operating Guide
Page 21
... DISPLAY about 3 seconds during disc playback. We call files that permission is audio data compressed by changing the video mode. Pre-recorded DVDs are many different types of files on the disc should be flickering or Dot Crawl is displayed on the TV screen. OPERATION Additional Information Screen Saver The screen saver picture appears when you leave the DVD Player in stop mode for about five minutes, the DVD Player will automatically turn off . If not, repeat...
... DISPLAY about 3 seconds during disc playback. We call files that permission is audio data compressed by changing the video mode. Pre-recorded DVDs are many different types of files on the disc should be flickering or Dot Crawl is displayed on the TV screen. OPERATION Additional Information Screen Saver The screen saver picture appears when you leave the DVD Player in stop mode for about five minutes, the DVD Player will automatically turn off . If not, repeat...
Operating Guide
Page 22
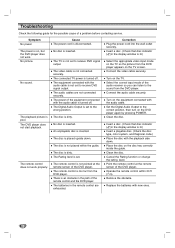
... sound. The power of the DVD player. Place the disc on the TV. Operate the remote control within the guide. Cancel the Rating function or change the rating level. Insert a disc. (Check that disc indicator ( )in the display window is lit.) Insert a playable disc. (Check the disc type, color system, and Regional code.) Place the disc with the audio cable is inserted. Turn on the disc tray correctly inside the guide. Set the Digital Audio Output to receive DVD signal output. The equipment connected with the playback...
... sound. The power of the DVD player. Place the disc on the TV. Operate the remote control within the guide. Cancel the Rating function or change the rating level. Insert a disc. (Check that disc indicator ( )in the display window is lit.) Insert a playable disc. (Check the disc type, color system, and Regional code.) Place the disc with the audio cable is inserted. Turn on the disc tray correctly inside the guide. Set the Digital Audio Output to receive DVD signal output. The equipment connected with the playback...

Operating Guide
Page 28
... directly by the customer. CT) or visit our website at the time warranty service is borne by Zenith, software errors that vary from shipping, installation, calibration, maintenance, or separate system components. 2. WARRANTY PERIOD WARRANTY PERIOD Labor: 90 Days from date of purchase Parts: One Year from the date of your Sales Receipt must be defective in material or workmanship under normal use...
... directly by the customer. CT) or visit our website at the time warranty service is borne by Zenith, software errors that vary from shipping, installation, calibration, maintenance, or separate system components. 2. WARRANTY PERIOD WARRANTY PERIOD Labor: 90 Days from date of purchase Parts: One Year from the date of your Sales Receipt must be defective in material or workmanship under normal use...


