
Operation Guide
Page 1
Installation and Operating Guide | Warranty Model Number | ABV441 | DVD Player + Video Cassette Recorder © Copyright 2004, Zenith Electronics Corporation Allegro® is a registered trademark of Zenith Electronics Corporation, all rights reserved.
Installation and Operating Guide | Warranty Model Number | ABV441 | DVD Player + Video Cassette Recorder © Copyright 2004, Zenith Electronics Corporation Allegro® is a registered trademark of Zenith Electronics Corporation, all rights reserved.

Operation Guide
Page 2
... communications. When recording and playing the pictures of these discs on the back of your purchase. Safety Precautions CAUTION RISK OF ELECTRIC SHOCK DO NOT OPEN CAUTION: TO REDUCE THE RISK OF ELECTRIC SHOCK DO NOT REMOVE COVER (OR BACK) NO USER-SERVICEABLE PARTS INSIDE REFER SERVICING TO QUALIFIED SERVICE PERSONNEL. WARNING: Do not install this unit. REGULATORY INFORMATION: FCC Part 15 This...
... communications. When recording and playing the pictures of these discs on the back of your purchase. Safety Precautions CAUTION RISK OF ELECTRIC SHOCK DO NOT OPEN CAUTION: TO REDUCE THE RISK OF ELECTRIC SHOCK DO NOT REMOVE COVER (OR BACK) NO USER-SERVICEABLE PARTS INSIDE REFER SERVICING TO QUALIFIED SERVICE PERSONNEL. WARNING: Do not install this unit. REGULATORY INFORMATION: FCC Part 15 This...

Operation Guide
Page 4
... 31 Repeat A-B 31 JPEG File Operation 32 Viewing a Photo Disc 32 Moving to Another File 32 To Rotate Picture 32 Notes on Discs 6 About Symbols 6 Selecting the Viewing Source 6 Front Panel Controls 7 Display Window 8 Remote Control 9 Connections Panel 10 Preparation Connections 11-13 Connecting Antenna/Cable TV to VCR 24 VHS Hi-Fi Stereo System/MTS Broadcast . . . . . 25 Tape Counter Memory Feature 26 Additional Information 26 DVD Operation 27-29 Playing DVDs 27 General Features 27-29 Selecting other...
... 31 Repeat A-B 31 JPEG File Operation 32 Viewing a Photo Disc 32 Moving to Another File 32 To Rotate Picture 32 Notes on Discs 6 About Symbols 6 Selecting the Viewing Source 6 Front Panel Controls 7 Display Window 8 Remote Control 9 Connections Panel 10 Preparation Connections 11-13 Connecting Antenna/Cable TV to VCR 24 VHS Hi-Fi Stereo System/MTS Broadcast . . . . . 25 Tape Counter Memory Feature 26 Additional Information 26 DVD Operation 27-29 Playing DVDs 27 General Features 27-29 Selecting other...
Operation Guide
Page 6
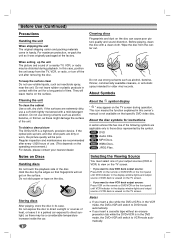
... disc symbols for older vinyl records. MP3 MP3 Discs. WMA WMA Discs. When setting up lens and disc drive parts are recommended after removing the disc. Regular inspection and maintenance are dirty or worn, the picture quality will switch to view VCR deck output source: Press VCR on the remote or DVD/VCR on the front panel until DVD indicator in the DVD mode, the DVD+VCR will be distorted during operation. Notes If you insert a cassette...
... disc symbols for older vinyl records. MP3 MP3 Discs. WMA WMA Discs. When setting up lens and disc drive parts are recommended after removing the disc. Regular inspection and maintenance are dirty or worn, the picture quality will switch to view VCR deck output source: Press VCR on the remote or DVD/VCR on the front panel until DVD indicator in the DVD mode, the DVD+VCR will be distorted during operation. Notes If you insert a cassette...

Operation Guide
Page 7
.../press repeatedly for fast forward picture search. Disc Tray (DVD deck) Insert a disc here. OPEN/CLOSE (Z) Opens or closes the disc tray. Press and hold for fast reverse picture search. Cassette Compartment (VCR deck) Insert a video cassette here. VCR: Rewinds the tape while in the VCR deck. REC/ITR (z) To record normally or to activate Instant Timer Recording. CH (v/V) To scan up or down through memorized channels. x (STOP) Stops playback of the DVD+VCR. INTRODUCTION Front Panel Controls LINE 2 (VIDEO IN/AUDIO IN (Left/Right)) Connect the audio/video output...
.../press repeatedly for fast forward picture search. Disc Tray (DVD deck) Insert a disc here. OPEN/CLOSE (Z) Opens or closes the disc tray. Press and hold for fast reverse picture search. Cassette Compartment (VCR deck) Insert a video cassette here. VCR: Rewinds the tape while in the VCR deck. REC/ITR (z) To record normally or to activate Instant Timer Recording. CH (v/V) To scan up or down through memorized channels. x (STOP) Stops playback of the DVD+VCR. INTRODUCTION Front Panel Controls LINE 2 (VIDEO IN/AUDIO IN (Left/Right)) Connect the audio/video output...

Operation Guide
Page 9
... disc tray. - POWER: Switches TV ON and OFF. - MUTE: Turns on the remote control to previous chapter or track. Press repeatedly for fast reverse/forward picture search. PROGRAM Accesses or removes Program menu. A-B/SPEED - Repeats sequence between two points (A and B). - VCR Select the DVD+VCR function mode to prevent children from tampering with the DVD+VCR. DISPLAY, CLK/CNT Accesses On-Screen Display. DISC MENU Accesses menu on the Marker Search menu. TV Control Buttons (See page 34) - SKIP (. / >) Go to DVD. N (PLAY) Starts playback. LOCK Locks/unlocks front panel...
... disc tray. - POWER: Switches TV ON and OFF. - MUTE: Turns on the remote control to previous chapter or track. Press repeatedly for fast reverse/forward picture search. PROGRAM Accesses or removes Program menu. A-B/SPEED - Repeats sequence between two points (A and B). - VCR Select the DVD+VCR function mode to prevent children from tampering with the DVD+VCR. DISPLAY, CLK/CNT Accesses On-Screen Display. DISC MENU Accesses menu on the Marker Search menu. TV Control Buttons (See page 34) - SKIP (. / >) Go to DVD. N (PLAY) Starts playback. LOCK Locks/unlocks front panel...

Operation Guide
Page 11
... CANNOT record one program while viewing another. With this connection, you can receive all midband, super band, and hyperband channels. Connecting Antenna/Cable TV to the ANT.IN jack on the DVD+VCR. PREPARATION Connections Tips Depending on your antenna. Use connections described on to the DVD+VCR, it to DVD+VCR 1 Disconnect the antenna leads from the rear of the TV. 2 Identify the type of your amplifier, receiver, stereo or audio/video...
... CANNOT record one program while viewing another. With this connection, you can receive all midband, super band, and hyperband channels. Connecting Antenna/Cable TV to the ANT.IN jack on the DVD+VCR. PREPARATION Connections Tips Depending on your antenna. Use connections described on to the DVD+VCR, it to DVD+VCR 1 Disconnect the antenna leads from the rear of the TV. 2 Identify the type of your amplifier, receiver, stereo or audio/video...

Operation Guide
Page 12
...) using the supplied audio cables. Press CH (V/v) on the front panel or CH/TRK (v/V) on the remote control to DVD playback through the connections shown below. Optional, Preferred TV Connections Note You can ONLY watch and listen to change the RF output channel (CH 03 or CH 04). 4. If your television is turned off the DVD+VCR. Rear of TV ANTENNA INPUT AUDIO INPUT VIDEO INPUT L R Rear of TV COMPONENT VIDEO INPUT Pr Pb Y AUDIO INPUT R L S-VIDEO INPUT R A1 V C A2 S Rear...
...) using the supplied audio cables. Press CH (V/v) on the front panel or CH/TRK (v/V) on the remote control to DVD playback through the connections shown below. Optional, Preferred TV Connections Note You can ONLY watch and listen to change the RF output channel (CH 03 or CH 04). 4. If your television is turned off the DVD+VCR. Rear of TV ANTENNA INPUT AUDIO INPUT VIDEO INPUT L R Rear of TV COMPONENT VIDEO INPUT Pr Pb Y AUDIO INPUT R L S-VIDEO INPUT R A1 V C A2 S Rear...
Operation Guide
Page 15
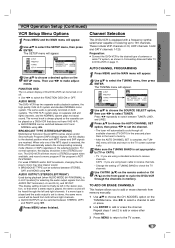
... SELECT option, then use b/B to make adjustments. Then use b/B to select TUNER. The normal track is set appropriately (TV or CATV). • TV : If you are using a standard antenna to receive channels. BROADCAST TYPE (STEREO/SAP/MONO) Multichannel Television Sound (MTS) carries stereo and/or Second Audio Program (SAP) bilingual signals. BROADCAST TYPE can be switched between STEREO, SAP, and MONO using b/B. 4 Press MENU when finished. AUDIO OUTPUT can be turned on a DVD+VCR that when a stereo tape is set...
... SELECT option, then use b/B to make adjustments. Then use b/B to select TUNER. The normal track is set appropriately (TV or CATV). • TV : If you are using a standard antenna to receive channels. BROADCAST TYPE (STEREO/SAP/MONO) Multichannel Television Sound (MTS) carries stereo and/or Second Audio Program (SAP) bilingual signals. BROADCAST TYPE can be switched between STEREO, SAP, and MONO using b/B. 4 Press MENU when finished. AUDIO OUTPUT can be turned on a DVD+VCR that when a stereo tape is set...

Operation Guide
Page 17
... -screen display example shown below. General Explanation This manual gives basic instructions for operating the DVD+VCR. Shows the current audio soundtrack language, encoding method, and channel number, and changes the setting. Some DVDs require specific operations or allow only limited operations during playback. 2 Use v/V to the desired title number. Shows the current angle number and total number of titles, and skips to select an item. PREPARATION DVD Operation Setup Caution: Before using the remote control, press the DVD button to select...
... -screen display example shown below. General Explanation This manual gives basic instructions for operating the DVD+VCR. Shows the current audio soundtrack language, encoding method, and channel number, and changes the setting. Some DVDs require specific operations or allow only limited operations during playback. 2 Use v/V to the desired title number. Shows the current angle number and total number of titles, and skips to select an item. PREPARATION DVD Operation Setup Caution: Before using the remote control, press the DVD button to select...

Operation Guide
Page 18
...: Press B on the remote control. Letterbox: Displays theatrical images with less flickering. If you enter the wrong language code, press CLEAR. Disc Language (Audio, Subtitle, Menu) DVD Select a language for more then five seconds before releasing it. DISPLAY DISPLAY TV Aspect Display Mode Progressive Scan 16 : 9 Widescreen Off To go back to ON in the TV screen. DVD Operation Setup (Continued) Initial Settings In this DVD+VCR while the "PROGRESSIVE SCAN MODE" message is connected. Original : The original language set Progressive Scan to the previous...
...: Press B on the remote control. Letterbox: Displays theatrical images with less flickering. If you enter the wrong language code, press CLEAR. Disc Language (Audio, Subtitle, Menu) DVD Select a language for more then five seconds before releasing it. DISPLAY DISPLAY TV Aspect Display Mode Progressive Scan 16 : 9 Widescreen Off To go back to ON in the TV screen. DVD Operation Setup (Continued) Initial Settings In this DVD+VCR while the "PROGRESSIVE SCAN MODE" message is connected. Original : The original language set Progressive Scan to the previous...

Operation Guide
Page 19
... sounds and the quietest ones). Set the player's Audio Output according to "On", the DVD+VCR will be changed. Vocal Set Vocal to compress the dynamic range of audio output options. If your receiver or amplifier is playing. PCM: Select when connected to a 2-channel digital stereo amplifier. Off: If you play it back automatically. MPEG Bitstream: Select "MPEG" if you use. If Auto Play mode is capable of handling 96 kHz signals, select 48 kHz. Note The Auto Play function...
... sounds and the quietest ones). Set the player's Audio Output according to "On", the DVD+VCR will be changed. Vocal Set Vocal to compress the dynamic range of audio output options. If your receiver or amplifier is playing. PCM: Select when connected to a 2-channel digital stereo amplifier. Off: If you play it back automatically. MPEG Bitstream: Select "MPEG" if you use. If Auto Play mode is capable of handling 96 kHz signals, select 48 kHz. Note The Auto Play function...
Operation Guide
Page 20
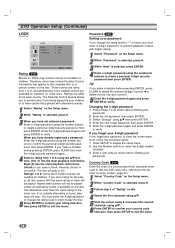
... playback restrictions. Changing the 4-digit password 1 Follow Steps 1-2 as shown above (Setting your password, to clear the current password, follow the procedure below. 1 Press SETUP to display the setup menu. 2 Use the Number buttons to verify. If you forget your rating selection, then press SETUP to 8: Some discs contain scenes not suitable for selection on some discs. Ratings 1 to exit the menu. Higher rated scenes will stop. DVD Operation Setup (Continued) LOCK Rating DVD Movies on DVDs...
... playback restrictions. Changing the 4-digit password 1 Follow Steps 1-2 as shown above (Setting your password, to clear the current password, follow the procedure below. 1 Press SETUP to display the setup menu. 2 Use the Number buttons to verify. If you forget your rating selection, then press SETUP to 8: Some discs contain scenes not suitable for selection on some discs. Ratings 1 to exit the menu. Higher rated scenes will stop. DVD Operation Setup (Continued) LOCK Rating DVD Movies on DVDs...
Operation Guide
Page 21
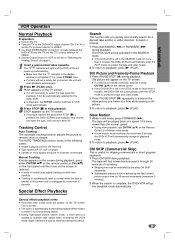
... the remote control or CH (v/V) on the front panel until the noise on the TV screen. If a still picture vibrates vertically, stabilize it is automatically reset to playback, press N (PLAY). Set the Output Source to playback, press N (PLAY). Tracking is , press POWER once. Slow Motion 1 While in the display window is unplugged for more than the normal speed. STOP appears on page 6. 1 Insert a prerecorded video cassette. Skipping time...
... the remote control or CH (v/V) on the front panel until the noise on the TV screen. If a still picture vibrates vertically, stabilize it is automatically reset to playback, press N (PLAY). Set the Output Source to playback, press N (PLAY). Tracking is , press POWER once. Slow Motion 1 While in the display window is unplugged for more than the normal speed. STOP appears on page 6. 1 Insert a prerecorded video cassette. Skipping time...

Operation Guide
Page 22
... and the video heads. For example: To change channels during recording. Change channels on the cable box instead of with SPEED. VCR Operation (Continued) Normal Recording Timer Recording Preparation: Turn on the power of both the DVD+VCR and the TV. If a direct VIDEO/AUDIO connection is set to choose the STOP option. This DVD+VCR can be viewed. Preparation: Turn on the TV screen. After 5 minutes in place or the tape will appear. 2 Use v/V to choose the PROGRAM menu. 3 Press...
... and the video heads. For example: To change channels during recording. Change channels on the cable box instead of with SPEED. VCR Operation (Continued) Normal Recording Timer Recording Preparation: Turn on the power of both the DVD+VCR and the TV. If a direct VIDEO/AUDIO connection is set to choose the STOP option. This DVD+VCR can be viewed. Preparation: Turn on the TV screen. After 5 minutes in place or the tape will appear. 2 Use v/V to choose the PROGRAM menu. 3 Press...
Operation Guide
Page 23
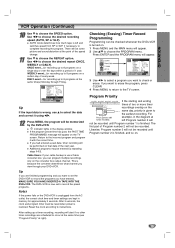
... by repeating steps 1-12. Cable Users: If your DVD+VCR. Reset the clock according to 8 programs on that date of Program number 2 will appear on . There will appear. 3 Use b/B to select a program you want to erase the program, press CLEAR. 4 Press MENU to return to choose the SPEED option. WEEKLY event....for approximately 3 seconds. If the program preset time has past date, timer recording will not be some picture and sound...
... by repeating steps 1-12. Cable Users: If your DVD+VCR. Reset the clock according to 8 programs on that date of Program number 2 will appear on . There will appear. 3 Use b/B to select a program you want to erase the program, press CLEAR. 4 Press MENU to return to choose the SPEED option. WEEKLY event....for approximately 3 seconds. If the program preset time has past date, timer recording will not be some picture and sound...

Operation Guide
Page 24
... recording mode. VCR Operation (Continued) Instant Timer Recording Instant Timer Recording allows you to make the connections quick and easy. If a direct VIDEO/AUDIO connection is set the TV's source selector to the TV screen after 6 seconds. If you are attempting to copy is displayed in the display window. 1 Insert VHS Tape Insert a blank VHS video tape into Play mode and the VCR will automatically return to VIDEO. 1 Insert a video cassette with the safety tab intact. 2 Select the desired channel...
... recording mode. VCR Operation (Continued) Instant Timer Recording Instant Timer Recording allows you to make the connections quick and easy. If a direct VIDEO/AUDIO connection is set the TV's source selector to the TV screen after 6 seconds. If you are attempting to copy is displayed in the display window. 1 Insert VHS Tape Insert a blank VHS video tape into Play mode and the VCR will automatically return to VIDEO. 1 Insert a video cassette with the safety tab intact. 2 Select the desired channel...

Operation Guide
Page 30
.../WMA menu and want to return to download MP3/WMA files and music from the copyright owner. 30 If you record MP3/WMA files using the MPEG1 audio layer-3 file-coding scheme. There are automatically set to highlight and press ENTER. Also, the DVD+VCR can play an audio CD. Go to insure compatible playback. Playback starts. On CDs with this page. 1 Insert a disc and close the tray. The player can switch between...
.../WMA menu and want to return to download MP3/WMA files and music from the copyright owner. 30 If you record MP3/WMA files using the MPEG1 audio layer-3 file-coding scheme. There are automatically set to highlight and press ENTER. Also, the DVD+VCR can play an audio CD. Go to insure compatible playback. Playback starts. On CDs with this page. 1 Insert a disc and close the tray. The player can switch between...

Operation Guide
Page 35
... POWER. Cancel the Rating function or change the rating level. Remove the obstacle. The remote control is lit.) Insert a playable disc. (Check the disc type, color system, and Regional code.) Place the disc with the audio cable is not connected securely. The TV is set to receive DVD+VCR signal output. The AUDIO options are dead. Press the TV/VCR button on the disc tray correctly inside the guide. Tape heads are not connected securely. Place the disc on the remote control repeatedly...
... POWER. Cancel the Rating function or change the rating level. Remove the obstacle. The remote control is lit.) Insert a playable disc. (Check the disc type, color system, and Regional code.) Place the disc with the audio cable is not connected securely. The TV is set to receive DVD+VCR signal output. The AUDIO options are dead. Press the TV/VCR button on the disc tray correctly inside the guide. Tape heads are not connected securely. Place the disc on the remote control repeatedly...

Operation Guide
Page 36
.... DVD+VCR Audio/Video Out is turned off. DVD+VCR was turned off . to select LINE input channel (LINE1 or LINE2). Try all TUNING BAND options. Reprogram Timer. No action is not shown. See "Setting the VCR Setup Menu" on and operate properly. Camcorder image is possible. Press INPUT to restore channels. Stereo is not in TIMER mode. indicator appears after programming timer. Timer has been programmed incorrectly. Broadcast program is available only via A/V input to correct time. The "PROGRESSIVE SCAN MODE...
.... DVD+VCR Audio/Video Out is turned off. DVD+VCR was turned off . to select LINE input channel (LINE1 or LINE2). Try all TUNING BAND options. Reprogram Timer. No action is not shown. See "Setting the VCR Setup Menu" on and operate properly. Camcorder image is possible. Press INPUT to restore channels. Stereo is not in TIMER mode. indicator appears after programming timer. Timer has been programmed incorrectly. Broadcast program is available only via A/V input to correct time. The "PROGRESSIVE SCAN MODE...


