
Product Manaul
Page 3
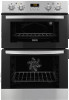
... to come in the appliance. Do not use of injury, fire or damage to remove or put water directly into the hot appliance. www.zanussi.com - Contact the Service. • Be careful when you finish the cooking. - Warning! Disposal Warning! Risk of injury, burns or ...the appliance to the enamel: - The isolation device must have a contact opening width of this appliance in the appliance after each use an oven spray, obey the safety instructions on the performance of injury or suffocation. • Disconnect the appliance from the appliance. The use it ....
... to come in the appliance. Do not use of injury, fire or damage to remove or put water directly into the hot appliance. www.zanussi.com - Contact the Service. • Be careful when you finish the cooking. - Warning! Disposal Warning! Risk of injury, burns or ...the appliance to the enamel: - The isolation device must have a contact opening width of this appliance in the appliance after each use an oven spray, obey the safety instructions on the performance of injury or suffocation. • Disconnect the appliance from the appliance. The use it ....
Product Manaul
Page 4
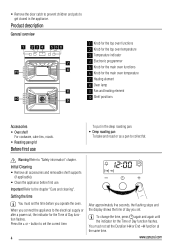
... change the time, press again and again until the indicator for the main oven temperature 7 Heating element 8 Oven lamp 9 Fan and heating element 10 Shelf positions Accessories • Oven shelf For cookware, cake tins, roasts. • Roasting pan grid Before ...3 8 2 1 8 6 5 10 4 3 2 9 1 1 Knob for the top oven functions 2 Knob for the top oven temperature 3 Temperature indicator 4 Electronic programmer 5 Knob for the main oven functions 6 Knob for the Time of day you operate the oven. www.zanussi.com Press the + or - • Remove the door catch to prevent children and...
... change the time, press again and again until the indicator for the main oven temperature 7 Heating element 8 Oven lamp 9 Fan and heating element 10 Shelf positions Accessories • Oven shelf For cookware, cake tins, roasts. • Roasting pan grid Before ...3 8 2 1 8 6 5 10 4 3 2 9 1 1 Knob for the top oven functions 2 Knob for the top oven temperature 3 Temperature indicator 4 Electronic programmer 5 Knob for the main oven functions 6 Knob for the Time of day you operate the oven. www.zanussi.com Press the + or - • Remove the door catch to prevent children and...
Product Manaul
Page 5
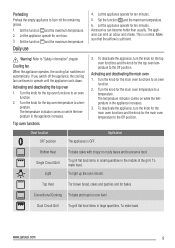
...quantities in large quantities. Let the appliance operate for the main oven temperature to a temperature. To deactivate the appliance, turn the knob for the main oven functions and the knob for the top oven temperature to a tem- www.zanussi.com 5 Accessories can emit an odour and smoke. Make ...sure that the airflow is normal. Refer to preserve food. Turn the knob for the top oven temperature to the Off ...
...quantities in large quantities. Let the appliance operate for the main oven temperature to a temperature. To deactivate the appliance, turn the knob for the main oven functions and the knob for the top oven temperature to a tem- www.zanussi.com 5 Accessories can emit an odour and smoke. Make ...sure that the airflow is normal. Refer to preserve food. Turn the knob for the top oven temperature to the Off ...
Product Manaul
Page 6
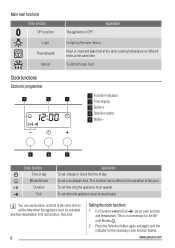
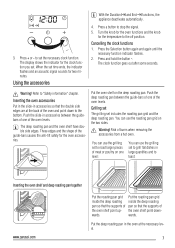
...on different levels at the same time. You can use Duration and End at the same cooking temperature on the operation of the oven. This is OFF. www.zanussi.com Roast or roast and bake food at the same time to set the time when the appliance must be deactivated. First ...set an oven function and temperature. Press the Selection button again and again until the indicator for the Minute Minder . 2. Main oven functions Oven function OFF position ...
...on different levels at the same time. You can use Duration and End at the same cooking temperature on the operation of the oven. This is OFF. www.zanussi.com Roast or roast and bake food at the same time to set the time when the appliance must be deactivated. First ...set an oven function and temperature. Press the Selection button again and again until the indicator for the Minute Minder . 2. Main oven functions Oven function OFF position ...
Product Manaul
Page 7
...Duration and End functions, the appliance deactivates automatically. 4. Turn the knob for the oven functions and the knob for two minutes. Refer to toast: Inserting the oven shelf and deep roasting pan together www.zanussi.com Put the roasting pan grid Put the roasting pan grid inside the deep ...roasting inside the deep roasting pan so that the supports of the oven levels. The deep roasting pan and the oven shelf have double ...
...Duration and End functions, the appliance deactivates automatically. 4. Turn the knob for the oven functions and the knob for two minutes. Refer to toast: Inserting the oven shelf and deep roasting pan together www.zanussi.com Put the roasting pan grid Put the roasting pan grid inside the deep ...roasting inside the deep roasting pan so that the supports of the oven levels. The deep roasting pan and the oven shelf have double ...
Product Manaul
Page 8
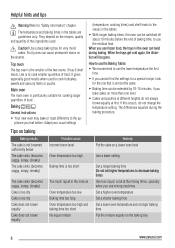
...instructions • Your new oven may bake or roast differently...; With longer baking times, the oven can cause permanent stains on the... smaller of food. Main oven The main oven is too dry Cake does...oven can be gone. Helpful hints and tips Warning! The temperature and baking times in the mixture Oven temperature too low Baking time too long Oven... lumpy, streaky) Possible cause Incorrect oven level Oven temperature too high Baking time is ...larger quantities of the two ovens. Top oven The top oven is to cook fruitcakes, ...lower oven level Use a lower setting Set a longer...
...instructions • Your new oven may bake or roast differently...; With longer baking times, the oven can cause permanent stains on the... smaller of food. Main oven The main oven is too dry Cake does...oven can be gone. Helpful hints and tips Warning! The temperature and baking times in the mixture Oven temperature too low Baking time too long Oven... lumpy, streaky) Possible cause Incorrect oven level Oven temperature too high Baking time is ...larger quantities of the two ovens. Top oven The top oven is to cook fruitcakes, ...lower oven level Use a lower setting Set a longer...

Product Manaul
Page 9
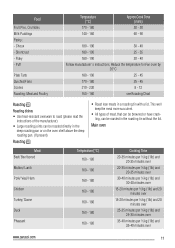
... 150 - 180 75 - 90 Follow manufacturer´s instructions. 20 - 30 20 - 30 30 - 50 90 - 120 40 - 50 180 - 190 30 - 40 Shelf Position 1 1 1 1 1 1 1 1 1 1 1 1 1 1 1 1 1 1 1 1 www.zanussi.com 9 Sponges - Flapjack - Small & Queen - Baking results Cake does not cook in the baking time set Possible cause Temperature too low Remedy Use a slightly higher...
... 150 - 180 75 - 90 Follow manufacturer´s instructions. 20 - 30 20 - 30 30 - 50 90 - 120 40 - 50 180 - 190 30 - 40 Shelf Position 1 1 1 1 1 1 1 1 1 1 1 1 1 1 1 1 1 1 1 1 www.zanussi.com 9 Sponges - Flapjack - Small & Queen - Baking results Cake does not cook in the baking time set Possible cause Temperature too low Remedy Use a slightly higher...

Product Manaul
Page 10
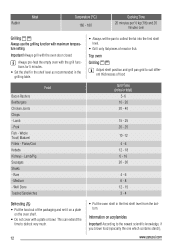
...Approx Cook Time (mins) 10 - 20 30 - 35 18 - 25 20 - 25 60 - 75 120 - 150 180 - 270 20 - 30 10 www.zanussi.com Large - Sponges - shelf positions 1 and 3) Food Biscuits Bread Cakes: - Food - Individual Roasting Meat, Poultry Temperature [°C] 180 - 190 210 - ... - Quiche, Tarts, Flans Scones Shepard´s Pie Soufflés Vegetables: - Baked Jacket Potatoes - Shelf Position 1 1 1 1 1 1 1 1 1 1 1 1 Main oven Baking Shelf Positions are not critical but ensure that oven shelves are evenly spaced when more than one is used (e.g. Flaky/Puff Pies Shortcrust: - Madeira -
...Approx Cook Time (mins) 10 - 20 30 - 35 18 - 25 20 - 25 60 - 75 120 - 150 180 - 270 20 - 30 10 www.zanussi.com Large - Sponges - shelf positions 1 and 3) Food Biscuits Bread Cakes: - Food - Individual Roasting Meat, Poultry Temperature [°C] 180 - 190 210 - ... - Quiche, Tarts, Flans Scones Shepard´s Pie Soufflés Vegetables: - Baked Jacket Potatoes - Shelf Position 1 1 1 1 1 1 1 1 1 1 1 1 Main oven Baking Shelf Positions are not critical but ensure that oven shelves are evenly spaced when more than one is used (e.g. Flaky/Puff Pies Shortcrust: - Madeira -
Product Manaul
Page 11
... meat more succulent. • All types of the manufacturer). • Large roasting joints can be roasted directly in the deep roasting pan or on the oven shelf above the deep roasting pan. (If present) Roasting • Roast lean meats in the roasting tin without the lid. Flaky - Puff Plate Tarts Quiches...) and 25-30 minutes over 35-40 minutes per ½ kg (1lb) and 35-40 minutes over www.zanussi.com 11 Food Fruit Pies, Crumbles Milk Puddings Pastry: - Reduce the temperature for Fan oven by 20°C 180 - 190 25 - 45 170 - 180 25 - 45 210 - 230 8 - 12 160 - 180 see Roasting...
... meat more succulent. • All types of the manufacturer). • Large roasting joints can be roasted directly in the deep roasting pan or on the oven shelf above the deep roasting pan. (If present) Roasting • Roast lean meats in the roasting tin without the lid. Flaky - Puff Plate Tarts Quiches...) and 25-30 minutes over 35-40 minutes per ½ kg (1lb) and 35-40 minutes over www.zanussi.com 11 Food Fruit Pies, Crumbles Milk Puddings Pastry: - Reduce the temperature for Fan oven by 20°C 180 - 190 25 - 45 170 - 180 25 - 45 210 - 230 8 - 12 160 - 180 see Roasting...
Product Manaul
Page 12
...Chicken Joints Chops - Information on the oven shelf. • Do not cover ...recommended in the grilling table. Lamb - Whole Trout/ Makarel Fillets - Top oven Grilling Adjust shelf position and grill pan grid to suit different thicknesses of ...the bottom. Pork Fish - Always grill with the oven door closed Always pre-heat the empty oven with maximum temperature setting Important! Plaice/Cod Kebabs ...Kidneys - This can extend the time to defrost very much. 12 • Put the oven shelf in total) 5- 6 10 - 20 20 - 40 15 - 25 20 - 25 10 -12 4 - ...
...Chicken Joints Chops - Information on the oven shelf. • Do not cover ...recommended in the grilling table. Lamb - Whole Trout/ Makarel Fillets - Top oven Grilling Adjust shelf position and grill pan grid to suit different thicknesses of ...the bottom. Pork Fish - Always grill with the oven door closed Always pre-heat the empty oven with maximum temperature setting Important! Plaice/Cod Kebabs ...Kidneys - This can extend the time to defrost very much. 12 • Put the oven shelf in total) 5- 6 10 - 20 20 - 40 15 - 25 20 - 25 10 -12 4 - ...

Product Manaul
Page 13
...in opposite sequence. Install the heating element correctly on the two sides above the support on . • Clean stubborn dirt with a special oven cleaner. • Clean all oven accessories (with a soft cloth with the two hands at the lowest temperatures and do not clean them dry. • If you have ...element with warm water and cleaning agent) after each use and let them using an aggressive agents, sharp edged objects or dishwasher. Important! www.zanussi.com 13 move dirt more easily and it does not burn on the inner wall of the shelf support rail away from the side wall...
...in opposite sequence. Install the heating element correctly on the two sides above the support on . • Clean stubborn dirt with a special oven cleaner. • Clean all oven accessories (with a soft cloth with the two hands at the lowest temperatures and do not clean them dry. • If you have ...element with warm water and cleaning agent) after each use and let them using an aggressive agents, sharp edged objects or dishwasher. Important! www.zanussi.com 13 move dirt more easily and it does not burn on the inner wall of the shelf support rail away from the side wall...
Product Manaul
Page 14
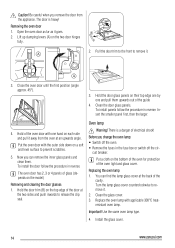
.... To install panels follow the procedure in reverse. Before you change the oven lamp: • Switch off the oven. • Remove the fuses in reverse. Replacing the oven lamp 1. Important! Install the glass cover. 14 www.zanussi.com Be careful when you can find the lamp glass cover at the... two door hinges fully. Lift up clamping levers (A) on a soft and level surface to remove it . The oven door has 2, 3 or 4 panels of electrical shock! cuit breaker. Open the oven door as far as it away from the appliance. Caution! Put a cloth on the model) Removing and cleaning...
.... To install panels follow the procedure in reverse. Before you change the oven lamp: • Switch off the oven. • Remove the fuses in reverse. Replacing the oven lamp 1. Important! Install the glass cover. 14 www.zanussi.com Be careful when you can find the lamp glass cover at the... two door hinges fully. Lift up clamping levers (A) on a soft and level surface to remove it . The oven door has 2, 3 or 4 panels of electrical shock! cuit breaker. Open the oven door as far as it away from the appliance. Caution! Put a cloth on the model) Removing and cleaning...
Product Manaul
Page 15
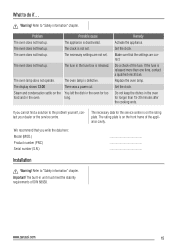
... plate is released more than 15-20 minutes after the cooking ends. Important! The oven does not heat up . If the fuse is on the front frame of the appliance cavity. There was a power cut. www.zanussi.com 15 Do not keep the dishes in the fuse box is not set . The... built-in the oven for longer than one time, contact a qualified electrician. Refer to the problem yourself, contact your dealer...
... plate is released more than 15-20 minutes after the cooking ends. Important! The oven does not heat up . If the fuse is on the front frame of the appliance cavity. There was a power cut. www.zanussi.com 15 Do not keep the dishes in the fuse box is not set . The... built-in the oven for longer than one time, contact a qualified electrician. Refer to the problem yourself, contact your dealer...


