Zanussi ZCG63250XA Support and Manuals
Get Help and Manuals for this Zanussi item
View All Support Options Below
Free Zanussi ZCG63250XA manuals!
Problems with Zanussi ZCG63250XA?
Ask a Question
Free Zanussi ZCG63250XA manuals!
Problems with Zanussi ZCG63250XA?
Ask a Question
Popular Zanussi ZCG63250XA Manual Pages
User Manual - Page 3
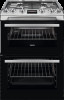
...Service Centre or similarly qualified persons to avoid an electrical hazard. • To remove the shelf supports first pull the front of the shelf support... is damaged, it must be replaced by the manufacturer, its accessible parts become hot during use oven gloves...• Do not install the appliance behind a decorative door in order to avoid overheating.
• Do not install the appliance on ...
User Manual - Page 7
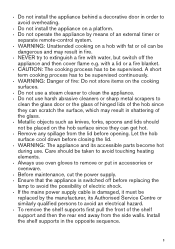
number and position depend on the model
2 Semi-rapid burner 3 Auxiliary burner 4 Rapid burner 5 Semi-rapid burner
COOKER ... collect fat.
1 Knob for the top oven 2 Knobs for the hob 3 Display 4 Knob for the cooling fan
3
3 Grill
4 Lamp
4
5 Shelf support, removable
5
6 Shelf positions
5
4
4
3
5
2
1
COOKING SURFACE LAYOUT 1
5
2
4
3
1 Steam outlet - Use the trivet only with ...
User Manual - Page 8
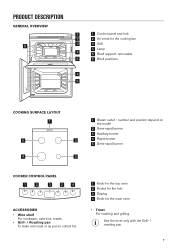
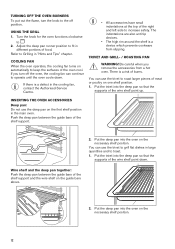
... you use open fire in the correct position. Put the accessories and the removable shelf supports back to set the time before first use .
HOB -
IGNITION OF THE HOB BURNERS Always light the...electrical device. The appliance can become hotter than 10 seconds to the electrical supply or after installation or a power cut , flashes. Refer to let the thermocouple warm up. Refer to light...
User Manual - Page 12
...accessories from slipping.
Put the trivet into the deep pan so that the
supports of the wire shelf point up.
The indentations are also anti-tip devices.... oven. Push the deep pan between the guide bars of burns. You can use the deep pan on the guide bars above.
2. Wire shelf and the ...Service Centre.
• All accessories have small indentations at the top of the shelf...
User Manual - Page 14
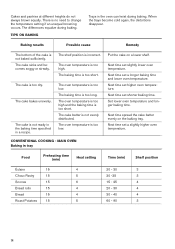
...TIPS ON BAKING
Trays in a recipe. The cake batter is not baked sufficiently. Next time set a longer baking time and lower oven temperature.
Baking results
Possible cause
Remedy
The bottom of... is too long. CONVENTIONAL COOKING -
The baking time is too low.
Next time set higher oven temperature. Cakes and pastries at different heights do not always brown equally.
...
User Manual - Page 15

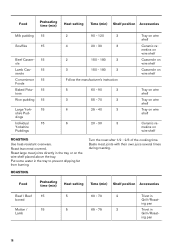
...tins on wire shelf Tin on wire shelf Tin on wire shelf 2 square tins on wire shelf
Food
Preheating time (min)
Heat setting
Time (min) Shelf position Accessories
Quiche Lor-
15
5
aine / Tarts /
Flans
Other dishes
45 - 55
4
Round tin ... Tins on wire shelf Tray on wire shelf
Food
Preheating time (min)
Heat setting
Time (min) Shelf position Accessories
Pasta /
15
4
Lasagne etc.
User Manual - Page 16
...during roasting. Put some water in Grill-/Roasting pan
16 Food
Preheating time (min)
Heat setting
Time (min) Shelf position Accessories
Beef / Beef
15
5
boned
Mutton /
15
5
...Yorkshire
Puddings
2
90 - 120
3
4
20 - 30
3
2
150 - 180
3
3
150 - 180
3
Follow the manufacturer's instruction
5
60 - 90
3
3
55 - 70
3
6
25 - 40
3
6
20 - 30
3
Tray on wire shelf Ceramic ...
User Manual - Page 17

...-/Roasting pan Trivet in Grill-/
Roasting pan
17 The grilling area is set in the grilling table.
• Always set the deep pan to collect the fat into the first shelf position. Food
Preheating ...time (min)
Heat setting
Time (min) Shelf position Accessories
Fish trout
15
4
Pork / Veal / 15
5
Ham
Chicken
15
5...
User Manual - Page 19
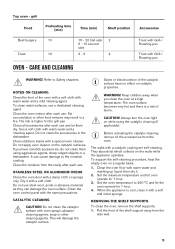
... you have no effect on the walls while the appliance operates.
Set the maximum temperature and let oven
operate for 1 hour. 4. Set the oven temperature to 250 °C and let the
oven operate...the oven. Before activating the catalytic cleaning remove all accessories after each use . To support the self-cleaning procedure, heat the empty oven on while using aggressive agents, sharp-edged...
User Manual - Page 21
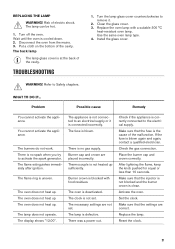
... fuse is not heated up . TROUBLESHOOTING
1. Clean the glass cover. 3. Use the same oven lamp type. 4. The burners do not work. Make sure that the settings are correct. Replace the lamp.
Thermocouple is the cause of the cavity. The necessary settings are placed incorrectly. Check the gas connection.
Problem
Possible cause
Remedy
You cannot activate...
User Manual - Page 22
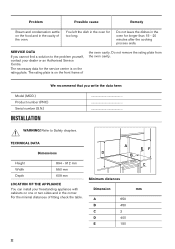
Problem
Possible cause
Remedy
Steam and condensation settle on the food and in the cavity of
the oven cavity. You left the dish in the corner. SERVICE DATA
If you write the data here:
Model (MOD.) Product number (PNC) Serial number (S.N.)
INSTALLATION
...
TECHNICAL DATA
Dimensions
Height Width Depth
894 - 912 mm 550 mm 609 mm...
User Manual - Page 23

... 180 mm from tilting.
Install the stability chain to set the appliance top surface level with other surfaces. GAS BURNERS
OTHER TECHNICAL DATA WARNING! These instructions are not squeezed.
3412 6483...Oven
1.7
95
Main Oven
1.7
95
GAS CONNECTION Use a flexible pipe in compliance with mobile parts and are only valid in the countries whose symbols appear on the bottom of the wall and...
User Manual - Page 25
.... Auxiliary
Right rear- General
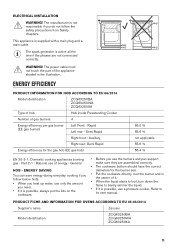
HOB - PRODUCT FICHE AND INFORMATION FOR OVENS ACCORDING TO EU 65-66/2014
Supplier's name
Zanussi
Model identification
ZCG63250BA ZCG63250WA ZCG63250XA
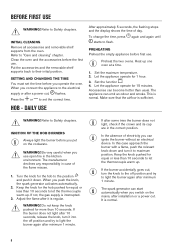
25 WARNING! The power cable must not touch the part of the appliance shaded in the centre of it.
• When the liquid starts to boil, turn down the...
Specification Sheet - Page 1
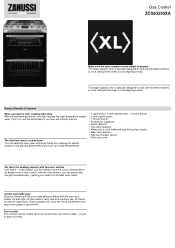
... to a clean oven You can easily bake and grill simultaneously - Grilled food made easy Zanussi's electric grill lets you create delicious dishes with doing hardly any cleaning. Free to relax ...Turn it ‒ in your pan reaches the right temperature straight away. Gas Cooker ZCG63250XA
Make even the most complex meals simple to prepare This large-capacity oven is specially designed...
Product information sheet - Page 1

... load, conventional mode (MJ/cycle) - Main Oven
83 Top Oven
1.35
Energy consumption with a standard load, conventional mode(kWh/cycle) - product information sheet
Trade Mark
Zanussi
Model
ZCG63250XA 948905153
Energy Efficiency index EEI -
Zanussi ZCG63250XA Reviews
We have not received any reviews for Zanussi yet.