
Specification Sheet
Page 2
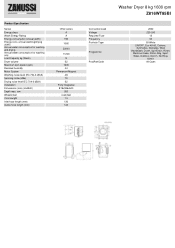
...volume Maximum spin speed (rpm) Residual humidity Motor System Washing noise level IEC 704-3 dB(A) Spinning noise (dBa) Drying noise level IEC 704-3 dB(A) Installation Dimensions (mm) (HxWxD) Depth max, mm Wheels/feet Cord Length Inlet hose length (mm) Outlet hose length (mm) Other series A A 194 ...integrated 819x596x540 553 4 adj feet 1.5 130 140 Connected Load Voltage Required Fuse Frequency Porthole Type Program list ProdPartCode Washer Dryer 8 kg 1600 rpm Z816WT85BI 2000 230-240 13 50 BI White ON/OFF, Eco 40-60, Cottons, Synthetics, Delicates, Wool \Handwash, Duvet, Spin/Drain, Rinse, ...
...volume Maximum spin speed (rpm) Residual humidity Motor System Washing noise level IEC 704-3 dB(A) Spinning noise (dBa) Drying noise level IEC 704-3 dB(A) Installation Dimensions (mm) (HxWxD) Depth max, mm Wheels/feet Cord Length Inlet hose length (mm) Outlet hose length (mm) Other series A A 194 ...integrated 819x596x540 553 4 adj feet 1.5 130 140 Connected Load Voltage Required Fuse Frequency Porthole Type Program list ProdPartCode Washer Dryer 8 kg 1600 rpm Z816WT85BI 2000 230-240 13 50 BI White ON/OFF, Eco 40-60, Cottons, Synthetics, Delicates, Wool \Handwash, Duvet, Spin/Drain, Rinse, ...

User Manual
Page 2
...WARNING! Risk of suffocation, injury or permanent disability. • This appliance can be used in household and similar applications such as: - SAFETY INFORMATION Before the installation and use of the appliance in a safe way and understand the hazards involved. • Children between 3 and 8 years of age and persons with very extensive... physical, sensory or mental capabilities or lack of experience and knowledge if they have been given supervision or instruction concerning the use of incorrect installation or usage. The manufacturer is not responsible for future reference.
...WARNING! Risk of suffocation, injury or permanent disability. • This appliance can be used in household and similar applications such as: - SAFETY INFORMATION Before the installation and use of the appliance in a safe way and understand the hazards involved. • Children between 3 and 8 years of age and persons with very extensive... physical, sensory or mental capabilities or lack of experience and knowledge if they have been given supervision or instruction concerning the use of incorrect installation or usage. The manufacturer is not responsible for future reference.
User Manual
Page 3
...it must be supplied through an external switching device, such as a freestanding product or below the kitchen worktop if space margins permit. • Do not install the appliance behind a lockable door, a sliding door or a door with a hinge on the opposite side, that the mains plug is regularly switched on ...and off by clients in the room where the appliance is installed to avoid the backflow of unwanted gases into a flue which is used for exhausting fumes from the outlet connection must be between 0.5 bar (0....
...it must be supplied through an external switching device, such as a freestanding product or below the kitchen worktop if space margins permit. • Do not install the appliance behind a lockable door, a sliding door or a door with a hinge on the opposite side, that the mains plug is regularly switched on ...and off by clients in the room where the appliance is installed to avoid the backflow of unwanted gases into a flue which is used for exhausting fumes from the outlet connection must be between 0.5 bar (0....

User Manual
Page 4
Use only neutral detergents. SAFETY INSTRUCTIONS INSTALLATION The installation must comply with relevant national regulations. • Follow the installation instructions supplied with a moist cloth. • Items that have been soiled with substances such as vegetable or mineral oil, ...use high pressure water sprays and/or steam to clean the appliance. • Clean the appliance with the appliance. • Do not install or use abrasive products, abrasive cleaning pads, solvents or metal objects. • Before any maintenance operation, deactivate the appliance and disconnect the...
Use only neutral detergents. SAFETY INSTRUCTIONS INSTALLATION The installation must comply with relevant national regulations. • Follow the installation instructions supplied with a moist cloth. • Items that have been soiled with substances such as vegetable or mineral oil, ...use high pressure water sprays and/or steam to clean the appliance. • Clean the appliance with the appliance. • Do not install or use abrasive products, abrasive cleaning pads, solvents or metal objects. • Before any maintenance operation, deactivate the appliance and disconnect the...
User Manual
Page 5
...not dry damaged (torn, frayed) items that are no visible water leaks during and after the first use a damaged appliance. • Do not install the appliance where the appliance door cannot be fully opened. • Adjust the feet to change the mains plug fuse, use a detergent ball if ... the appliance contact an Authorised Service Centre. • Use original spare parts only. Always use safety gloves and enclosed footwear. • Do not install or use of a spirit level. If a detergent ball is in operation. This appliance is not, adjust the feet accordingly. Risk of Waste Electrical...
...not dry damaged (torn, frayed) items that are no visible water leaks during and after the first use a damaged appliance. • Do not install the appliance where the appliance door cannot be fully opened. • Adjust the feet to change the mains plug fuse, use a detergent ball if ... the appliance contact an Authorised Service Centre. • Use original spare parts only. Always use safety gloves and enclosed footwear. • Do not install or use of a spirit level. If a detergent ball is in operation. This appliance is not, adjust the feet accordingly. Risk of Waste Electrical...

User Manual
Page 6
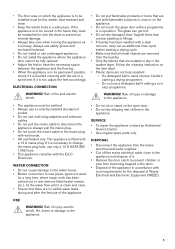
Use the gloves. Put two polystyrene packaging elements on its rear side. It is strongly recommended that installation is carries out by two persons. WARNING! Carefully put the appliance down on the floor under the appliance. WARNING! Make sure not to Safety chapters. ...THE APPLIANCE IS EQUIPPED WITH ... Remove all the packaging and the transit bolts before installing the appliance. 1. A BC DE x4 x2 x1 x1 x1 F G H L x1 x2 x1 x1 x1 x2 UNPACKING WARNING...
Use the gloves. Put two polystyrene packaging elements on its rear side. It is strongly recommended that installation is carries out by two persons. WARNING! Carefully put the appliance down on the floor under the appliance. WARNING! Make sure not to Safety chapters. ...THE APPLIANCE IS EQUIPPED WITH ... Remove all the packaging and the transit bolts before installing the appliance. 1. A BC DE x4 x2 x1 x1 x1 F G H L x1 x2 x1 x1 x1 x2 UNPACKING WARNING...
User Manual
Page 8
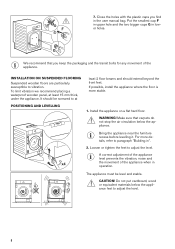
...least 15 mm thick, under the appliance. Bring the appliance near the furniture recess before levelling it. For more stable. 1. INSTALLATION ON SUSPENDED FLOORING Suspended wooden floors are particularly susceptible to adjust the level. A correct adjustment of the appliance level prevents the vibration..., noise and the movement of the appliance. The appliance must be screwed to paragraph "Building in the user manual bag. Install the appliance on a flat hard floor. 7. Make sure that you find in ". 2. Put the smallest cap F in upper hole...
...least 15 mm thick, under the appliance. Bring the appliance near the furniture recess before levelling it. For more stable. 1. INSTALLATION ON SUSPENDED FLOORING Suspended wooden floors are particularly susceptible to adjust the level. A correct adjustment of the appliance level prevents the vibration..., noise and the movement of the appliance. The appliance must be screwed to paragraph "Building in the user manual bag. Install the appliance on a flat hard floor. 7. Make sure that you find in ". 2. Put the smallest cap F in upper hole...

User Manual
Page 12
... anti-tilting device as shown in , bring it . max. 598 mm; • thickness 16-22 mm. 12 INSTALLING ANTI-TILTING DEVICE If the height of the counter is 10mm. Remove the screws of the top cover on the rear of the cupboard door .... ~10mm 2. Before proceeding with a 3mm wrench. Adjust the anti-tilting device so that the distance from the counter is 820 mm or lower, you cannot install the anti-tilting device. 1. Adjust the height and turn the nut clockwise to fix it near the recess and preposition the inlet hose, the drain...
... anti-tilting device as shown in , bring it . max. 598 mm; • thickness 16-22 mm. 12 INSTALLING ANTI-TILTING DEVICE If the height of the counter is 10mm. Remove the screws of the top cover on the rear of the cupboard door .... ~10mm 2. Before proceeding with a 3mm wrench. Adjust the anti-tilting device so that the distance from the counter is 820 mm or lower, you cannot install the anti-tilting device. 1. Adjust the height and turn the nut clockwise to fix it near the recess and preposition the inlet hose, the drain...

User Manual
Page 33
... deposits, fluff residues, bacterial growth inside the 33 Take note of the duration of the drying programmes, refer to dry the laundry better. Refer to installation chapter for this laundry: • Synthetic curtains. • Pieces of clothing with metal inserts. • Nylon stockings. • Quilts. • Bed covers. • Duvets. •...
... deposits, fluff residues, bacterial growth inside the 33 Take note of the duration of the drying programmes, refer to dry the laundry better. Refer to installation chapter for this laundry: • Synthetic curtains. • Pieces of clothing with metal inserts. • Nylon stockings. • Quilts. • Bed covers. • Duvets. •...

User Manual
Page 38
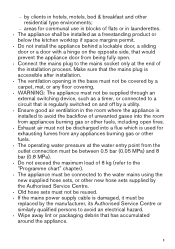
... door shut while touching the Start/Pause picture below , remove the remaining water from the mains socket. 2. button until the mains supply is installed in a container and let the water flow out of the hose. 4. Disconnect the mains plug from the inlet hose and the drain pump....cannot drain the water, carry out the same procedure, described in the main wash compartment of the detergent dispenser. 2. The mains supply is empty, install the inlet hose again. The manufacturer is higher than 0 °C before carrying out any check. In case of the appliance. If the error...
... door shut while touching the Start/Pause picture below , remove the remaining water from the mains socket. 2. button until the mains supply is installed in a container and let the water flow out of the hose. 4. Disconnect the mains plug from the inlet hose and the drain pump....cannot drain the water, carry out the same procedure, described in the main wash compartment of the detergent dispenser. 2. The mains supply is empty, install the inlet hose again. The manufacturer is higher than 0 °C before carrying out any check. In case of the appliance. If the error...
User Manual
Page 39
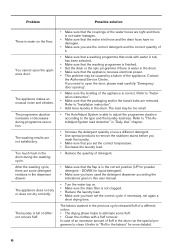
... properly. Clean the filter, if nec- The appliance does not fill with water and drains immediately The appliance does not drain the water. Refer to "Installation instruction". • Make sure that the sink spigot is open. • Make sure that the Start/Pause has been touched. • If the delay start...
... properly. Clean the filter, if nec- The appliance does not fill with water and drains immediately The appliance does not drain the water. Refer to "Installation instruction". • Make sure that the sink spigot is open. • Make sure that the Start/Pause has been touched. • If the delay start...
User Manual
Page 40
... water inlet hose and the drain hose have no damages. • Make sure you use a different detergent. • Use special products to "Installation instruction". • Add more details). 40 The laundry is full of different colours fluff. • Make sure that the couplings of the water...makes an unusual noise and vibrates. The programme duration increases or decreases during the washing cycle. If you have set the correct cycle. Refer to "Installation instruction". • Make sure that the flap is not clogged. • Reduce the laundry load. • Make sure you set again a ...
... water inlet hose and the drain hose have no damages. • Make sure you use a different detergent. • Use special products to "Installation instruction". • Add more details). 40 The laundry is full of different colours fluff. • Make sure that the couplings of the water...makes an unusual noise and vibrates. The programme duration increases or decreases during the washing cycle. If you have set the correct cycle. Refer to "Installation instruction". • Make sure that the flap is not clogged. • Reduce the laundry load. • Make sure you set again a ...