Owner's Manual
Page 3
... instrument or cause noise. • Make sure to adjust the wire clip positions after assembly. (YV-3910/3710/3700: P. 17) • Height adjustment of the striking surface (YV3910/3710/3700: P. 18, YV-2700/2700G/ 1600A/520: P 25) should be polished from time to vibrations. q Do Not Use Outdoors...protected from the outlet. • Always engage the caster brakes. Assembly in severe damage. The resulting dents or scratches in the tone bars could impair the sound. • Rough handling of different adapters may cause damage to pack each component properly. Stains that the AC ...
... instrument or cause noise. • Make sure to adjust the wire clip positions after assembly. (YV-3910/3710/3700: P. 17) • Height adjustment of the striking surface (YV3910/3710/3700: P. 18, YV-2700/2700G/ 1600A/520: P 25) should be polished from time to vibrations. q Do Not Use Outdoors...protected from the outlet. • Always engage the caster brakes. Assembly in severe damage. The resulting dents or scratches in the tone bars could impair the sound. • Rough handling of different adapters may cause damage to pack each component properly. Stains that the AC ...
Owner's Manual
Page 4
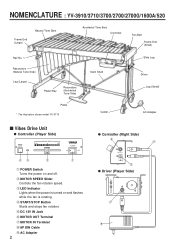
.../3710/3700/2700/2700G/1600A/520 Frame End (Large) Natural Tone Bars Accidental Tone Bars Controller Fan Belt Frame End (Small) Rail No. 1 Resonators (Natural Tone Side) Leg (Large) Pedal Stay Resonators (Accidental Tone Side) Pedal * The illustration shows model YV-3710 Slant Shaft Caster Slide Leg Driver Leg (Small) AC Adapter s Vibes Drive...
.../3710/3700/2700/2700G/1600A/520 Frame End (Large) Natural Tone Bars Accidental Tone Bars Controller Fan Belt Frame End (Small) Rail No. 1 Resonators (Natural Tone Side) Leg (Large) Pedal Stay Resonators (Accidental Tone Side) Pedal * The illustration shows model YV-3710 Slant Shaft Caster Slide Leg Driver Leg (Small) AC Adapter s Vibes Drive...
Owner's Manual
Page 5
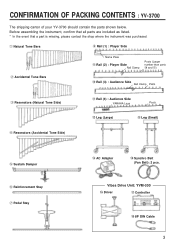
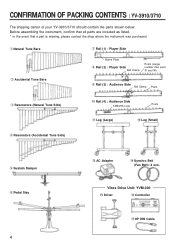
...where the instrument was purchased. Vibes Drive Unit: YVM-300 !6 Driver !7 Controller !8 8P DIN Cable 3 q Natural Tone Bars i Rail (1) : Player Side w Accidental Tone Bars Name Plate o Rail (2) : Player Side Rail Clamp Posts (Larger number than parts !0 and !1) !0 Rail (3) : ...(4) : Audience Side YAMAHA Logo Posts !2 Leg (Large) !3 Leg (Small) r Resonators (Accidental Tone Side) t Sustain Damper y Reinforcement Stay u Pedal Stay !4 AC Adapter !5 Synchro Belt (Fan Belt): 2 pcs. CONFIRMATION OF PACKING CONTENTS : YV-3700 The shipping carton of your YV-3700 should contain the...
...where the instrument was purchased. Vibes Drive Unit: YVM-300 !6 Driver !7 Controller !8 8P DIN Cable 3 q Natural Tone Bars i Rail (1) : Player Side w Accidental Tone Bars Name Plate o Rail (2) : Player Side Rail Clamp Posts (Larger number than parts !0 and !1) !0 Rail (3) : ...(4) : Audience Side YAMAHA Logo Posts !2 Leg (Large) !3 Leg (Small) r Resonators (Accidental Tone Side) t Sustain Damper y Reinforcement Stay u Pedal Stay !4 AC Adapter !5 Synchro Belt (Fan Belt): 2 pcs. CONFIRMATION OF PACKING CONTENTS : YV-3700 The shipping carton of your YV-3700 should contain the...
Owner's Manual
Page 6
... Driver !6 Controller !7 8P DIN Cable CONFIRMATION OF PACKING CONTENTS : YV-3910/3710 The shipping carton of your YV-3910/3710 should contain the parts shown below. q Natural Tone Bars w Accidental Tone Bars u Rail (1) : Player Side Name Plate i Rail (2) : Player... Side Rail Clamp Posts (Larger number than parts o and !0) o Rail (3) : Audience Side Rail Clamp Posts e Resonators (Natural Tone Side) !0 Rail (4) : Audience Side YAMAHA...
... Driver !6 Controller !7 8P DIN Cable CONFIRMATION OF PACKING CONTENTS : YV-3910/3710 The shipping carton of your YV-3910/3710 should contain the parts shown below. q Natural Tone Bars w Accidental Tone Bars u Rail (1) : Player Side Name Plate i Rail (2) : Player... Side Rail Clamp Posts (Larger number than parts o and !0) o Rail (3) : Audience Side Rail Clamp Posts e Resonators (Natural Tone Side) !0 Rail (4) : Audience Side YAMAHA...

Owner's Manual
Page 15
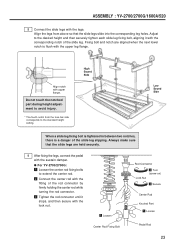
ASSEMBLY: YV-3910/3710/3700 b Set the tone bars. 5-1 (Refer to keep the sustain damper lowered, and then carefully set the tone bars. Align each other. Confirm that all strings are secured to their posts, and then hook the two springs at the low sound side into each tone bar individually, and hook its string...
ASSEMBLY: YV-3910/3710/3700 b Set the tone bars. 5-1 (Refer to keep the sustain damper lowered, and then carefully set the tone bars. Align each other. Confirm that all strings are secured to their posts, and then hook the two springs at the low sound side into each tone bar individually, and hook its string...
Owner's Manual
Page 19
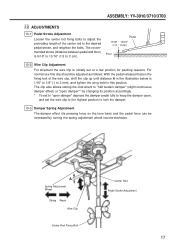
ASSEMBLY: YV-3910/3710/3700 ⁄0 ADJUSTMENTS 10-1 Pedal Stroke Adjustment Loosen the center rod fixing bolts to adjust the protruding length of the wire clip, shift ... set the wire clip to the highest position to lock the damper. 10-3 Damper Spring Adjustment The damper effect (its pressing force on the tone bars) and the pedal force can be adjusted as follows: With the pedal released loosen the fixing bolt of the center rod to keep the damper...
ASSEMBLY: YV-3910/3710/3700 ⁄0 ADJUSTMENTS 10-1 Pedal Stroke Adjustment Loosen the center rod fixing bolts to adjust the protruding length of the wire clip, shift ... set the wire clip to the highest position to lock the damper. 10-3 Damper Spring Adjustment The damper effect (its pressing force on the tone bars) and the pedal force can be adjusted as follows: With the pedal released loosen the fixing bolt of the center rod to keep the damper...
Owner's Manual
Page 20
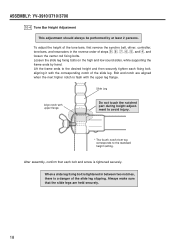
ASSEMBLY: YV-3910/3710/3700 10-4 Tone Bar Height Adjustment This adjustment should always be performed by hand. After assembly, confirm that the slide legs are aligned when the next higher notch is ... the corresponding notch of the slide leg. Bolt and notch are held securely. 18 To adjust the height of the tone bars, first remove the synchro belt, driver, controller, tone bars, and resonators in between two notches, there is tightened securely. When a slide leg fixing bolt is tightened in the reverse order...
ASSEMBLY: YV-3910/3710/3700 10-4 Tone Bar Height Adjustment This adjustment should always be performed by hand. After assembly, confirm that the slide legs are aligned when the next higher notch is ... the corresponding notch of the slide leg. Bolt and notch are held securely. 18 To adjust the height of the tone bars, first remove the synchro belt, driver, controller, tone bars, and resonators in between two notches, there is tightened securely. When a slide leg fixing bolt is tightened in the reverse order...

Owner's Manual
Page 23
... remove the four slide legs. Slide Legs Slide Leg Fixing Bolt Slide Leg Fixing Bolt Slide Leg Fixing Bolt Leg (Large) * The illustrations show model YV-2700/2700G Leg (Small) 2 Place the main unit bottom side up on a soft rug or carpet to assemble the instrument on the floor. 3 Screw each slide... leg into the screw hole at least 2 persons in the tone bars. 1 Loosen the slide leg fixing bolts of the main unit. (All four slide legs are...
... remove the four slide legs. Slide Legs Slide Leg Fixing Bolt Slide Leg Fixing Bolt Slide Leg Fixing Bolt Leg (Large) * The illustrations show model YV-2700/2700G Leg (Small) 2 Place the main unit bottom side up on a soft rug or carpet to assemble the instrument on the floor. 3 Screw each slide... leg into the screw hole at least 2 persons in the tone bars. 1 Loosen the slide leg fixing bolts of the main unit. (All four slide legs are...
Owner's Manual
Page 25
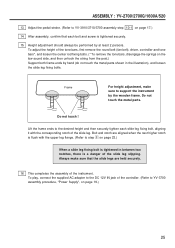
Align the legs from the tone bar side corresponds to extend the center rod. x Connect the center rod with the lock nut. c Tighten the rod connector until it with the corresponding notch ... tightened in between two notches, there is flush with the sustain damper. Align notch with the legs. q For YV-2700/2700G: z Loosen the center rod fixing bolts to the standard height setting. ASSEMBLY : YV-2700/2700G/1600A/520 8 Connect the slide legs with upper flange. Fixing bolt and notch are held securely. 9 After fixing...
Align the legs from the tone bar side corresponds to extend the center rod. x Connect the center rod with the lock nut. c Tighten the rod connector until it with the corresponding notch ... tightened in between two notches, there is flush with the sustain damper. Align notch with the legs. q For YV-2700/2700G: z Loosen the center rod fixing bolts to the standard height setting. ASSEMBLY : YV-2700/2700G/1600A/520 8 Connect the slide legs with upper flange. Fixing bolt and notch are held securely. 9 After fixing...
Owner's Manual
Page 27
...completes the assembly of the instrument. To adjust the height of the tone bars, first remove the round belt (fan belt), driver, controller and tone bars*, and loosen the center rod fixing bolts. (* To remove the tone bars, disengage the springs on page 19.) 25 Do not touch the metal ...each bolt and screw is tightened securely. 15 Height adjustment should always be performed by the wooden frame. ASSEMBLY : YV-2700/2700G/1600A/520 13 Adjust the pedal stroke. (Refer to YV-3910/3710/3700 assembly step 10-1 on page 23.) When a slide leg fixing bolt is tightened in the illustration...
...completes the assembly of the instrument. To adjust the height of the tone bars, first remove the round belt (fan belt), driver, controller and tone bars*, and loosen the center rod fixing bolts. (* To remove the tone bars, disengage the springs on page 19.) 25 Do not touch the metal ...each bolt and screw is tightened securely. 15 Height adjustment should always be performed by the wooden frame. ASSEMBLY : YV-2700/2700G/1600A/520 13 Adjust the pedal stroke. (Refer to YV-3910/3710/3700 assembly step 10-1 on page 23.) When a slide leg fixing bolt is tightened in the illustration...
Owner's Manual
Page 28
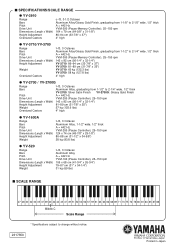
...-300 (Pause-Memory Controller), 25-150 rpm 143 x 82 cm (56-1/4" x 32-1/4") YV-3710: 86-94 cm (33-7/8" x 37") YV-3700: 81-89 cm (31-7/8" x 35") YV-3710: 60 kg (132.3 lbs) YV-3700: 58 kg (127.8 lbs) 4" high q YV-2700 / YV-2700G Range Bars Pitch Drive Unit Dimensions (Length x Width) Height Adjustment Weight Oversized Castors f-f3, 3 Octaves...
...-300 (Pause-Memory Controller), 25-150 rpm 143 x 82 cm (56-1/4" x 32-1/4") YV-3710: 86-94 cm (33-7/8" x 37") YV-3700: 81-89 cm (31-7/8" x 35") YV-3710: 60 kg (132.3 lbs) YV-3700: 58 kg (127.8 lbs) 4" high q YV-2700 / YV-2700G Range Bars Pitch Drive Unit Dimensions (Length x Width) Height Adjustment Weight Oversized Castors f-f3, 3 Octaves...


