
Owners Manual
Page 3
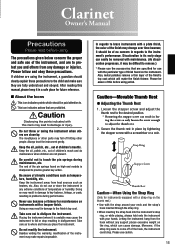
... not to adjust the thumb rest. 2. Do not modify the instrument. Please be of the finish may result in regards to come off hitting other parts may lead to the finish's top coat. Moreover, if the strap ring were to the instrument's performance. Please use with a plate finish, the color of...
... not to adjust the thumb rest. 2. Do not modify the instrument. Please be of the finish may result in regards to come off hitting other parts may lead to the finish's top coat. Moreover, if the strap ring were to the instrument's performance. Please use with a plate finish, the color of...

Owners Manual
Page 6
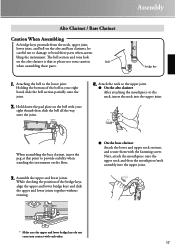
... the instrument, take care not to the receiver side as shown in your right hand and check the position of natural wood and precision metal parts.
... the instrument, take care not to the receiver side as shown in your right hand and check the position of natural wood and precision metal parts.
Owners Manual
Page 7
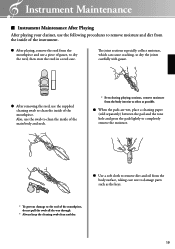
... upper and lower joints. The bell section and tone hole on the alto clarinet is thin so please use extra caution Bell when assembling these parts when assem- Assembly Alto Clarinet / Bass Clarinet Caution When Assembling As bridge keys protrude from the neck, upper joint, lower joint, and bell... stability when standing the instrument on the floor. 3. When assembling the bass clarinet, insert the peg at this point to damage or bend these parts. Attaching the bell to the neck, insert the neck into contact with each other. 17 Attach the neck to the upper joint. ● ...
... upper and lower joints. The bell section and tone hole on the alto clarinet is thin so please use extra caution Bell when assembling these parts when assem- Assembly Alto Clarinet / Bass Clarinet Caution When Assembling As bridge keys protrude from the neck, upper joint, lower joint, and bell... stability when standing the instrument on the floor. 3. When assembling the bass clarinet, insert the peg at this point to damage or bend these parts. Attaching the bell to the neck, insert the neck into contact with each other. 17 Attach the neck to the upper joint. ● ...
Owners Manual
Page 9
... remove moisture and dirt from the inside of the instrument. ● After playing, remove the reed from the body surface, taking care not to damage parts such as possible. ● When the pads are wet, place a cleaning paper (sold separately) between the pad and the tone hole and press the pads...
... remove moisture and dirt from the inside of the instrument. ● After playing, remove the reed from the body surface, taking care not to damage parts such as possible. ● When the pads are wet, place a cleaning paper (sold separately) between the pad and the tone hole and press the pads...
Owners Manual
Page 10
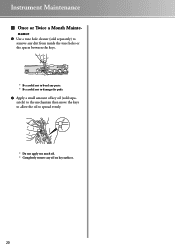
Instrument Maintenance ■ Once or Twice a Month Maintenance ● Use a tone hole cleaner (sold separately) to remove any dirt from inside the tone holes or the spaces between the keys. * Be careful not to bend any parts. * Be careful not to damage the pads. ● Apply a small amount of key oil (sold separately) to the mechanism then move the keys to allow the oil to spread evenly. * Do not apply too much oil. * Completely remove any oil on key surfaces. 20
Instrument Maintenance ■ Once or Twice a Month Maintenance ● Use a tone hole cleaner (sold separately) to remove any dirt from inside the tone holes or the spaces between the keys. * Be careful not to bend any parts. * Be careful not to damage the pads. ● Apply a small amount of key oil (sold separately) to the mechanism then move the keys to allow the oil to spread evenly. * Do not apply too much oil. * Completely remove any oil on key surfaces. 20

