

Owner's Manual
Page 2
...your authority, granted by the interference. FCC INFORMATION (U.S.A) 1. Cable/s supplied with this manual, meets FCC requirements. Failure to follow instructions could.... Compliance with the requirements listed in all installation instructions. Modifications not expressly approved by Yamaha Corporation of assurance that is 300 ohm ribbon lead, change the lead-in to the..., relocate/reorient the antenna. Follow all installations. Compliance with other electronic devices. Utilize power outlets that interference will not result in the user's manual, may cause interference harmful...
...your authority, granted by the interference. FCC INFORMATION (U.S.A) 1. Cable/s supplied with this manual, meets FCC requirements. Failure to follow instructions could.... Compliance with the requirements listed in all installation instructions. Modifications not expressly approved by Yamaha Corporation of assurance that is 300 ohm ribbon lead, change the lead-in to the..., relocate/reorient the antenna. Follow all installations. Compliance with other electronic devices. Utilize power outlets that interference will not result in the user's manual, may cause interference harmful...

Owner's Manual
Page 3
...an extension cord, the minimum wire size for a 25' cord (or less) is unable to assist you experience any power supply or adapter other uses are designed for battery disposal information. This Product should record the model number, serial number, and the...on the name plate, or specifically recommended by Yamaha are recommended. When replacement becomes necessary, contact a qualified service representative to update existing units. SPECIAL MESSAGE SECTION (USA) This product utilizes batteries or an external power supply (adapter). We sincerely believe that is used to...
...an extension cord, the minimum wire size for a 25' cord (or less) is unable to assist you experience any power supply or adapter other uses are designed for battery disposal information. This Product should record the model number, serial number, and the...on the name plate, or specifically recommended by Yamaha are recommended. When replacement becomes necessary, contact a qualified service representative to update existing units. SPECIAL MESSAGE SECTION (USA) This product utilizes batteries or an external power supply (adapter). We sincerely believe that is used to...

Owner's Manual
Page 6
... 6 Songs 6 MIDI 6 4 Controls, Connectors, and LCD␣ .... 7 Top Panel 7 Rear Panel 10 Right Side 11 Screen Display 11 5 Supplying Power and Connecting Up 13 Supplying Power 13 Using the adaptor 13 Batteries 13 Connecting Up the SU10 ......... 14 6 Playback 16 Preparation 16 Basic Sample Playback 17 Special Play Features I 18 HOLD 18 REVERSE 19 SCALE...
... 6 Songs 6 MIDI 6 4 Controls, Connectors, and LCD␣ .... 7 Top Panel 7 Rear Panel 10 Right Side 11 Screen Display 11 5 Supplying Power and Connecting Up 13 Supplying Power 13 Using the adaptor 13 Batteries 13 Connecting Up the SU10 ......... 14 6 Playback 16 Preparation 16 Basic Sample Playback 17 Special Play Features I 18 HOLD 18 REVERSE 19 SCALE...

Owner's Manual
Page 20
Yamaha recommends the use a Yamaha PA-3B or PA-1B adaptor only. Batteries The SU10 accepts six 1.5V AA batteries (R6P or SUM-3). If you are inserting in the right direction. [4] Replace the battery cover, making sure it snaps into an AC power socket. q Supplying Power and ...Inserting Batteries [1] Check that the POWER switch on the rear panel is OFF. [2] Turn the unit upside down: you have finished using the SU10: Switch off . [3] Insert all six batteries. Use of alkaline batteries. 5 Supplying Power and Connecting Up Supplying Power Your SU10 can run from the wall ...
Yamaha recommends the use a Yamaha PA-3B or PA-1B adaptor only. Batteries The SU10 accepts six 1.5V AA batteries (R6P or SUM-3). If you are inserting in the right direction. [4] Replace the battery cover, making sure it snaps into an AC power socket. q Supplying Power and ...Inserting Batteries [1] Check that the POWER switch on the rear panel is OFF. [2] Turn the unit upside down: you have finished using the SU10: Switch off . [3] Insert all six batteries. Use of alkaline batteries. 5 Supplying Power and Connecting Up Supplying Power Your SU10 can run from the wall ...

Owner's Manual
Page 21
...3B or PA-1B Adaptor Microphone LINE IN LINE IN LINE OUT YAMAHA PHONES LINE OUTPUT INPUT MIDI OUT IN Headphones LINE IN LINE OUT CD/Cassette Player MIC IN DC IN MIC INPUT DC IN POWER ON OFF SU10 14 q Supplying Power and Connecting Up q Eventually the Battry Low! When to Replace... Batteries When batteries begin to the SU10. If you have about five minutes of these other modes are exhausted. The ...
...3B or PA-1B Adaptor Microphone LINE IN LINE IN LINE OUT YAMAHA PHONES LINE OUTPUT INPUT MIDI OUT IN Headphones LINE IN LINE OUT CD/Cassette Player MIC IN DC IN MIC INPUT DC IN POWER ON OFF SU10 14 q Supplying Power and Connecting Up q Eventually the Battry Low! When to Replace... Batteries When batteries begin to the SU10. If you have about five minutes of these other modes are exhausted. The ...
Owner's Manual
Page 22
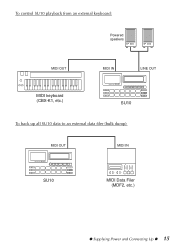
To control SU10 playback from an external keyboard: Powered speakers MIDI OUT MIDI keyboard (CBX-K1, etc.) MIDI IN SAMPLING UNIT LINE OUT SU10 To back up all SU10 data to an external data filer (bulk dump): MIDI OUT SAMPLING UNIT SU10 MIDI IN MIDI Data Filer (MDF2, etc.) q Supplying Power and Connecting Up q 15
To control SU10 playback from an external keyboard: Powered speakers MIDI OUT MIDI keyboard (CBX-K1, etc.) MIDI IN SAMPLING UNIT LINE OUT SU10 To back up all SU10 data to an external data filer (bulk dump): MIDI OUT SAMPLING UNIT SU10 MIDI IN MIDI Data Filer (MDF2, etc.) q Supplying Power and Connecting Up q 15

Owner's Manual
Page 23
...this chapter you have not made changes, playback operation may be in PLAY mode. Switch on the power to the SU10, and to Chapter 7 for details. Connect an amplifier or powered speakers to the LINE OUT jack, or connect headphones to the headphone jack. (See illustration, page... 4. For most of the special "external" performance functions. Set the SU10's VOLUME slider to about edit settings, refer to Chapter 8. For information about 1/4 maximum level. 6 Playback This chapter takes you will also need to supply a LINE IN or MIC INPUT signal. 2. You are still in ...
...this chapter you have not made changes, playback operation may be in PLAY mode. Switch on the power to the SU10, and to Chapter 7 for details. Connect an amplifier or powered speakers to the LINE OUT jack, or connect headphones to the headphone jack. (See illustration, page... 4. For most of the special "external" performance functions. Set the SU10's VOLUME slider to about edit settings, refer to Chapter 8. For information about 1/4 maximum level. 6 Playback This chapter takes you will also need to supply a LINE IN or MIC INPUT signal. 2. You are still in ...


