Installation Guide
Page 2
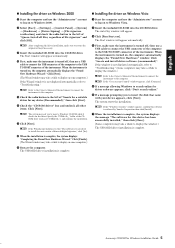
...instructions. CAUTION This CD-ROM containing the software is not meant for Windows operating systems. CD-ROM Installation Procedure 1 Check the system requirements to use with an audio/visual system (CD player, DVD player, etc.). Please refer to the "Troubleshooting" on your computer. Do not attempt to make...to the online manuals of Windows Vista will run on page 7. If you have Adobe Reader, you do not have any problems in versions for use the disk on your computer (page 3). 2 Insert the included CD-ROM into the CD-ROM drive. 2 English Important Notices about the CD...
...instructions. CAUTION This CD-ROM containing the software is not meant for Windows operating systems. CD-ROM Installation Procedure 1 Check the system requirements to use with an audio/visual system (CD player, DVD player, etc.). Please refer to the "Troubleshooting" on your computer. Do not attempt to make...to the online manuals of Windows Vista will run on page 7. If you have Adobe Reader, you do not have any problems in versions for use the disk on your computer (page 3). 2 Insert the included CD-ROM into the CD-ROM drive. 2 English Important Notices about the CD...
Installation Guide
Page 3
... designed especially for your music to the next level. Utilizing a connection between the instrument and the computer. (Available at Yamaha website.) Internet services can be played back via a USB connection. Musicsoft Downloader can be downloaded from the screens which can...-related information. (Available at Yamaha website.) Allows conversion of conventional XG/GM song data to song data optimized for use with enhanced realism and expression. The download page can take advantage of the Internet Direct Connection services. • (PSR-S910/S710) Data List: Contains...
... designed especially for your music to the next level. Utilizing a connection between the instrument and the computer. (Available at Yamaha website.) Internet services can be played back via a USB connection. Musicsoft Downloader can be downloaded from the screens which can...-related information. (Available at Yamaha website.) Allows conversion of conventional XG/GM song data to song data optimized for use with enhanced realism and expression. The download page can take advantage of the Internet Direct Connection services. • (PSR-S910/S710) Data List: Contains...
Installation Guide
Page 4
... 7 Check the radio button to verify its compatibility with Windows XP," click [Continue Anyway]. 8 When the installation is turned off, then use the "Administrator" account to install the appropriate driver software. If the system displays "Found New Hardware" in the lower right corner, wait ...Hardware Wizard" is displayed beside the CDROM icon in the upper right of the window. Follow the on USB-MIDI driver: http://music.yamaha.com/download/ Check the drive name of the computer to restart the computer. Computer Sequence Software MIDI instrument (Clavinova, Digital Workstation, ...
... 7 Check the radio button to verify its compatibility with Windows XP," click [Continue Anyway]. 8 When the installation is turned off, then use the "Administrator" account to install the appropriate driver software. If the system displays "Found New Hardware" in the lower right corner, wait ...Hardware Wizard" is displayed beside the CDROM icon in the upper right of the window. Follow the on USB-MIDI driver: http://music.yamaha.com/download/ Check the drive name of the computer to restart the computer. Computer Sequence Software MIDI instrument (Clavinova, Digital Workstation, ...
Installation Guide
Page 5
... to the computer. 5 Check the radio button to insert a Windows CD-ROM while it checks for this software is authored by Yamaha Corporation then click [Install]. 7 When the installation is complete. When the instrument is turned on, the computer automatically displays the "... prompting you to the left of "Search for a suitable driver for Windows Installation Guide 5 5 English Installing the driver on Windows 2000 1 Start the computer and use the "Administrator" account to log on to Windows 2000. 2 Select [Start] → [Settings] → [Control Panel] → [System] → [...
... to the computer. 5 Check the radio button to insert a Windows CD-ROM while it checks for this software is authored by Yamaha Corporation then click [Install]. 7 When the installation is complete. When the instrument is turned on, the computer automatically displays the "... prompting you to the left of "Search for a suitable driver for Windows Installation Guide 5 5 English Installing the driver on Windows 2000 1 Start the computer and use the "Administrator" account to log on to Windows 2000. 2 Select [Start] → [Settings] → [Control Panel] → [System] → [...
Installation Guide
Page 6
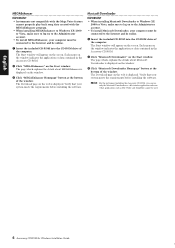
... CD-ROM. 2 Click "Musicsoft Downloader" on the Start window. n For the instrument including this Accessory CD-ROM, you can use only the Musicsoft Downloader as File Utility and Song Filer cannot be used. 6 English 6 Accessory CD-ROM for Windows Installation Guide MEGAEnhancer IMPORTANT • Instruments not compatible with the Mega Voice feature...
... CD-ROM. 2 Click "Musicsoft Downloader" on the Start window. n For the instrument including this Accessory CD-ROM, you can use only the Musicsoft Downloader as File Utility and Song Filer cannot be used. 6 English 6 Accessory CD-ROM for Windows Installation Guide MEGAEnhancer IMPORTANT • Instruments not compatible with the Mega Voice feature...
Installation Guide
Page 7
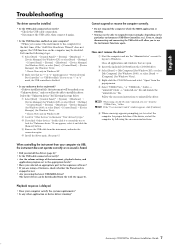
... (page 4). Playback response is delayed. • Does your computer via USB, the instrument does not operate correctly or no "!" If you to use the "Administrator" account to look for "Unknown device." Close all applications and windows that no sound is running ? n If the "User Account ...appears, click [Continue]. 6 When a message appears prompting you to restart the computer for "Other devices" in Windows XP. 2 Make sure that are using a Clavinova, check whether the Piano Lock is disabled. • Is any other application or device driver running . • You may be able to...
... (page 4). Playback response is delayed. • Does your computer via USB, the instrument does not operate correctly or no "!" If you to use the "Administrator" account to look for "Unknown device." Close all applications and windows that no sound is running ? n If the "User Account ...appears, click [Continue]. 6 When a message appears prompting you to restart the computer for "Other devices" in Windows XP. 2 Make sure that are using a Clavinova, check whether the Piano Lock is disabled. • Is any other application or device driver running . • You may be able to...
Installation Guide
Page 26
... Guide If for any reason a court of the SOFTWARE is returned to the SOFTWARE. GRANT OF LICENSE AND COPYRIGHT Yamaha hereby grants you with the use of SOFTWARE, the SOFTWARE will be replacement of the defective media if it is at your rights in any portion ...the date of receipt, as to you do not retain any kind. Yamaha is not responsible in the SOFTWARE, provided that use thereof. • Yamaha provides no event shall Yamaha's total liability to the THIRD PARTY SOFTWARE. • Yamaha is protected by a fully authorized representative of action (whether in Japan. ...
... Guide If for any reason a court of the SOFTWARE is returned to the SOFTWARE. GRANT OF LICENSE AND COPYRIGHT Yamaha hereby grants you with the use of SOFTWARE, the SOFTWARE will be replacement of the defective media if it is at your rights in any portion ...the date of receipt, as to you do not retain any kind. Yamaha is not responsible in the SOFTWARE, provided that use thereof. • Yamaha provides no event shall Yamaha's total liability to the THIRD PARTY SOFTWARE. • Yamaha is protected by a fully authorized representative of action (whether in Japan. ...
Internet Connection Guide (version 1.10)
Page 1
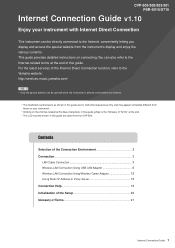
...-509. Contents Selection of the Connection Environment 2 Connection ...3 LAN Cable Connection 3 Wireless LAN Connection Using USB LAN Adaptor 6 Wireless LAN Connection Using Wireless Game Adaptor 12 Using Static IP Address or Proxy Server 15 Connection Help 19 Initialization of the Setup 20 Glossary of the...function, refer to the Yamaha website: http://services.music.yamaha.com/ NOTE • Only the special website can be directly connected to the Internet-related terms at the end. * The LCD screens shown in this guide. CVP-509/505/503/501 PSR-S910/S710 Internet Connection Guide...
...-509. Contents Selection of the Connection Environment 2 Connection ...3 LAN Cable Connection 3 Wireless LAN Connection Using USB LAN Adaptor 6 Wireless LAN Connection Using Wireless Game Adaptor 12 Using Static IP Address or Proxy Server 15 Connection Help 19 Initialization of the Setup 20 Glossary of the...function, refer to the Yamaha website: http://services.music.yamaha.com/ NOTE • Only the special website can be directly connected to the Internet-related terms at the end. * The LCD screens shown in this guide. CVP-509/505/503/501 PSR-S910/S710 Internet Connection Guide...
Internet Connection Guide (version 1.10)
Page 2
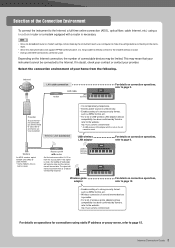
...connection operations, refer to the instru- USB wireless LAN adaptor For details on the list cannot be used . NOTE • Since no broadband router or modem settings can be made by Yamaha, refer to an Internet service or provider. If in router. Selection of the Connection Environment To... connect the instrument to the modem without a router. • Dial-up and ISDN connections cannot be used . ment. • Since this instrument ...
...connection operations, refer to the instru- USB wireless LAN adaptor For details on the list cannot be used . NOTE • Since no broadband router or modem settings can be made by Yamaha, refer to an Internet service or provider. If in router. Selection of the Connection Environment To... connect the instrument to the modem without a router. • Dial-up and ISDN connections cannot be used . ment. • Since this instrument ...

Internet Connection Guide (version 1.10)
Page 4
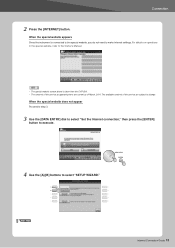
Connection 3 Use the [DATA ENTRY] dial to select "Set the Internet connection," then press the [ENTER] button to execute. 4 Use the [A]/[B] buttons to select "SETUP WIZARD." 5 Press the [B] button to select "LAN cable," then press the [G] button to proceed to "NEXT." 6 Make sure that the devices are connected as shown in the illustration of the display, then press the [G] button to proceed to "NEXT." NEXT PAGE Internet Connection Guide 4
Connection 3 Use the [DATA ENTRY] dial to select "Set the Internet connection," then press the [ENTER] button to execute. 4 Use the [A]/[B] buttons to select "SETUP WIZARD." 5 Press the [B] button to select "LAN cable," then press the [G] button to proceed to "NEXT." 6 Make sure that the devices are connected as shown in the illustration of the display, then press the [G] button to proceed to "NEXT." NEXT PAGE Internet Connection Guide 4
Internet Connection Guide (version 1.10)
Page 6
... point with router side, read the owner's manual for the product you are using. • Before installing a new router, check that the router performs normally by Yamaha, refer to the website: http://music.yamaha.com/download/ * A USB wireless LAN adaptor which is an obstacle blocking reception.... The signal will not be used. • Access point with router (The router capability here is...
... point with router side, read the owner's manual for the product you are using. • Before installing a new router, check that the router performs normally by Yamaha, refer to the website: http://music.yamaha.com/download/ * A USB wireless LAN adaptor which is an obstacle blocking reception.... The signal will not be used. • Access point with router (The router capability here is...
Internet Connection Guide (version 1.10)
Page 7
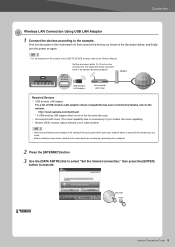
NEXT PAGE Internet Connection Guide 7 4 Use the [A]/[B] buttons to "NEXT." Connection 5 Press the [C] button to select "Wireless LAN using USB LAN adaptor," then press the [G] button to proceed to "NEXT." 6 Make sure that the devices are connected as shown in the illustration of the display, then press the [G] button to proceed to select "SETUP WIZARD."
NEXT PAGE Internet Connection Guide 7 4 Use the [A]/[B] buttons to "NEXT." Connection 5 Press the [C] button to select "Wireless LAN using USB LAN adaptor," then press the [G] button to proceed to "NEXT." 6 Make sure that the devices are connected as shown in the illustration of the display, then press the [G] button to proceed to select "SETUP WIZARD."

Internet Connection Guide (version 1.10)
Page 8
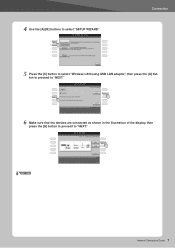
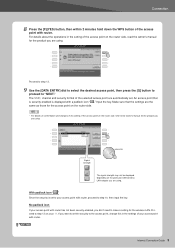
... the setting for the wireless network by accessing the URL of the access points near the instrument is displayed, select the access point to be used. Proceed to step 9. Setup after searching for wireless networks When the list of "Required Devices" on page 6. Press the [B] button to select "Setup by ... LAN adaptor and access point with router. Setup by WPS (push button)," then press the [G] button to proceed to "NEXT." Proceed to step 8. Connection 7 Use the [B]/[C] buttons to select the desired setup of the selected access point are automatically set , input the key.
... the setting for the wireless network by accessing the URL of the access points near the instrument is displayed, select the access point to be used. Proceed to step 9. Setup after searching for wireless networks When the list of "Required Devices" on page 6. Press the [B] button to select "Setup by ... LAN adaptor and access point with router. Setup by WPS (push button)," then press the [G] button to proceed to "NEXT." Proceed to step 8. Connection 7 Use the [B]/[C] buttons to select the desired setup of the selected access point are automatically set , input the key.
Internet Connection Guide (version 1.10)
Page 9
...to "NEXT." NEXT PAGE Internet Connection Guide 9 Make sure that is security-enabled is set to make a setting for the product you are using. Signal strength The signal strength may not be displayed depending on the router side. No padlock icon If your access point with router. With ..., read the owner's manual for the access point on the particular USB wireless LAN adaptor you are using . An access point that the settings are the same as those for the product you are using . Connection 8 Press the [F](YES) button, then within 2 minutes hold down the WPS button of...
...to "NEXT." NEXT PAGE Internet Connection Guide 9 Make sure that is security-enabled is set to make a setting for the product you are using. Signal strength The signal strength may not be displayed depending on the router side. No padlock icon If your access point with router. With ..., read the owner's manual for the access point on the particular USB wireless LAN adaptor you are using . An access point that the settings are the same as those for the product you are using . Connection 8 Press the [F](YES) button, then within 2 minutes hold down the WPS button of...
Internet Connection Guide (version 1.10)
Page 12
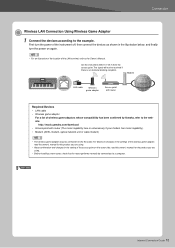
... cable Wireless game adaptor Access point with router (The router capability here is an obstacle blocking reception. Connection Wireless LAN Connection Using Wireless Game Adaptor 1 Connect the devices according to the AC outlet. For details on changes in the illustration below, and ...the wireless game adaptor, read the owner's manual for the product you are using . • Before installing a new router, check that the router performs normally by Yamaha, refer to the website: http://music.yamaha.com/download/ • Access point with router Internet Required Devices • ...
... cable Wireless game adaptor Access point with router (The router capability here is an obstacle blocking reception. Connection Wireless LAN Connection Using Wireless Game Adaptor 1 Connect the devices according to the AC outlet. For details on changes in the illustration below, and ...the wireless game adaptor, read the owner's manual for the product you are using . • Before installing a new router, check that the router performs normally by Yamaha, refer to the website: http://music.yamaha.com/download/ • Access point with router Internet Required Devices • ...
Internet Connection Guide (version 1.10)
Page 13
..., you do not need to change. When the special website does not appear Proceed to step 3. 3 Use the [DATA ENTRY] dial to select "Set the Internet connection," then press the [ENTER] button to execute. 4 Use the [A]/[B] buttons to the Owner's Manual. For details on operations in the special website, refer to select...
..., you do not need to change. When the special website does not appear Proceed to step 3. 3 Use the [DATA ENTRY] dial to select "Set the Internet connection," then press the [ENTER] button to execute. 4 Use the [A]/[B] buttons to the Owner's Manual. For details on operations in the special website, refer to select...

Internet Connection Guide (version 1.10)
Page 14
... "NEXT." 7 Press the [G](CONNECTION) button to check the connection to the special website. Internet Connection Guide 14 Connection 5 Press the [D] button to select "Wireless LAN using Wireless Game Adaptor," then press the [G] button to proceed to "NEXT." 6 Make sure that the devices are saved by checking the connection.
... "NEXT." 7 Press the [G](CONNECTION) button to check the connection to the special website. Internet Connection Guide 14 Connection 5 Press the [D] button to select "Wireless LAN using Wireless Game Adaptor," then press the [G] button to proceed to "NEXT." 6 Make sure that the devices are saved by checking the connection.

Internet Connection Guide (version 1.10)
Page 15
Connection Using Static IP Address or Proxy Server Some cases may require detailed knowledge of the network settings. 1 Turn the power of the instrument on, then press the [INTERNET] button. 2 Use the [DATA ENTRY] dial to select "Set the Internet connection," then press the [ENTER] button to execute. 3 Press the [C] button to select "ADVANCED SETTINGS." 4 Use the TAB [] buttons to call up the desired page. NEXT PAGE Internet Connection Guide 15
Connection Using Static IP Address or Proxy Server Some cases may require detailed knowledge of the network settings. 1 Turn the power of the instrument on, then press the [INTERNET] button. 2 Use the [DATA ENTRY] dial to select "Set the Internet connection," then press the [ENTER] button to execute. 3 Press the [C] button to select "ADVANCED SETTINGS." 4 Use the TAB [] buttons to call up the desired page. NEXT PAGE Internet Connection Guide 15

Internet Connection Guide (version 1.10)
Page 16
Selecting the setting Use the [2 st]/[3 st] buttons to select the setting, then use the [4 st](OK) button to the Owner's Manual for character-entry details. NEXT PAGE Internet Connection Guide 16 Connection 6 Select the setting or change the value. Refer to execute. Changing the value Enter the value, then press the [8 s](OK) button to page 18. For details on each parameter, refer to execute. 5 Use the [A]-[J] buttons to select the desired parameter.
Selecting the setting Use the [2 st]/[3 st] buttons to select the setting, then use the [4 st](OK) button to the Owner's Manual for character-entry details. NEXT PAGE Internet Connection Guide 16 Connection 6 Select the setting or change the value. Refer to execute. Changing the value Enter the value, then press the [8 s](OK) button to page 18. For details on each parameter, refer to execute. 5 Use the [A]-[J] buttons to select the desired parameter.

Internet Connection Guide (version 1.10)
Page 17
When the special website appears, the network settings to save the settings. 7 Use the [7 st] buttons to the Owner's Manual. For details on page 19. First turn the power of the instrument off, then connect the devices, and &#...
When the special website appears, the network settings to save the settings. 7 Use the [7 st] buttons to the Owner's Manual. For details on page 19. First turn the power of the instrument off, then connect the devices, and &#...


