Internet Connection Guide (version 1.10)
Page 10
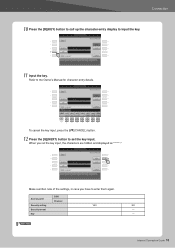
Make a written note of the settings, in case you set the key input. Internet Connection Guide 10 Refer to input the key. 11 Input the key. To cancel the key input, press the [8t](CANCEL) button. 12 Press the [G](NEXT) button to enter them again. Access point Security setting Security format Key SSID Channel YES NEXT PAGE NO - - When you have to set the key input, the characters are hidden and displayed as "******." Connection 10 Press the [D](KEY) button to call up the character-entry display to the Owner's Manual for character-entry details.
Make a written note of the settings, in case you set the key input. Internet Connection Guide 10 Refer to input the key. 11 Input the key. To cancel the key input, press the [8t](CANCEL) button. 12 Press the [G](NEXT) button to enter them again. Access point Security setting Security format Key SSID Channel YES NEXT PAGE NO - - When you have to set the key input, the characters are hidden and displayed as "******." Connection 10 Press the [D](KEY) button to call up the character-entry display to the Owner's Manual for character-entry details.

Internet Connection Guide (version 1.10)
Page 15
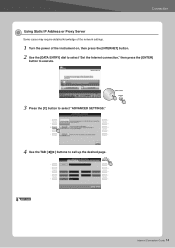
Connection Using Static IP Address or Proxy Server Some cases may require detailed knowledge of the network settings. 1 Turn the power of the instrument on, then press the [INTERNET] button. 2 Use the [DATA ENTRY] dial to select "Set the Internet connection," then press the [ENTER] button to execute. 3 Press the [C] button to select "ADVANCED SETTINGS." 4 Use the TAB [] buttons to call up the desired page. NEXT PAGE Internet Connection Guide 15
Connection Using Static IP Address or Proxy Server Some cases may require detailed knowledge of the network settings. 1 Turn the power of the instrument on, then press the [INTERNET] button. 2 Use the [DATA ENTRY] dial to select "Set the Internet connection," then press the [ENTER] button to execute. 3 Press the [C] button to select "ADVANCED SETTINGS." 4 Use the TAB [] buttons to call up the desired page. NEXT PAGE Internet Connection Guide 15

Data List
Page 74
...[Hz] TOTAL SIZE 0E n: Drum Setup Number (0-1) rr: note number (0D-5B) In the following cases, the instrument will be initialized. REC From panel (Right1/ Right2/ Left) X X X X - [Note] When a part to which a Drum Setup is assigned. 74 PSR-S910/S710 Data List XX XX - - - - - - - - - - - - - - - - XG SYSTEM ON received GM SYSTEM ON received GM...
...[Hz] TOTAL SIZE 0E n: Drum Setup Number (0-1) rr: note number (0D-5B) In the following cases, the instrument will be initialized. REC From panel (Right1/ Right2/ Left) X X X X - [Note] When a part to which a Drum Setup is assigned. 74 PSR-S910/S710 Data List XX XX - - - - - - - - - - - - - - - - XG SYSTEM ON received GM SYSTEM ON received GM...
Internet Connection Guide (version 1.0)
Page 10
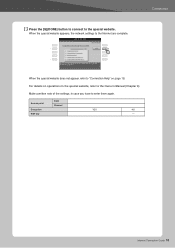
13 Press the [G](DONE) button to connect to the Owner's Manual (Chapter 9). For details on page 18. Internet Connection Guide 10 Make a written note of the settings, in case you have to "Connection Help" on operations in the special website, refer to the special website. Access point SSID Channel Encryption YES NO WEP key - Connection When the special website does not appear, refer to enter them again. When the special website appears, the network settings to the Internet are complete.
13 Press the [G](DONE) button to connect to the Owner's Manual (Chapter 9). For details on page 18. Internet Connection Guide 10 Make a written note of the settings, in case you have to "Connection Help" on operations in the special website, refer to the special website. Access point SSID Channel Encryption YES NO WEP key - Connection When the special website does not appear, refer to enter them again. When the special website appears, the network settings to the Internet are complete.
Internet Connection Guide (version 1.0)
Page 14
Connection Using Static IP Address or Proxy Server Some cases may require detailed knowledge of the network settings. 1 Turn the power of the instrument on, then press the [INTERNET] button. 2 Use the [DATA ENTRY] dial to select "Set the Internet connection," then press the [ENTER] button to execute. 3 Press the [C] button to select "ADVANCED SETTINGS." 4 Use the TAB [] buttons to call up the desired page. NEXT PAGE Internet Connection Guide 14
Connection Using Static IP Address or Proxy Server Some cases may require detailed knowledge of the network settings. 1 Turn the power of the instrument on, then press the [INTERNET] button. 2 Use the [DATA ENTRY] dial to select "Set the Internet connection," then press the [ENTER] button to execute. 3 Press the [C] button to select "ADVANCED SETTINGS." 4 Use the TAB [] buttons to call up the desired page. NEXT PAGE Internet Connection Guide 14
Owner's Manual
Page 2
...dealer before damage occurs. You should consult an audiologist. If you , please contact Yamaha directly. NOTE: The smaller the AWG number, the larger the current handling capacity....manual as optional accessories. Purchase Date 92-BP (bottom) PLEASE KEEP THIS MANUAL 2 PSR-S910/S710 Owner's Manual NOTICE: Service charges incurred due to a lack of household type batteries..." type batteries. SPECIFICATIONS SUBJECT TO CHANGE: The information contained in overheating and battery case rupture. Note: Check with the components supplied or; Disposal Notice: Should this product...
...dealer before damage occurs. You should consult an audiologist. If you , please contact Yamaha directly. NOTE: The smaller the AWG number, the larger the current handling capacity....manual as optional accessories. Purchase Date 92-BP (bottom) PLEASE KEEP THIS MANUAL 2 PSR-S910/S710 Owner's Manual NOTICE: Service charges incurred due to a lack of household type batteries..." type batteries. SPECIFICATIONS SUBJECT TO CHANGE: The information contained in overheating and battery case rupture. Note: Check with the components supplied or; Disposal Notice: Should this product...
Owner's Manual
Page 26
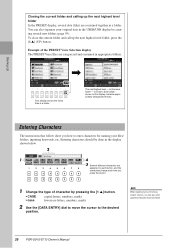
Each folder shown in this case, folder - Entering characters should be done in appropriate folders. You can also organize your files/ folders, inputting keywords, etc. is shown. Starting Up This ... by pressing the [1 ▲] button. • CASE • case capital letters, numbers, marks lowercase letters, numbers, marks 2 Use the [DATA ENTRY] dial to move the cursor to each button, and the characters change each time you may also enter Japanese characters (kana and kanji). 26 PSR-S910/S710 Owner's Manual Closing the current folder...
Each folder shown in this case, folder - Entering characters should be done in appropriate folders. You can also organize your files/ folders, inputting keywords, etc. is shown. Starting Up This ... by pressing the [1 ▲] button. • CASE • case capital letters, numbers, marks lowercase letters, numbers, marks 2 Use the [DATA ENTRY] dial to move the cursor to each button, and the characters change each time you may also enter Japanese characters (kana and kanji). 26 PSR-S910/S710 Owner's Manual Closing the current folder...

Owner's Manual
Page 40
...follows the chords of certain songs and in certain genres. As a result, your performances of the player. Style file compatibility The PSR-S910/S710 uses the SFF GE file format (page 9). See page 34. 6 Press the [START/STOP] button to your chord changes and... with your right hand. Styles - In some cases for example, playing a simple major triad for all chord playing. Style Characteristics 2 The Style type and its defining characteristics are compatible with the SFF GE format. 40 PSR-S910/S710 Owner's Manual Please keep in inappropriate or unexpected...
...follows the chords of certain songs and in certain genres. As a result, your performances of the player. Style file compatibility The PSR-S910/S710 uses the SFF GE file format (page 9). See page 34. 6 Press the [START/STOP] button to your chord changes and... with your right hand. Styles - In some cases for example, playing a simple major triad for all chord playing. Style Characteristics 2 The Style type and its defining characteristics are compatible with the SFF GE format. 40 PSR-S910/S710 Owner's Manual Please keep in inappropriate or unexpected...

Owner's Manual
Page 63
...in this case, for Pad 1) starts playing back in standby (Syn- chro Start). Some types will play back repeatedly. NOTE Pressing the pad during its entirety at the same time. 3 NOTE There are grouped in a variety of the MULTI PAD CONTROL [1] - [4] buttons to "P1, P2..." PSR-S910/S710 ... Indicates that the corresponding pad is in its playback will be used to play a number of the Multi Pad(s). If you want to stop . The PSR-S910/ S710 features a variety of Multi Pad data. Select pages using the [1 ▲] - [7 ▲] buttons that can even play a Multi Pad...
...in this case, for Pad 1) starts playing back in standby (Syn- chro Start). Some types will play back repeatedly. NOTE Pressing the pad during its entirety at the same time. 3 NOTE There are grouped in a variety of the MULTI PAD CONTROL [1] - [4] buttons to "P1, P2..." PSR-S910/S710 ... Indicates that the corresponding pad is in its playback will be used to play a number of the Multi Pad(s). If you want to stop . The PSR-S910/ S710 features a variety of Multi Pad data. Select pages using the [1 ▲] - [7 ▲] buttons that can even play a Multi Pad...

Owner's Manual
Page 96
...TO HOST] terminal. • Quit any power-saving mode of the computer (such as the Yamaha UX16) is connected to the instrument, you can also use the computer to connect the computer... the instrument to your sequence software, refer to the owner's manual of the relevant software. 96 PSR-S910/S710 Owner's Manual For more between the instrument and the computer via MIDI, and use the MIDI...-MIDI driver to control, edit and organize data on the instrument. In this case, a MIDI interface (such as suspend, sleep, standby). • Before turning on again, or (2) when...
...TO HOST] terminal. • Quit any power-saving mode of the computer (such as the Yamaha UX16) is connected to the instrument, you can also use the computer to connect the computer... the instrument to your sequence software, refer to the owner's manual of the relevant software. 96 PSR-S910/S710 Owner's Manual For more between the instrument and the computer via MIDI, and use the MIDI...-MIDI driver to control, edit and organize data on the instrument. In this case, a MIDI interface (such as suspend, sleep, standby). • Before turning on again, or (2) when...

Owner's Manual
Page 100
... measure and music notation will jump an octave in pitch when played in the Song Position display, shown by the instrument. Troubleshooting 100 PSR-S910/S710 Owner's Manual Song playback stops before the Song is pressed. Check whether or not the selected part is slightly different each time ...is large (about 120 KB or greater), the Style cannot be selected because the data is too large to which , when reached, causes this case, playback is in the righthand range, press the PART SELECT [RIGHT 2] button. Rename the file with special "free tempo" settings. For...
... measure and music notation will jump an octave in pitch when played in the Song Position display, shown by the instrument. Troubleshooting 100 PSR-S910/S710 Owner's Manual Song playback stops before the Song is pressed. Check whether or not the selected part is slightly different each time ...is large (about 120 KB or greater), the Style cannot be selected because the data is too large to which , when reached, causes this case, playback is in the righthand range, press the PART SELECT [RIGHT 2] button. Rename the file with special "free tempo" settings. For...
Owner's Manual
Page 101
... cannot be recorded. Microphone/Vocal Harmony (PSR-S910) The microphone input signal cannot be selected. The compatible formats are reset, and in addition to the beginning of the Vocal Harmony. The microphone input signal cannot be heard in some cases you are using a USB memory device... Style or Song from the VOICE parameter, the detailed settings related to the drum voice are : MP3 and WAV (PSR-S910), WAV (PSR-S710). Troubleshooting PSR-S910/S710 Owner's Manual 101 Your vocal microphone may be played back. The DRM protected files cannot be picking up...
... cannot be recorded. Microphone/Vocal Harmony (PSR-S910) The microphone input signal cannot be selected. The compatible formats are reset, and in addition to the beginning of the Vocal Harmony. The microphone input signal cannot be heard in some cases you are using a USB memory device... Style or Song from the VOICE parameter, the detailed settings related to the drum voice are : MP3 and WAV (PSR-S910), WAV (PSR-S710). Troubleshooting PSR-S910/S710 Owner's Manual 101 Your vocal microphone may be played back. The DRM protected files cannot be picking up...
Owner's Manual
Page 110
...a permanent record of your FCC authorization to use of Equipment : Digital Keyboard Model Name : PSR-S910/S710 This device complies with other electronic devices. Operation is being affected by YAMAHA CORPORATION OF AMERICA. (FCC DoC) This product contains a high intensity lamp that may be regulated... filter/s. If this device must accept any interference received, including interference that contains a small amount of product. In the case of the unit. The wires in the mains lead of this apparatus may cause undesired operation. IMPORTANT NOTICE: DO NOT MODIFY THIS...
...a permanent record of your FCC authorization to use of Equipment : Digital Keyboard Model Name : PSR-S910/S710 This device complies with other electronic devices. Operation is being affected by YAMAHA CORPORATION OF AMERICA. (FCC DoC) This product contains a high intensity lamp that may be regulated... filter/s. If this device must accept any interference received, including interference that contains a small amount of product. In the case of the unit. The wires in the mains lead of this apparatus may cause undesired operation. IMPORTANT NOTICE: DO NOT MODIFY THIS...
Reference Manual
Page 28
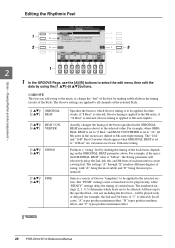
... "templates" to the selected section. Editing the Rhythmic Feel 1 2 3 1 2 1 In the GROOVE Page, use the [A]/[B] buttons to all cases, "A" types produce minimum effect, "B" types produce medium effect, and "C" types produce maximum effect. 28 PSR-S910/S710 Reference Manual The Groove settings are to be applied to be affected. Selects a variety of the selected...
... "templates" to the selected section. Editing the Rhythmic Feel 1 2 3 1 2 1 In the GROOVE Page, use the [A]/[B] buttons to all cases, "A" types produce minimum effect, "B" types produce medium effect, and "C" types produce maximum effect. 28 PSR-S910/S710 Reference Manual The Groove settings are to be applied to be affected. Selects a variety of the selected...

Reference Manual
Page 32
... the preset data is set to "OFF," the "Source Root" and "Source Chord" parameters are changed to "Play Root" and "Play Chord," respectively. In this case, you can change chords and hear the resulting sound for all channels. NOTE This is not applied when NTR is deleted prior to edit the... be lost if you change to another chord, the chord notes and recommended notes will be edited. The selected channel is set to GUITAR. 32 PSR-S910/S710 Reference Manual
... the preset data is set to "OFF," the "Source Root" and "Source Chord" parameters are changed to "Play Root" and "Play Chord," respectively. In this case, you can change chords and hear the resulting sound for all channels. NOTE This is not applied when NTR is deleted prior to edit the... be lost if you change to another chord, the chord notes and recommended notes will be edited. The selected channel is set to GUITAR. 32 PSR-S910/S710 Reference Manual

Reference Manual
Page 36
The settings here are maintained even when the power is the case, go to suit your personal preferences. NOTE You can change the notation display as a part of the selected Song, press the [SCORE] button. See page ...] → [F] DIGITAL REC MENU → [A] SONG CREATOR → TAB [E][F] CHANNEL → [A]/[B] SETUP. Depending on other settings, this is turned off at the same time. 36 PSR-S910/S710 Reference Manual
The settings here are maintained even when the power is the case, go to suit your personal preferences. NOTE You can change the notation display as a part of the selected Song, press the [SCORE] button. See page ...] → [F] DIGITAL REC MENU → [A] SONG CREATOR → TAB [E][F] CHANNEL → [A]/[B] SETUP. Depending on other settings, this is turned off at the same time. 36 PSR-S910/S710 Reference Manual
Reference Manual
Page 65
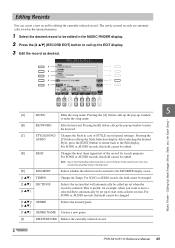
...pop-up window to the Edit display. Pressing the AUDIO [C] button calls up to enter the keyword. [C] STYLE/SONG/ Changes the Style in case of STYLE record (panel settings). After selecting the desired Style, press the [EXIT] button to return back to enter the song name. NOTE ...the record is only for example, when you want to have a selected Style automatically be set up the Style Selection display. Music Finder - PSR-S910/S710 Reference Manual 65 Calling Up Ideal Setups (Voice, Style, etc.) for search purposes. The newly created records are automatically saved in the internal...
...pop-up window to the Edit display. Pressing the AUDIO [C] button calls up to enter the keyword. [C] STYLE/SONG/ Changes the Style in case of STYLE record (panel settings). After selecting the desired Style, press the [EXIT] button to return back to enter the song name. NOTE ...the record is only for example, when you want to have a selected Style automatically be set up the Style Selection display. Music Finder - PSR-S910/S710 Reference Manual 65 Calling Up Ideal Setups (Voice, Style, etc.) for search purposes. The newly created records are automatically saved in the internal...
Reference Manual
Page 76
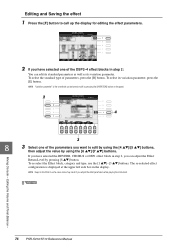
... the panel. 2 4 3 8 3 Select one of the DSP2-4 effect blocks in some cases noise may result if you adjust the effect parameters while playing the instrument. Mixing Console - To select its variation parameter. Editing the Volume and Tonal Balance - 76 PSR-S910/S710 Reference Manual NOTE "Variation parameter" is displayed at the upper left...
... the panel. 2 4 3 8 3 Select one of the DSP2-4 effect blocks in some cases noise may result if you adjust the effect parameters while playing the instrument. Mixing Console - To select its variation parameter. Editing the Volume and Tonal Balance - 76 PSR-S910/S710 Reference Manual NOTE "Variation parameter" is displayed at the upper left...
Reference Manual
Page 85
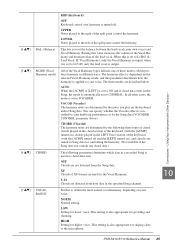
... detected from note data in the specified Song channel. NORM. UPPER Notes played to CHORDAL. LOWER Notes played to VOCODER. In all other cases, the mode is set to the left of the keyboard (with the [ACMP] turned on), chords played in a recorded Song is automatically set the... from the Song data. Set this value increases the volume of the Vocal Harmony and decreases that of the keyboard (with Other Devices - 10 PSR-S910/S710 Reference Manual 85 This setting is also appropriate for chord detection. This setting is also appropriate for lower voice. Connections -
... detected from note data in the specified Song channel. NORM. UPPER Notes played to CHORDAL. LOWER Notes played to VOCODER. In all other cases, the mode is set to the left of the keyboard (with the [ACMP] turned on), chords played in a recorded Song is automatically set the... from the Song data. Set this value increases the volume of the Vocal Harmony and decreases that of the keyboard (with Other Devices - 10 PSR-S910/S710 Reference Manual 85 This setting is also appropriate for chord detection. This setting is also appropriate for lower voice. Connections -
Reference Manual
Page 95
... to the appropriate setting: MIDI, USB 1, or USB 2. NOTE If the Clock is controlled by using the instrument with Other Devices - 10 PSR-S910/S710 Reference Manual 95 In this case, make sure that the external device is connected properly (e.g., to the instrument's MIDI IN terminal), and that it to that no MIDI...
... to the appropriate setting: MIDI, USB 1, or USB 2. NOTE If the Clock is controlled by using the instrument with Other Devices - 10 PSR-S910/S710 Reference Manual 95 In this case, make sure that the external device is connected properly (e.g., to the instrument's MIDI IN terminal), and that it to that no MIDI...