Owner's Manual
Page 2
...;ve years. Please study this plate. NAME PLATE LOCATION: The graphic below and retain this manual as regulated by law to return the defective parts. Purchase Date 2 q q q q q q q q q q q q q q q q q q q q q q q q q q q q q q q q q q q q q q q q q q q q q q q q IMPORTANT NOTICE: All Yamaha electronic products are located on this manual carefully and consult your purchase. Warning: Do not attempt to the disposal of products that...
...;ve years. Please study this plate. NAME PLATE LOCATION: The graphic below and retain this manual as regulated by law to return the defective parts. Purchase Date 2 q q q q q q q q q q q q q q q q q q q q q q q q q q q q q q q q q q q q q q q q q q q q q q q q IMPORTANT NOTICE: All Yamaha electronic products are located on this manual carefully and consult your purchase. Warning: Do not attempt to the disposal of products that...

Owner's Manual
Page 3
... products, unless specifically designed for extended periods of an extension cord is uncomfortable. Care should be serviced by Yamaha. 5. ified service person when: a. sory mounting fixtures that unobstructed ventilation is used near a swimming pool..., the following: 1. DO NOT operate for the supply voltage in performance; Some Yamaha products may be referred to the main supply. 2. PLEASE KEEP THIS MANUAL 92-469-2 qqqqqqqqqqqqqqqqqqqqqqqqqqqqqqqqqqqqqqqqqqqqqqqqq 3 1 All other uses are to be installed in combination with...
... products, unless specifically designed for extended periods of an extension cord is uncomfortable. Care should be serviced by Yamaha. 5. ified service person when: a. sory mounting fixtures that unobstructed ventilation is used near a swimming pool..., the following: 1. DO NOT operate for the supply voltage in performance; Some Yamaha products may be referred to the main supply. 2. PLEASE KEEP THIS MANUAL 92-469-2 qqqqqqqqqqqqqqqqqqqqqqqqqqqqqqqqqqqqqqqqqqqqqqqqq 3 1 All other uses are to be installed in combination with...

Owner's Manual
Page 6
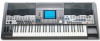
...to make the most advanced tone generation technology with maximum musical versatility. Keep the manual in particular, are the property of how Yamaha technology can significantly expand your PSR-9000's features and vast performance potential, we urge you stunning sound quality with state-of...8226; Floppy Disk x 1 (includes accompaniment style files: page 25) • Floppy Disks x 2 (These include the following items: • PSR-9000 x 1 • AC Power Cord x 1 • AC Plug Adaptor x 1 (in the U.S. The Yamaha PSR-9000 combines the most of IVL Technologies Ltd.
...to make the most advanced tone generation technology with maximum musical versatility. Keep the manual in particular, are the property of how Yamaha technology can significantly expand your PSR-9000's features and vast performance potential, we urge you stunning sound quality with state-of...8226; Floppy Disk x 1 (includes accompaniment style files: page 25) • Floppy Disks x 2 (These include the following items: • PSR-9000 x 1 • AC Power Cord x 1 • AC Plug Adaptor x 1 (in the U.S. The Yamaha PSR-9000 combines the most of IVL Technologies Ltd.

Owner's Manual
Page 7
... 156 If the PSR-9000 does not function as part of the upgrade to start playing your Yamaha dealer or service center. If so, read everything above, lightly go over nine Footages, plus new tone generation system and new sampled waves. qqqqqqqqqqqqqqqqqqqqqqqqqqqqqqqqqqqqqqqqqqqqqqqqq 7 5 It shows you how to use the manual Starting Up...page 14...
... 156 If the PSR-9000 does not function as part of the upgrade to start playing your Yamaha dealer or service center. If so, read everything above, lightly go over nine Footages, plus new tone generation system and new sampled waves. qqqqqqqqqqqqqqqqqqqqqqqqqqqqqqqqqqqqqqqqqqqqqqqqq 7 5 It shows you how to use the manual Starting Up...page 14...

Owner's Manual
Page 8
...Registration Memory 28 Using the Preset Registration Memory 28 Registering the Panel Settings 29 Disk Song Playback 30 Playback of the upgrade to use the manual 7 Contents 8 Top Panel & Connections 10 Rear Panel & Connections 12 Starting Up 14 Music stand 15 Panel logos 15 Basic Operation ...Data 75 Editing Wave data 76 * Custom Voice Creating 80 Easy Editing 81 Full Editing 82 * 8 q q q q q q q q q q q q q q q q q q q q q q q q q q q q q q q q q q q q q q q q q q q q q q q q 6 Packing List 6 New Functions in PSR-9000 Version 2 .......7 How to PSR-9000 Version 2.
...Registration Memory 28 Using the Preset Registration Memory 28 Registering the Panel Settings 29 Disk Song Playback 30 Playback of the upgrade to use the manual 7 Contents 8 Top Panel & Connections 10 Rear Panel & Connections 12 Starting Up 14 Music stand 15 Panel logos 15 Basic Operation ...Data 75 Editing Wave data 76 * Custom Voice Creating 80 Easy Editing 81 Full Editing 82 * 8 q q q q q q q q q q q q q q q q q q q q q q q q q q q q q q q q q q q q q q q q q q q q q q q q 6 Packing List 6 New Functions in PSR-9000 Version 2 .......7 How to PSR-9000 Version 2.

Owner's Manual
Page 9
... ROM ..130 Converting files 131 * Editing Disk Files 131 Editing Directories 132 Formatting a Disk 132 Checking a Disk 133 The PSR-9000 "Functions 134 Master Tuning/Scale Tuning 134 Split Point/Chord Fingering 135 Controller Assignment 135 Registration/Freeze Group/Voice Set Settings ..139 Harmony...191 MIDI Data Format 192 MIDI Implementation Chart 208 Specifications 210 The illustrations and LCD screens as shown in this owner's manual are for Recording (Quick Recording 91 Song Edit Functions (Multi Track Recording) ....92 * Song Setup (Multi Track Recording 93 Step ...
... ROM ..130 Converting files 131 * Editing Disk Files 131 Editing Directories 132 Formatting a Disk 132 Checking a Disk 133 The PSR-9000 "Functions 134 Master Tuning/Scale Tuning 134 Split Point/Chord Fingering 135 Controller Assignment 135 Registration/Freeze Group/Voice Set Settings ..139 Harmony...191 MIDI Data Format 192 MIDI Implementation Chart 208 Specifications 210 The illustrations and LCD screens as shown in this owner's manual are for Recording (Quick Recording 91 Song Edit Functions (Multi Track Recording) ....92 * Song Setup (Multi Track Recording 93 Step ...
Owner's Manual
Page 36
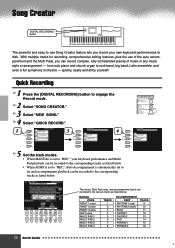
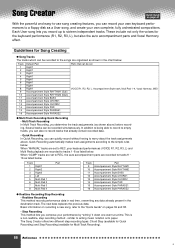
..."SONG CREATOR." 3 Select "NEW SONG." 4 Select "QUICK RECORD." 2 A 3 A 4 B B C C D D E E 5 Set the track modes. • When MANUAL is automatically set to "REC," your own keyboard performances to rock band, big band, Latin ensemble, and even a full symphony orchestra - from solo piano and...," Auto Accompaniment is set to on and accompaniment playback can be recorded to the various tracks as listed below . quickly, easily and all by yourself! MANUAL VOICE RIGHT 1 voice RIGHT 2 voice RIGHT 3 voice LEFT voice MULTI PAD 1 MULTI PAD 2 MULTI PAD 3 MULTI PAD 4 TRACK 1 2 3 ...
..."SONG CREATOR." 3 Select "NEW SONG." 4 Select "QUICK RECORD." 2 A 3 A 4 B B C C D D E E 5 Set the track modes. • When MANUAL is automatically set to "REC," your own keyboard performances to rock band, big band, Latin ensemble, and even a full symphony orchestra - from solo piano and...," Auto Accompaniment is set to on and accompaniment playback can be recorded to the various tracks as listed below . quickly, easily and all by yourself! MANUAL VOICE RIGHT 1 voice RIGHT 2 voice RIGHT 3 voice LEFT voice MULTI PAD 1 MULTI PAD 2 MULTI PAD 3 MULTI PAD 4 TRACK 1 2 3 ...

Owner's Manual
Page 42
... [F] button can be used to the previous available page. However, when certain functions (for example, the LCD [6] buttons can be changed manually.) Rotating the data dial to the right (clockwise) increases the value, while rotating it to -understand display. Pressing [NEXT] button go to...[NEXT] buttons. In the example display shown above , for example, Music Database selection, Naming and Mixing Console adjusting) are in the PSR-9000 display hierarchy, the [EXIT] button will return you may occasionally find yourself confused as to which features an [LCD CONTRAST] control....
... [F] button can be used to the previous available page. However, when certain functions (for example, the LCD [6] buttons can be changed manually.) Rotating the data dial to the right (clockwise) increases the value, while rotating it to -understand display. Pressing [NEXT] button go to...[NEXT] buttons. In the example display shown above , for example, Music Database selection, Naming and Mixing Console adjusting) are in the PSR-9000 display hierarchy, the [EXIT] button will return you may occasionally find yourself confused as to which features an [LCD CONTRAST] control....
Owner's Manual
Page 53
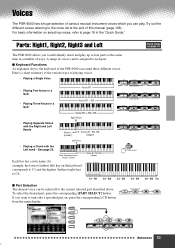
...J LOWER PART ON/OFF UPPER q q q q q q q q q q q q q q q q q q q q q q q q q q q q q q q q q q q q q q q q q q q Reference 53 51 Here's a short summary of the various ways of the PSR-9000 can play up to C6. B2 AUTO ACCOMPANIMENT C3 - Auto Accompaniment section (Lower) Each key has a note name; Parts: Right1, Right2, Right3 and Left Quick... Guide on the keyboard corresponds to C1 and the highest (farthest right) key to four parts at the end of this manual (page 166). B3 C4 - for the current selected part described above , the keyboard of playing voices. • Playing...
...J LOWER PART ON/OFF UPPER q q q q q q q q q q q q q q q q q q q q q q q q q q q q q q q q q q q q q q q q q q q Reference 53 51 Here's a short summary of the various ways of the PSR-9000 can play up to C6. B2 AUTO ACCOMPANIMENT C3 - Auto Accompaniment section (Lower) Each key has a note name; Parts: Right1, Right2, Right3 and Left Quick... Guide on the keyboard corresponds to C1 and the highest (farthest right) key to four parts at the end of this manual (page 166). B3 C4 - for the current selected part described above , the keyboard of playing voices. • Playing...
Owner's Manual
Page 88
... creating features, you can record your keyboard performances (VOICE R1, R2, R3, L) and Multi Pads playback are recorded to tracks 9 ~ 16 as listed below. When "MANUAL" tracks are set to REC, your own keyboard performances to a floppy disk as shown in the destination track. These include not only the voices...
... creating features, you can record your keyboard performances (VOICE R1, R2, R3, L) and Multi Pads playback are recorded to tracks 9 ~ 16 as listed below. When "MANUAL" tracks are set to REC, your own keyboard performances to a floppy disk as shown in the destination track. These include not only the voices...

Owner's Manual
Page 97
... following parameters are available. • Kbd. q Gate time settings The following parameters are available. • Normal Tenuto Staccato.......... 80% 100% 40% • Staccatissimo.. 20% • Manual When this is selected, the strength at which you enter the note. q q q q q q q q q q q q q q q q q q q q q q q q q q q q q q q q q q q q q q q q q q...When this is set to 47. • pp The velocity of the entered note is actually sounded), as a percentage manually. When this to be recorded. Beat: 1 - 4 (for the next note to actually delete the event at ...
... following parameters are available. • Kbd. q Gate time settings The following parameters are available. • Normal Tenuto Staccato.......... 80% 100% 40% • Staccatissimo.. 20% • Manual When this is selected, the strength at which you enter the note. q q q q q q q q q q q q q q q q q q q q q q q q q q q q q q q q q q q q q q q q q q...When this is set to 47. • pp The velocity of the entered note is actually sounded), as a percentage manually. When this to be recorded. Beat: 1 - 4 (for the next note to actually delete the event at ...

Owner's Manual
Page 143
...is set to "NEVER," the selected menu displays remain indefinitely until changed manually. To return to the original display, press the [CLOSE] LCD button (which voices and styles are not used for use with the PSR-9000) • Type 1 • Type 2 Print Scroll ESC F1 F2 F3... for details. Screen Saver Time determines how much time elapses before returning to the PSR-9000. Press this is not set to "NEVER," the Voice List or Style List displays remain indefinitely. (You can manually return to the previous display by pressing the [EXIT] button.) s Language When...
...is set to "NEVER," the selected menu displays remain indefinitely until changed manually. To return to the original display, press the [CLOSE] LCD button (which voices and styles are not used for use with the PSR-9000) • Type 1 • Type 2 Print Scroll ESC F1 F2 F3... for details. Screen Saver Time determines how much time elapses before returning to the PSR-9000. Press this is not set to "NEVER," the Voice List or Style List displays remain indefinitely. (You can manually return to the previous display by pressing the [EXIT] button.) s Language When...
Owner's Manual
Page 148
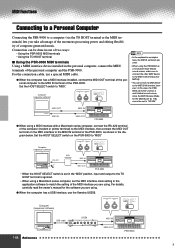
..., carefully read the owner's manual for the software you are using a MIDI interface with a Macintosh series computer, connect the RS-422 terminal of the computer (modem or printer terminal) to the MIDI interface, then connect the MIDI OUT terminal on the PSR-9000 to match the setting of the... For the connection cable, use the Yamaha UX256. however, in the diagram below. Set the HOST SELECT switch to "XG/GM." Set the HOST SELECT switch on the MIDI interface to the MIDI B IN terminal; MIDI OUT MIDI IN MIDI IN MIDI OUT PSR-9000 q When using . Connection can connect ...
..., carefully read the owner's manual for the software you are using a MIDI interface with a Macintosh series computer, connect the RS-422 terminal of the computer (modem or printer terminal) to the MIDI interface, then connect the MIDI OUT terminal on the PSR-9000 to match the setting of the... For the connection cable, use the Yamaha UX256. however, in the diagram below. Set the HOST SELECT switch to "XG/GM." Set the HOST SELECT switch on the MIDI interface to the MIDI B IN terminal; MIDI OUT MIDI IN MIDI IN MIDI OUT PSR-9000 q When using . Connection can connect ...

Owner's Manual
Page 149
... from the computer is not recognized or transmitted. 1-8 Only MIDI data assigned to the relevant owner's manuals. PC-2 PC-1 MIDI Mac MIDI Functions mini DIN 8-pin D-SUB 9-pin PSR-9000 q Macintosh Series Connect the RS-422 terminal (modem or printer terminal) on the computer to Port ...MIDI data from the computer is recognized by the PSR-9000, but is not transmitted through the MIDI B OUT terminal. The data is not transmitted through the MIDI B OUT terminal. For details, carefully read the owner's manual for computer and sequence software you exceptionally flexible...
... from the computer is not recognized or transmitted. 1-8 Only MIDI data assigned to the relevant owner's manuals. PC-2 PC-1 MIDI Mac MIDI Functions mini DIN 8-pin D-SUB 9-pin PSR-9000 q Macintosh Series Connect the RS-422 terminal (modem or printer terminal) on the computer to Port ...MIDI data from the computer is recognized by the PSR-9000, but is not transmitted through the MIDI B OUT terminal. The data is not transmitted through the MIDI B OUT terminal. For details, carefully read the owner's manual for computer and sequence software you exceptionally flexible...
Owner's Manual
Page 160
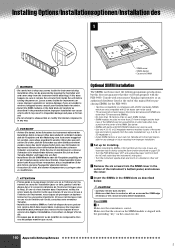
... modules SIMM ou l'unité de disque dur avec précaution comme décrit dans la procédure ci-dessous. ness of this manual before installation. ATTENTION • Prenez garde à ne pas laisser tomber une vis à l'intérieur de l'instrument au cours de l'...be used) • 70 nanoseconds or faster access time (note: 60 nanosecond SIMMs are unable to retrieve a dropped screw, consult your Yamaha dealer for the PSR-9000. • 16-bit bus compatibility or compliance with parity and EDO DRAM modules can also be used must be sure to remove the screw...
... modules SIMM ou l'unité de disque dur avec précaution comme décrit dans la procédure ci-dessous. ness of this manual before installation. ATTENTION • Prenez garde à ne pas laisser tomber une vis à l'intérieur de l'instrument au cours de l'...be used) • 70 nanoseconds or faster access time (note: 60 nanosecond SIMMs are unable to retrieve a dropped screw, consult your Yamaha dealer for the PSR-9000. • 16-bit bus compatibility or compliance with parity and EDO DRAM modules can also be used must be sure to remove the screw...

Owner's Manual
Page 197
... FA Cancel Off When the DOC Multi Timbre ON is accepted, the MIDI receive mode is set as listed below : Channel No Part 1~10 Manual Part (Melody Part) 15 Rhythm 16 Control (Including the System Exclusive messages,) F0H 43H 73H 01H 61H F7H 01100001 61 = MIDI FA Cancel ...;es MIDI Parameter Request Dump Request F0H 43H 3nH 4CH hh mm l l F7H 11110000 01000011 0011nnnn 01001100 0hhhhhhh 0mmmmmmm 0lllllll 11110111 F0 = Exclusive status 43 = YAMAHA ID 3n = Device Number n=always 0(when transmit), n=0-F(when recieve) 4C = Model ID hh = Address High mm = Address Mid ll = Address Low F7 = ...
... FA Cancel Off When the DOC Multi Timbre ON is accepted, the MIDI receive mode is set as listed below : Channel No Part 1~10 Manual Part (Melody Part) 15 Rhythm 16 Control (Including the System Exclusive messages,) F0H 43H 73H 01H 61H F7H 01100001 61 = MIDI FA Cancel ...;es MIDI Parameter Request Dump Request F0H 43H 3nH 4CH hh mm l l F7H 11110000 01000011 0011nnnn 01001100 0hhhhhhh 0mmmmmmm 0lllllll 11110111 F0 = Exclusive status 43 = YAMAHA ID 3n = Device Number n=always 0(when transmit), n=0-F(when recieve) 4C = Model ID hh = Address High mm = Address Mid ll = Address Low F7 = ...
Owner's Manual
Page 211
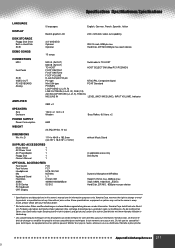
.... Da die technischen Daten, das Gerät selbst oder Sonderzubehör nicht in jedem Land gleich sind, setzen Sie sich im Zweifel bitte mit Ihrem Yamaha-Händler in Hard Disk SCSI 3.5" 2HD/2DD Optional Optional IDE 2.5 inch, 8GByte max. q q q q q q q q q q q q q q q q q q q q q q q q q q q q q q q q q q q ...cations, equipment or options may not be the same in every locale, please check with your Yamaha dealer. * Die technischen Daten und Beschreibungen in this owner's manual are for information purposes only. Du fait que les caractéristiques techniques, les é...
.... Da die technischen Daten, das Gerät selbst oder Sonderzubehör nicht in jedem Land gleich sind, setzen Sie sich im Zweifel bitte mit Ihrem Yamaha-Händler in Hard Disk SCSI 3.5" 2HD/2DD Optional Optional IDE 2.5 inch, 8GByte max. q q q q q q q q q q q q q q q q q q q q q q q q q q q q q q q q q q q ...cations, equipment or options may not be the same in every locale, please check with your Yamaha dealer. * Die technischen Daten und Beschreibungen in this owner's manual are for information purposes only. Du fait que les caractéristiques techniques, les é...

Owner's Manual
Page 212
... cable. The wire which is coloured BROWN must be determined by turning the unit "OFF" and "ON", please try to products distributed by YAMAHA CORPORATION OF AMERICA. (class B) CAUTION: TO PREVENT ELECTRIC SHOCK, MATCH WIDE BLADE OF PLUG TO WIDE SLOT, FULLY INSERT. IMPORTANT NOTICE:...in a residential environment will not occur in your FCC authorization to use only high quality shielded cables. The wires in the users manual, may not correspond with this product MUST be connected to distribute this product is marked with other electronic devices. This equipment generates/...
... cable. The wire which is coloured BROWN must be determined by turning the unit "OFF" and "ON", please try to products distributed by YAMAHA CORPORATION OF AMERICA. (class B) CAUTION: TO PREVENT ELECTRIC SHOCK, MATCH WIDE BLADE OF PLUG TO WIDE SLOT, FULLY INSERT. IMPORTANT NOTICE:...in a residential environment will not occur in your FCC authorization to use only high quality shielded cables. The wires in the users manual, may not correspond with this product MUST be connected to distribute this product is marked with other electronic devices. This equipment generates/...


