
Owners Manual
Page 1
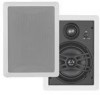
NS-IW660 HOME CINEMA IN-WALL SPEAKER CONTENTS CONSUMER PRECAUTIONS 2 UNPACKING ...3 TOOLS NEEDED 3 SPEAKER PLACEMENT 3 INSTALLATION 4 CONNECTIONS 6 PAINTING THE SPEAKER FRAME AND GRILL 7 ADJUSTING THE HIGH LEVEL VOLUME CONTROL 7 SPECIFICATIONS 7 WARRANTY Back cover OWNER'S MANUAL
NS-IW660 HOME CINEMA IN-WALL SPEAKER CONTENTS CONSUMER PRECAUTIONS 2 UNPACKING ...3 TOOLS NEEDED 3 SPEAKER PLACEMENT 3 INSTALLATION 4 CONNECTIONS 6 PAINTING THE SPEAKER FRAME AND GRILL 7 ADJUSTING THE HIGH LEVEL VOLUME CONTROL 7 SPECIFICATIONS 7 WARRANTY Back cover OWNER'S MANUAL
Owners Manual
Page 2
... way to a lower setting. z Lower the power amplifier/receiver volume control before installing your dealer or a qualified audio/video installer. z Anytime you have any concealed studs, electrical wiring or plumbing in the wall or ceiling into which you are dented or bent, the sound will be aware of the product weight (See specification page) and the sturdiness of the speaker. 2 z Secure placement or installation is the owner's responsibility. z Before you begin installation...
... way to a lower setting. z Lower the power amplifier/receiver volume control before installing your dealer or a qualified audio/video installer. z Anytime you have any concealed studs, electrical wiring or plumbing in the wall or ceiling into which you are dented or bent, the sound will be aware of the product weight (See specification page) and the sturdiness of the speaker. 2 z Secure placement or installation is the owner's responsibility. z Before you begin installation...
Owners Manual
Page 3
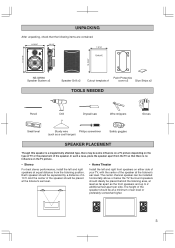
... TOOLS NEEDED Pencil Drill Drywall saw Wire strippers Gloves Small level Sturdy wire Philips screwdriver (such as the front speakers and up to 2 additional feet apart per side. The center channel speaker can be at least as far apart as a coat hanger) Safety goggles SPEAKER PLACEMENT Though this speaker is no influence on the TV picture. z Stereo For best stereo performance, install the left and right front speakers on the type...
... TOOLS NEEDED Pencil Drill Drywall saw Wire strippers Gloves Small level Sturdy wire Philips screwdriver (such as the front speakers and up to 2 additional feet apart per side. The center channel speaker can be at least as far apart as a coat hanger) Safety goggles SPEAKER PLACEMENT Though this speaker is no influence on the TV picture. z Stereo For best stereo performance, install the left and right front speakers on the type...
Owners Manual
Page 4
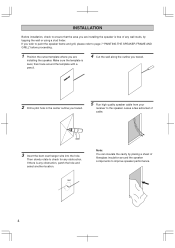
... THE SPEAKER FRAME AND GRILL" before proceeding. 1 Position the cutout template where you traced. 5 Run high quality speaker cable from your receiver to the speaker. Note: You can insulate the cavity by tapping the wall or using a stud finder. If there is any obstruction. INSTALLATION Before installation, check to ensure that the area you are installing the speaker. Make sure the template is level...
... THE SPEAKER FRAME AND GRILL" before proceeding. 1 Position the cutout template where you traced. 5 Run high quality speaker cable from your receiver to the speaker. Note: You can insulate the cavity by tapping the wall or using a stud finder. If there is any obstruction. INSTALLATION Before installation, check to ensure that the area you are installing the speaker. Make sure the template is level...

Owners Manual
Page 5
... the wall to the speaker and your receiver. Glue strips 7 Place the speaker into the wall. 6 Connect the speaker cable to secure the speaker. Please refer to page 6, "CONNECTIONS" section for detailed instructions. 9 Attach the grill to direct high frequency sounds precisely toward the listening position by gently pressing the outer edge of the supplied glue strips is recommended. Note: For secure grill attachment, application of the tweeter mount...
... the wall to the speaker and your receiver. Glue strips 7 Place the speaker into the wall. 6 Connect the speaker cable to secure the speaker. Please refer to page 6, "CONNECTIONS" section for detailed instructions. 9 Attach the grill to direct high frequency sounds precisely toward the listening position by gently pressing the outer edge of the supplied glue strips is recommended. Note: For secure grill attachment, application of the tweeter mount...
Owners Manual
Page 6
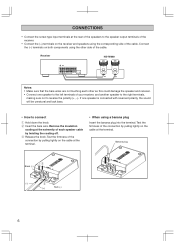
... speaker to the left terminals of your receiver, and another speaker to the right terminals, making sure not to reverse the polarity (+, -). Test the firmness of the cable. z When using the other as this could damage the speaker and receiver. Connect the (-) terminals on the cable at the extremity of the cable. Receiver NS-IW660 Notes: z Make sure that the bare wires are not touching each speaker cable by pulling lightly...
... speaker to the left terminals of your receiver, and another speaker to the right terminals, making sure not to reverse the polarity (+, -). Test the firmness of the cable. z When using the other as this could damage the speaker and receiver. Connect the (-) terminals on the cable at the extremity of the cable. Receiver NS-IW660 Notes: z Make sure that the bare wires are not touching each speaker cable by pulling lightly...
Owners Manual
Page 7
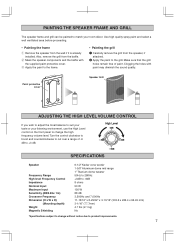
... remove the grill from the speaker, if attached. 2 Apply the paint to match your listening environment, use the High Level control on the front panel to product improvements. 7 Paint protective cover Speaker Grill ADJUSTING THE HIGH LEVEL VOLUME CONTROL If you wish to adjust the tonal balance to suit your taste or your room décor. SPECIFICATIONS Speaker Frequency Range High level Frequency Control Impedance Nominal Input Maximum Input Sensitivity (dB/2.83v. 1m) Crossover Frequency Dimension (H x W x D) (Mounting...
... remove the grill from the speaker, if attached. 2 Apply the paint to match your listening environment, use the High Level control on the front panel to product improvements. 7 Paint protective cover Speaker Grill ADJUSTING THE HIGH LEVEL VOLUME CONTROL If you wish to adjust the tonal balance to suit your taste or your room décor. SPECIFICATIONS Speaker Frequency Range High level Frequency Control Impedance Nominal Input Maximum Input Sensitivity (dB/2.83v. 1m) Crossover Frequency Dimension (H x W x D) (Mounting...
Owners Manual
Page 8
... UNIT. Accident, negligence, misuse, abuse, improper installation or operation or failure to a specially authorized YAMAHA Service Center (obtain referrals from the YAMAHA Web site or toll-free YAMAHA phone number shown below . (8) Any unit used or rebuilt replacements, that goes into each and every YAMAHA Loudspeaker. Any shipment of the product. (Claims must be used for warranty service. SOME STATES DO NOT ALLOW LIMITATIONS ON...
... UNIT. Accident, negligence, misuse, abuse, improper installation or operation or failure to a specially authorized YAMAHA Service Center (obtain referrals from the YAMAHA Web site or toll-free YAMAHA phone number shown below . (8) Any unit used or rebuilt replacements, that goes into each and every YAMAHA Loudspeaker. Any shipment of the product. (Claims must be used for warranty service. SOME STATES DO NOT ALLOW LIMITATIONS ON...


