Owners Manual
Page 1
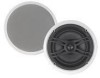
NS-IW560C HOME CINEMA IN-CEILING SPEAKER CONTENTS CONSUMER PRECAUTIONS 2 UNPACKING ...3 TOOLS NEEDED 3 SPEAKER PLACEMENT 3 INSTALLATION 4 CONNECTIONS 6 PAINTING THE SPEAKER FRAME AND GRILL 7 SPECIFICATIONS 7 WARRANTY Back cover OWNER'S MANUAL
NS-IW560C HOME CINEMA IN-CEILING SPEAKER CONTENTS CONSUMER PRECAUTIONS 2 UNPACKING ...3 TOOLS NEEDED 3 SPEAKER PLACEMENT 3 INSTALLATION 4 CONNECTIONS 6 PAINTING THE SPEAKER FRAME AND GRILL 7 SPECIFICATIONS 7 WARRANTY Back cover OWNER'S MANUAL
Owners Manual
Page 2
... instructions provided in this owner's manual are not sure of a safe way to install these precautions carefully before installing your NS-IW560C speaker. • Before you begin installation, read this type of wall construction. • When installing your NS-IW560C in-eciling speakers, be distorted. • Lower the power amplifier/receiver volume control before changing input sources. The wiring method and compartment shall be in accordance with the applicable section of the National Electrical Code...
... instructions provided in this owner's manual are not sure of a safe way to install these precautions carefully before installing your NS-IW560C speaker. • Before you begin installation, read this type of wall construction. • When installing your NS-IW560C in-eciling speakers, be distorted. • Lower the power amplifier/receiver volume control before changing input sources. The wiring method and compartment shall be in accordance with the applicable section of the National Electrical Code...
Owners Manual
Page 3
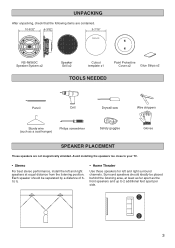
...aaaaaa16" TEMPLATE NS-IW560C Speaker System x2 Speaker Grill x2 Cutout template x1 Paint Protective Cover x2 Glue Strips x2 TOOLS NEEDED Pencil Drill Drywall saw Wire strippers Sturdy wire (such as the front speakers and up to your TV. • Stereo For best stereo performance, install the left and right surround channels.
...aaaaaa16" TEMPLATE NS-IW560C Speaker System x2 Speaker Grill x2 Cutout template x1 Paint Protective Cover x2 Glue Strips x2 TOOLS NEEDED Pencil Drill Drywall saw Wire strippers Sturdy wire (such as the front speakers and up to your TV. • Stereo For best stereo performance, install the left and right surround channels.
Owners Manual
Page 4
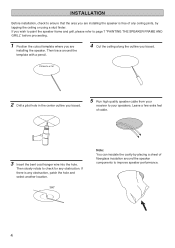
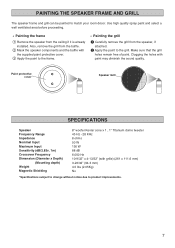
... the ceiling or using a stud finder. If you wish to paint the speaker frame and grill, please refer to page 7 "PAINTING THE SPEAKER FRAME AND GRILL" before proceeding. 1 Position the cutout template where you are installing the speaker is any obstruction. INSTALLATION Before installation, check to ensure that the area you are installing the speaker. TEMPLATE 2 Drill a pilot hole in the center outline...
... the ceiling or using a stud finder. If you wish to paint the speaker frame and grill, please refer to page 7 "PAINTING THE SPEAKER FRAME AND GRILL" before proceeding. 1 Position the cutout template where you are installing the speaker is any obstruction. INSTALLATION Before installation, check to ensure that the area you are installing the speaker. TEMPLATE 2 Drill a pilot hole in the center outline...
Owners Manual
Page 5
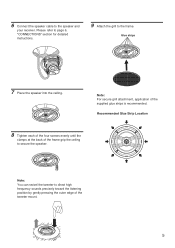
...the tweeter mount. 5 Please refer to page 6, "CONNECTIONS" section for detailed instructions. 9 Attach the grill to the speaker and your receiver. 6 Connect the speaker cable to the frame. Note: You can swivel the tweeter to secure the speaker. Recommended Glue Strip Location 8 Tighten each of the four screws evenly until the clamps at the back of the frame grip the ceiling to direct high frequency sounds ...
...the tweeter mount. 5 Please refer to page 6, "CONNECTIONS" section for detailed instructions. 9 Attach the grill to the speaker and your receiver. 6 Connect the speaker cable to the frame. Note: You can swivel the tweeter to secure the speaker. Recommended Glue Strip Location 8 Tighten each of the four screws evenly until the clamps at the back of the frame grip the ceiling to direct high frequency sounds ...
Owners Manual
Page 6
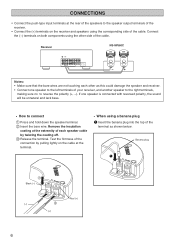
... the cable. Receiver NS-IW560C +− − + Notes: • Make sure that the bare wires are not touching each speaker cable by pulling lightly on the cable at the terminal. • When using a banana plug 1 Insert the banana plug into the top of the terminal as this could damage the speaker and receiver. • Connect one speaker is connected with reversed polarity, the sound will be unnatural and lack bass...
... the cable. Receiver NS-IW560C +− − + Notes: • Make sure that the bare wires are not touching each speaker cable by pulling lightly on the cable at the terminal. • When using a banana plug 1 Insert the banana plug into the top of the terminal as this could damage the speaker and receiver. • Connect one speaker is connected with reversed polarity, the sound will be unnatural and lack bass...
Owners Manual
Page 7
...aaSPECIFICATIONS Speaker Frequency Range Impedance Nominal lnput Maximum lnput Sensitivity (dB/2.83v. 1m) Crossover Frequency Dimension (Diameter x Depth) (Mounting depth) Weight Magnetic Shielding 8" woofer Kevlar cone x 1 , 1" Titanium dome tweeter 45 Hz - 28 KHz 8 ohms 50 W 150 W 88 dB 6,000 Hz 10-9/32" x 4-13/32" (with grille) (261 x 111.6 mm) 3-23/32" (94.3 mm) 4.5 lbs (2.05Kg) No *Specifications subject to change...
...aaSPECIFICATIONS Speaker Frequency Range Impedance Nominal lnput Maximum lnput Sensitivity (dB/2.83v. 1m) Crossover Frequency Dimension (Diameter x Depth) (Mounting depth) Weight Magnetic Shielding 8" woofer Kevlar cone x 1 , 1" Titanium dome tweeter 45 Hz - 28 KHz 8 ohms 50 W 150 W 88 dB 6,000 Hz 10-9/32" x 4-13/32" (with grille) (261 x 111.6 mm) 3-23/32" (94.3 mm) 4.5 lbs (2.05Kg) No *Specifications subject to change...
Owners Manual
Page 8
... 90620-1345 internet URL: www.yamaha.com/yec For referral to your sales receipt or other than YAMAHA or a specially authorized YAMAHA Service Center. (2) Any unit which has been altered, or on which the serial number or cabinet has been defaced, modified or removed. (3) Consequential, economic or property damage. (4) Normal wear and maintenance. (5) Initial setup or check-ups with ho...
... 90620-1345 internet URL: www.yamaha.com/yec For referral to your sales receipt or other than YAMAHA or a specially authorized YAMAHA Service Center. (2) Any unit which has been altered, or on which the serial number or cabinet has been defaced, modified or removed. (3) Consequential, economic or property damage. (4) Normal wear and maintenance. (5) Initial setup or check-ups with ho...


