
Owners Manual
Page 1
NS-IW280C HOME CINEMA IN-CEILING SPEAKER CONTENTS CONSUMER PRECAUTIONS 2 UNPACKING ...3 TOOLS NEEDED 3 SPEAKER PLACEMENT 3 INSTALLATION 4 CONNECTIONS 6 PAINTING THE SPEAKER FRAME AND GRILL 7 SPECIFICATIONS 7 WARRANTY Back cover NS-IW280C OWNER'S MANUAL
NS-IW280C HOME CINEMA IN-CEILING SPEAKER CONTENTS CONSUMER PRECAUTIONS 2 UNPACKING ...3 TOOLS NEEDED 3 SPEAKER PLACEMENT 3 INSTALLATION 4 CONNECTIONS 6 PAINTING THE SPEAKER FRAME AND GRILL 7 SPECIFICATIONS 7 WARRANTY Back cover NS-IW280C OWNER'S MANUAL

Owners Manual
Page 2
... you are dented or bent, the sound will be distorted. Never touch the woofer or tweeter units with your NS-IW280C in the wall or ceiling into which you note distortion, reduce the volume control on your NS-IW280C speakers. YAMAHA shall not be liable for example, FM to install these precautions carefully before changing input sources...
... you are dented or bent, the sound will be distorted. Never touch the woofer or tweeter units with your NS-IW280C in the wall or ceiling into which you note distortion, reduce the volume control on your NS-IW280C speakers. YAMAHA shall not be liable for example, FM to install these precautions carefully before changing input sources...
Owners Manual
Page 4
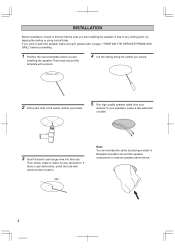
... is free of any ceiling joints, by placing a sheet of cable. 3 Insert the bent coat hanger wire into the hole. TEMPLATE 2 Drill a pilot hole in the center outline you traced. 5 Run high quality speaker cable from your receiver to improve speaker performance. 4 NS-IW280C Then trace around the speaker components to your speakers. If you wish to...
... is free of any ceiling joints, by placing a sheet of cable. 3 Insert the bent coat hanger wire into the hole. TEMPLATE 2 Drill a pilot hole in the center outline you traced. 5 Run high quality speaker cable from your receiver to improve speaker performance. 4 NS-IW280C Then trace around the speaker components to your speakers. If you wish to...
Owners Manual
Page 5
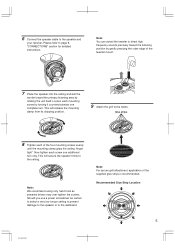
... over-tighten the screws. This will secure the speaker firmly to the speaker and your receiver. 6 Connect the speaker cable to the ceiling. Note: For secure grill attachment, application of the four mounting screws evenly until the mounting clamp grips the ceiling "finger tight". Recommended Glue Strip Location 5 NS-IW280C Glue strips 8 Tighten each mounting screw by...
... over-tighten the screws. This will secure the speaker firmly to the speaker and your receiver. 6 Connect the speaker cable to the ceiling. Note: For secure grill attachment, application of the four mounting screws evenly until the mounting clamp grips the ceiling "finger tight". Recommended Glue Strip Location 5 NS-IW280C Glue strips 8 Tighten each mounting screw by...
Owners Manual
Page 7
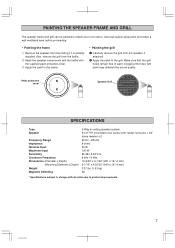
... Diameter x Depth) Weight Magnetic Shielding 3-Way In-ceiling speaker system 6-1/2" P.P. mica filled cone woofer with paint may diminish the sound quality. Make sure that the grill holes remain free of paint. Also, remove the grill from the speaker, if attached. 2 Apply the paint to product improvements. 7 NS-IW280C Painting the grill 1 Carefully remove the grill...
... Diameter x Depth) Weight Magnetic Shielding 3-Way In-ceiling speaker system 6-1/2" P.P. mica filled cone woofer with paint may diminish the sound quality. Make sure that the grill holes remain free of paint. Also, remove the grill from the speaker, if attached. 2 Apply the paint to product improvements. 7 NS-IW280C Painting the grill 1 Carefully remove the grill...


