
Owner's Manual
Page 3
..., do maintenance when children are prohibited. Please be of the finish may change over time however, it is sharpened to provide greater key action. Piccolo/Flute Owner's Manual Precautions Please read before using polish. Please follow and obey these precautions to disfigure the instrument. The mouthpiece or other parts may result...
..., do maintenance when children are prohibited. Please be of the finish may change over time however, it is sharpened to provide greater key action. Piccolo/Flute Owner's Manual Precautions Please read before using polish. Please follow and obey these precautions to disfigure the instrument. The mouthpiece or other parts may result...

Owner's Manual
Page 4
Nomenclature ■ Piccolo Headjoint ■ Flute Headjoint 18 Crown Embouchure Hole Body Crown Embouchure Hole Keys Headjoint Crown Body Lip Plate Embouchure Hole Footjoint Keys Body Keys Footjoint
Nomenclature ■ Piccolo Headjoint ■ Flute Headjoint 18 Crown Embouchure Hole Body Crown Embouchure Hole Keys Headjoint Crown Body Lip Plate Embouchure Hole Footjoint Keys Body Keys Footjoint
Owner's Manual
Page 5
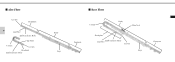
■ Alto Flute Crown Headjoint 19 Lip Plate Embouchure Hole Lip Plate U-Joint Crown Headjoint Embouchure Hole Body Keys ■ Bass Flute U-Joint Body Hand rest Footjoint Headjoint Lip Plate Embouchure Hole Crown Keys Footjoint
■ Alto Flute Crown Headjoint 19 Lip Plate Embouchure Hole Lip Plate U-Joint Crown Headjoint Embouchure Hole Body Keys ■ Bass Flute U-Joint Body Hand rest Footjoint Headjoint Lip Plate Embouchure Hole Crown Keys Footjoint
Owner's Manual
Page 6
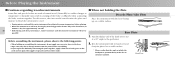
...8226; When holding or assembling the instrument, do not play it for about 20 to piccolo and bass flutes only). ■ When not holding the flute Piccolo/Flute/Alto Flute Place the instrument with its hand rest and footjoint placed on a stable surface. Turn the thicker end of...joints before playing. • When the instrument is positioned may result in strument unstable. Bass Flute 1. Hand rest Before Playing the Instrument ■ Cautions regarding wooden instruments Some flute and piccolo bodies are made of natural wood (Grenadilla) so sudden changes in temperature or ...
...8226; When holding or assembling the instrument, do not play it for about 20 to piccolo and bass flutes only). ■ When not holding the flute Piccolo/Flute/Alto Flute Place the instrument with its hand rest and footjoint placed on a stable surface. Turn the thicker end of...joints before playing. • When the instrument is positioned may result in strument unstable. Bass Flute 1. Hand rest Before Playing the Instrument ■ Cautions regarding wooden instruments Some flute and piccolo bodies are made of natural wood (Grenadilla) so sudden changes in temperature or ...

Owner's Manual
Page 7
■ Putting the instrument in the case. Also, never leave a damp cloth or gauze, etc., in its case First, wipe off moisture and dirt from the joints, then place the headjoint into the case snugly, without forcing. 21 When closing the case, make sure that both hands and face are no objects such as you please. For instruments with the metal on the keys causing damage. Key cap Ointments or creams containing sulfur (for acne, etc.) coming in contact with ring key caps, take care not to change the instrument's tonal character as a gauze or cloth on top of the silver or ...
■ Putting the instrument in the case. Also, never leave a damp cloth or gauze, etc., in its case First, wipe off moisture and dirt from the joints, then place the headjoint into the case snugly, without forcing. 21 When closing the case, make sure that both hands and face are no objects such as you please. For instruments with the metal on the keys causing damage. Key cap Ointments or creams containing sulfur (for acne, etc.) coming in contact with ring key caps, take care not to change the instrument's tonal character as a gauze or cloth on top of the silver or ...
Owner's Manual
Page 8
Marks Body Marks Footjoint Headjoint Body Body Flute Headjoint Taking care not to press the keys, attach the headjoint to the body. * Take care not grasp the lip plate on the headjoint, and ...
Marks Body Marks Footjoint Headjoint Body Body Flute Headjoint Taking care not to press the keys, attach the headjoint to the body. * Take care not grasp the lip plate on the headjoint, and ...

Owner's Manual
Page 9
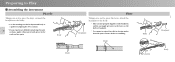
... its uppermost point, and the footjoint by its lowest point, and attach the footjoint to the body. * Use a gauze to the main body. Alto Flute/Bass Flute 1. Footjoint Body Taking care not to press to the keys, hold the body in the middle and try again. Attach the U-joint to wipe off...
... its uppermost point, and the footjoint by its lowest point, and attach the footjoint to the body. * Use a gauze to the main body. Alto Flute/Bass Flute 1. Footjoint Body Taking care not to press to the keys, hold the body in the middle and try again. Attach the U-joint to wipe off...
Owner's Manual
Page 10
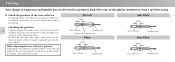
..., its position should be checked periodically. Piccolo 7.5mm Alto Flute 26mm Checking the position 24 Using the supplied cleaning rod accessory, insert it into the headjoint and make sure that the line on the cleaning rod Flute 17mm Tone reflector Cleaning rod Tone reflector Cleaning rod Bass... Flute 40mm Tone reflector Cleaning rod Tone reflector Cleaning rod Line on the cleaning rod is centered in the...
..., its position should be checked periodically. Piccolo 7.5mm Alto Flute 26mm Checking the position 24 Using the supplied cleaning rod accessory, insert it into the headjoint and make sure that the line on the cleaning rod Flute 17mm Tone reflector Cleaning rod Tone reflector Cleaning rod Bass... Flute 40mm Tone reflector Cleaning rod Tone reflector Cleaning rod Line on the cleaning rod is centered in the...

Owner's Manual
Page 11
U-joint Body Headjoint Piccolo/Flute Tuning is complete, tune the instrument. Doing so will degrade the pitch balance making it in to raise the pitch. After tone reflector adjustment is ... the headjoint slightly toward or away from the body. * Do not adjust the space between the headjoint and U-joint. Headjoint Body Alto Flute/Bass Flute On the alto and bass flutes, tuning is too close to the crown Loosen the crown, push the tone reflector to the right and re-tighten the crown...
U-joint Body Headjoint Piccolo/Flute Tuning is complete, tune the instrument. Doing so will degrade the pitch balance making it in to raise the pitch. After tone reflector adjustment is ... the headjoint slightly toward or away from the body. * Do not adjust the space between the headjoint and U-joint. Headjoint Body Alto Flute/Bass Flute On the alto and bass flutes, tuning is too close to the crown Loosen the crown, push the tone reflector to the right and re-tighten the crown...

Owner's Manual
Page 12
Wrap the gauze around the end of the cleaning rod, making sure no bare metal is wrapped and wipe away moisture from wooden instruments. Wipe away moisture from the joint sections as well. * Take extra care removing moisture from the instrument's bore. Gauze Gauze Moisture left in the bore can result in the same direction that the gauze is exposed. * Exposed metal can damage the interior of the cleaning rod. 26 2. Maintenance ■ After playing the instrument ● Cleaning the body 1. Rotate the body in cracking. Cleaning rod Gauze Gauze 3. Insert the corner of a ...
Wrap the gauze around the end of the cleaning rod, making sure no bare metal is wrapped and wipe away moisture from wooden instruments. Wipe away moisture from the joint sections as well. * Take extra care removing moisture from the instrument's bore. Gauze Gauze Moisture left in the bore can result in the same direction that the gauze is exposed. * Exposed metal can damage the interior of the cleaning rod. 26 2. Maintenance ■ After playing the instrument ● Cleaning the body 1. Rotate the body in cracking. Cleaning rod Gauze Gauze 3. Insert the corner of a ...

Owner's Manual
Page 13
Polishing cloth Polishing cloth ● Pad maintenance 1. Cleaning paper Powder paper ● Cleaning the exterior Taking care not to apply pressure on the keys, use a piece of cleaning paper between the pad and the tone hole and completely remove moisture from the instrument's exterior. * When cleaning the keys, take care not to remove the stickiness. While the pads are still sticky, use a polishing cloth to wipe away fingerprints or oil from them. 27 2. If the pads are still wet, insert a piece of powder paper to damage the pads.
Polishing cloth Polishing cloth ● Pad maintenance 1. Cleaning paper Powder paper ● Cleaning the exterior Taking care not to apply pressure on the keys, use a piece of cleaning paper between the pad and the tone hole and completely remove moisture from the instrument's exterior. * When cleaning the keys, take care not to remove the stickiness. While the pads are still sticky, use a polishing cloth to wipe away fingerprints or oil from them. 27 2. If the pads are still wet, insert a piece of powder paper to damage the pads.

Owner's Manual
Page 14
Also, do not point the end of the spout toward your eyes. 1. Oil can be a danger. Key oil 2. After applying oil, move the key several times to spread the oil evenly. Apply some key oil to the key mechanisms. 28 * Do not apply too much key oil. * Completely remove any oil that gets onto the surface of the spout with your hand. Never touch the end of the keys or instrument. ■ Maintenance required every two to three months Be careful when using the key oil The end of the oil spout is sharp and therefore can spray out of the spout and possibly into your face.
Also, do not point the end of the spout toward your eyes. 1. Oil can be a danger. Key oil 2. After applying oil, move the key several times to spread the oil evenly. Apply some key oil to the key mechanisms. 28 * Do not apply too much key oil. * Completely remove any oil that gets onto the surface of the spout with your hand. Never touch the end of the keys or instrument. ■ Maintenance required every two to three months Be careful when using the key oil The end of the oil spout is sharp and therefore can spray out of the spout and possibly into your face.

Owner's Manual
Page 15
The pads and tone holes may be worn. Excessive force applied to the key mechanisms. If that doesn't improve key function, contact the dealer from whom you purchased the instrument. 29 The keys are stiff and function poorly. Too much oil may be worn. → Apply some other deformation in the body of tune. The headjoint may be deformed. Attaching or removing the headjoint is not clear, or the instrument plays out of the instrument. → Contact the dealer from whom you purchased the instrument. There may have been left attached to the keys may have bent them . → ...
The pads and tone holes may be worn. Excessive force applied to the key mechanisms. If that doesn't improve key function, contact the dealer from whom you purchased the instrument. 29 The keys are stiff and function poorly. Too much oil may be worn. → Apply some other deformation in the body of tune. The headjoint may be deformed. Attaching or removing the headjoint is not clear, or the instrument plays out of the instrument. → Contact the dealer from whom you purchased the instrument. There may have been left attached to the keys may have bent them . → ...
