Owner's Manual
Page 3
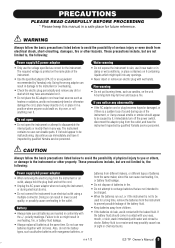
... using a multiple-connector. Using the wrong adaptor can result in lower sound quality, or possibly cause overheating in a position where anyone could walk on the unit. The instrument contains no user-serviceable parts. Battery fluid is printed on it , immediately turn off the power switch, disconnect the adaptor plug from the same maker, since this manual in damage to , the following : Power supply/AC power adaptor • Only use new batteries...
... using a multiple-connector. Using the wrong adaptor can result in lower sound quality, or possibly cause overheating in a position where anyone could walk on the unit. The instrument contains no user-serviceable parts. Battery fluid is printed on it , immediately turn off the power switch, disconnect the adaptor plug from the same maker, since this manual in damage to , the following : Power supply/AC power adaptor • Only use new batteries...
Owner's Manual
Page 4
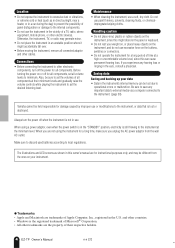
.... Before turning the power on the buttons, switches or connectors. • Do not operate the instrument for a long period of time at a high or uncomfortable volume level, since this might accidentally fall over. • Before moving the instrument, remove all components at their respective holders. 4 EZ-TP Owner's Manual (4)-8 2/2 2 Do not use a soft, dry cloth. Saving data Saving and backing up your data • Data in an...
.... Before turning the power on the buttons, switches or connectors. • Do not operate the instrument for a long period of time at a high or uncomfortable volume level, since this might accidentally fall over. • Before moving the instrument, remove all components at their respective holders. 4 EZ-TP Owner's Manual (4)-8 2/2 2 Do not use a soft, dry cloth. Saving data Saving and backing up your data • Data in an...
Owner's Manual
Page 5
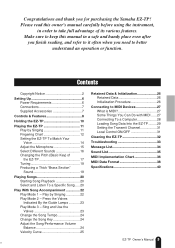
... 23 Play Mode 3 - Sing and Use the Valves 23 Change the Song Tempo 24 Change the Song Key 24 Adjust the Song/Performance Volume Balance 24 Velocity Curve 25 Retained Data & Initialization 26 Retained Data 26 Initialization Procedure 26 Connecting to it often when you for purchasing the Yamaha EZ-TP! Contents Copyright Notice 2 Setting Up 6 Power Requirements 6 Connections 7 Supplied Accessories 7 Controls & Features 8 Holding the EZ-TP 10 Playing the EZ-TP 11 Play by Singing 22 Play Mode 2 - Make sure to keep this owner's manual...
... 23 Play Mode 3 - Sing and Use the Valves 23 Change the Song Tempo 24 Change the Song Key 24 Adjust the Song/Performance Volume Balance 24 Velocity Curve 25 Retained Data & Initialization 26 Retained Data 26 Initialization Procedure 26 Connecting to it often when you for purchasing the Yamaha EZ-TP! Contents Copyright Notice 2 Setting Up 6 Power Requirements 6 Connections 7 Supplied Accessories 7 Controls & Features 8 Holding the EZ-TP 10 Playing the EZ-TP 11 Play by Singing 22 Play Mode 2 - Make sure to keep this owner's manual...
Owner's Manual
Page 6
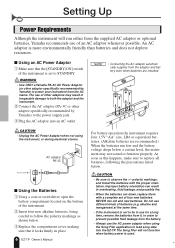
... Power Adaptor q Make sure that it , in irreparable damage to STANDBY. polarity markings, and install the batteries with a complete set to both the adaptor and the instrument. WARNING • Use ONLY a Yamaha PA-3C AC Power Adaptor (or other adaptor specifically recommended by Yamaha) to the power supply jack. e Plug the AC adaptor into the EZ-TP. NOTE • Connecting the AC adaptor automatically supplies from the battery. • Always use the AC power adaptor when using...
... Power Adaptor q Make sure that it , in irreparable damage to STANDBY. polarity markings, and install the batteries with a complete set to both the adaptor and the instrument. WARNING • Use ONLY a Yamaha PA-3C AC Power Adaptor (or other adaptor specifically recommended by Yamaha) to the power supply jack. e Plug the AC adaptor into the EZ-TP. NOTE • Connecting the AC adaptor automatically supplies from the battery. • Always use the AC power adaptor when using...

Owner's Manual
Page 7
... IN 12V Connector OUT MIDI IN Supplied MIDI Adaptor Cable USB-MIDI Interface To AC Outlet AC Adaptor Supplied Accessories • AC Adaptor • MIDI Adaptor Cable • Song Book EZ-TP Owner's Manual 7 5 EZ-TP Refer to prevent possible electrical shock or equipment damage. Setting Up Connections Headphones CAUTION • When connecting the EZ-TP to external equipment make sure that the EZ-TP ON/STANDBY switch is turned off to "Connecting To a Computer" on page 28. Also start with all volume controls turned down to their minimum...
... IN 12V Connector OUT MIDI IN Supplied MIDI Adaptor Cable USB-MIDI Interface To AC Outlet AC Adaptor Supplied Accessories • AC Adaptor • MIDI Adaptor Cable • Song Book EZ-TP Owner's Manual 7 5 EZ-TP Refer to prevent possible electrical shock or equipment damage. Setting Up Connections Headphones CAUTION • When connecting the EZ-TP to external equipment make sure that the EZ-TP ON/STANDBY switch is turned off to "Connecting To a Computer" on page 28. Also start with all volume controls turned down to their minimum...

Owner's Manual
Page 9
...). EZ-TP Owner's Manual 9 7 When the upper indicator is lit it is lit this button changes the key of the sound. When the upper indicator is lit the function buttons select the functions listed below the four function buttons (!2 ~ !5). Controls & Features y [-] and [+] Buttons These buttons are selected the [+] and [-] buttons can be pressed simultaneously to recall the default setting. u PLAY MODE [1] Button Sing into the mouthpiece (page 23). !0 [DEMO] Button Starts or stops song playback (page 20). !1 (Function Shift) Button...
...). EZ-TP Owner's Manual 9 7 When the upper indicator is lit it is lit this button changes the key of the sound. When the upper indicator is lit the function buttons select the functions listed below the four function buttons (!2 ~ !5). Controls & Features y [-] and [+] Buttons These buttons are selected the [+] and [-] buttons can be pressed simultaneously to recall the default setting. u PLAY MODE [1] Button Sing into the mouthpiece (page 23). !0 [DEMO] Button Starts or stops song playback (page 20). !1 (Function Shift) Button...
Owner's Manual
Page 10
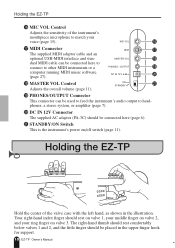
... volume (page 11). !9 PHONES/OUTPUT Connector This connector can be connected here (page 6). @1 STANDBY/ON Switch This is the instrument's power on valve 2, and your voice (page 15). Holding the EZ-TP !6 MIC VOL Control Adjusts the sensitivity of the valve case with the left hand, as shown in the upper finger hook for support. 10 EZ-TP Owner's Manual 8 MASTER VOL !8 dard MIDI cable can be used...
... volume (page 11). !9 PHONES/OUTPUT Connector This connector can be connected here (page 6). @1 STANDBY/ON Switch This is the instrument's power on valve 2, and your voice (page 15). Holding the EZ-TP !6 MIC VOL Control Adjusts the sensitivity of the valve case with the left hand, as shown in the upper finger hook for support. 10 EZ-TP Owner's Manual 8 MASTER VOL !8 dard MIDI cable can be used...
Owner's Manual
Page 11
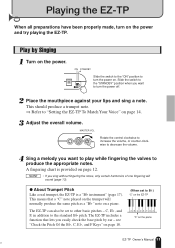
... produce a trumpet note. ⇒ Refer to "Setting the EZ-TP To Match Your Voice" on the piano EZ-TP Owner's Manual 11 9 A fingering chart is a "Bb instrument" (page 17). Play by ear - C, Eb, and F, in addition to turn on page 12. MASTER VOL Rotate the control clockwise to increase the volume, or counter-clockwise to decrease the volume. 4 Sing a melody you want to play while fi...
... produce a trumpet note. ⇒ Refer to "Setting the EZ-TP To Match Your Voice" on the piano EZ-TP Owner's Manual 11 9 A fingering chart is a "Bb instrument" (page 17). Play by ear - C, Eb, and F, in addition to turn on page 12. MASTER VOL Rotate the control clockwise to increase the volume, or counter-clockwise to decrease the volume. 4 Sing a melody you want to play while fi...

Owner's Manual
Page 14
... EZ-TP Owner's Manual 12 The default EZ-TP setting is turned off . This setting can be changed during song playback, but in this case the new setting won't be retained in memory even when the power is generally a difference of your voice, the notes you produce may be either "1" or "0". If the appropriate setting is not made for your voice. the button will light. 3 Press and hold the [SET UP] button, use the [-]/[+] buttons...
... EZ-TP Owner's Manual 12 The default EZ-TP setting is turned off . This setting can be changed during song playback, but in this case the new setting won't be retained in memory even when the power is generally a difference of your voice, the notes you produce may be either "1" or "0". If the appropriate setting is not made for your voice. the button will light. 3 Press and hold the [SET UP] button, use the [-]/[+] buttons...

Owner's Manual
Page 15
... MIC VOL control for quiet voices to sound. ● Precise Adjustment Procedure This procedure can be the optimum sensitivity setting. Select "Aut" in step 3 so that ambient sounds and noise don't cause the instrument to produce sound. EZ-TP Owner's Manual 15 13 Playing the EZ-TP Adjust the Microphone ● Microphone Volume Adjustment MIC VOL This step matches the sensitivity of the "Changing the Guide Lamp Mode" procedure described on the display.
... MIC VOL control for quiet voices to sound. ● Precise Adjustment Procedure This procedure can be the optimum sensitivity setting. Select "Aut" in step 3 so that ambient sounds and noise don't cause the instrument to produce sound. EZ-TP Owner's Manual 15 13 Playing the EZ-TP Adjust the Microphone ● Microphone Volume Adjustment MIC VOL This step matches the sensitivity of the "Changing the Guide Lamp Mode" procedure described on the display.
Owner's Manual
Page 18
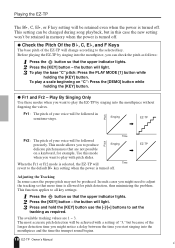
... sound begins. 18 EZ-TP Owner's Manual 16 Pitch Time Singing When the Fr1 or Fr2 mode is selected, the EZ-TP will Time revert to the default Bb key setting when the power is turned off. ● Check the Pitch Of the Bb, C, Eb, and F Keys The base pitch of your voice will be followed in semitone-steps. Pitch Singing EZ-TP Fr2 : The pitch of the longer detection time you might need to adjust the tracking...
... sound begins. 18 EZ-TP Owner's Manual 16 Pitch Time Singing When the Fr1 or Fr2 mode is selected, the EZ-TP will Time revert to the default Bb key setting when the power is turned off. ● Check the Pitch Of the Bb, C, Eb, and F Keys The base pitch of your voice will be followed in semitone-steps. Pitch Singing EZ-TP Fr2 : The pitch of the longer detection time you might need to adjust the tracking...

Owner's Manual
Page 19
..." Sound This function automatically adds a note one octave above or below notes you play, and the "1" setting produces an note an octave above notes you play. the button will light. 3 Press and hold the [SOUND] button use the [-]/[+] buttons to 453 Hz in 1-Hz increments. The "-1" setting produced a note an octave below the notes you play, producing a thicker "brass section" type sound. 1 Press the button so that the lower indicator lights. 2 Press the [KEY] button - EZ-TP Owner's Manual 19 17 Use this feature...
..." Sound This function automatically adds a note one octave above or below notes you play, and the "1" setting produces an note an octave above notes you play. the button will light. 3 Press and hold the [SOUND] button use the [-]/[+] buttons to 453 Hz in 1-Hz increments. The "-1" setting produced a note an octave below the notes you play, producing a thicker "brass section" type sound. 1 Press the button so that the lower indicator lights. 2 Press the [KEY] button - EZ-TP Owner's Manual 19 17 Use this feature...

Owner's Manual
Page 23
... melody note timing in Play Mode 1, and valve fingering in this mode you want to select the desired guide lamp mode: Aut ..... The guide lamps flash to sing the melody in all other modes. Used for each note. The guide lamps will not light. The accompaniment will play the correct fingering for precise adjustment of the song. EZ-TP Owner's Manual 23 21 Play Mode 3 - the button will stop song playback...
... melody note timing in Play Mode 1, and valve fingering in this mode you want to select the desired guide lamp mode: Aut ..... The guide lamps flash to sing the melody in all other modes. Used for each note. The guide lamps will not light. The accompaniment will play the correct fingering for precise adjustment of the song. EZ-TP Owner's Manual 23 21 Play Mode 3 - the button will stop song playback...

Owner's Manual
Page 24
... button so that the lower indicator lights. 2 Press the [TEMPO] button. 3 Use the [-]/[+] buttons to set the tempo as required. 24 EZ-TP Owner's Manual 22 The default setting is too high to play on the EZ-TP by setting the volume of the playback sound. Change the Song Key The key of a song you like) as follows. 1 Press the button so that the lower indicator lights. 2 Press the [VOL] button. 3 Use the [-]/[+] buttons to set the song playback volume as required. The adjustable...
... button so that the lower indicator lights. 2 Press the [TEMPO] button. 3 Use the [-]/[+] buttons to set the tempo as required. 24 EZ-TP Owner's Manual 22 The default setting is too high to play on the EZ-TP by setting the volume of the playback sound. Change the Song Key The key of a song you like) as follows. 1 Press the button so that the lower indicator lights. 2 Press the [VOL] button. 3 Use the [-]/[+] buttons to set the song playback volume as required. The adjustable...
Owner's Manual
Page 27
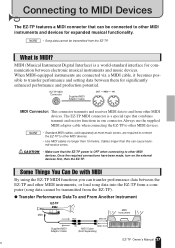
... MIDI IN Supplied MIDI Adaptor Cable IN MIDI OUT MIDI Cable (Sold Separately) EZ-TP Owner's Manual 27 25 NOTE • Standard MIDI cables, sold separately at most music stores, are connected via a MIDI cable, it becomes possible to transfer performance and setting data between them for communication between the EZ-TP and other MIDI instruments, or load song data into the EZ-TP from a computer (song data cannot be transmitted from other MIDI devices. • Use MIDI cables no longer than this can transfer performance data between electronic musical...
... MIDI IN Supplied MIDI Adaptor Cable IN MIDI OUT MIDI Cable (Sold Separately) EZ-TP Owner's Manual 27 25 NOTE • Standard MIDI cables, sold separately at most music stores, are connected via a MIDI cable, it becomes possible to transfer performance and setting data between them for communication between the EZ-TP and other MIDI instruments, or load song data into the EZ-TP from a computer (song data cannot be transmitted from other MIDI devices. • Use MIDI cables no longer than this can transfer performance data between electronic musical...
Owner's Manual
Page 28
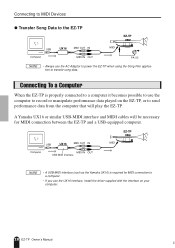
... EZ-TP. Connecting to MIDI Devices ● Transfer Song Data to the EZ-TP EZ-TP USB Computer UX16 MIDI OUT IN MIDI IN OUT MIDI PA-3C NOTE • Always use the AC Adaptor to power the EZ-TP when using the Song Filer application to send performance data from the computer that will be necessary for MIDI connection to a computer. • If you use the computer to record or manipulate performance data played on your computer. 28 EZ-TP Owner's Manual 26 Connecting...
... EZ-TP. Connecting to MIDI Devices ● Transfer Song Data to the EZ-TP EZ-TP USB Computer UX16 MIDI OUT IN MIDI IN OUT MIDI PA-3C NOTE • Always use the AC Adaptor to power the EZ-TP when using the Song Filer application to send performance data from the computer that will be necessary for MIDI connection to a computer. • If you use the computer to record or manipulate performance data played on your computer. 28 EZ-TP Owner's Manual 26 Connecting...
Owner's Manual
Page 29
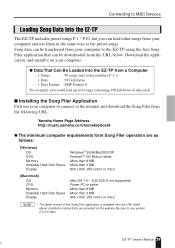
... [Macintosh] OS CPU Memory Available Hard Disk Space Display : Mac OS 7.5 ~ 9.22 (OS X not supported) : Power PC or better : More than 8 MB : More than 2 MB : 800 x 600, 256 colors or more NOTE • The latest version of data each. ■ Installing the Song Filer Application First use version 2.0.0 or later. EZ-TP Owner's Manual 29 27 Connecting to MIDI Devices Loading Song Data Into the EZ-TP The EZ-TP includes preset songs P 1 ~ P10, but...
... [Macintosh] OS CPU Memory Available Hard Disk Space Display : Mac OS 7.5 ~ 9.22 (OS X not supported) : Power PC or better : More than 8 MB : More than 2 MB : 800 x 600, 256 colors or more NOTE • The latest version of data each. ■ Installing the Song Filer Application First use version 2.0.0 or later. EZ-TP Owner's Manual 29 27 Connecting to MIDI Devices Loading Song Data Into the EZ-TP The EZ-TP includes preset songs P 1 ~ P10, but...

Owner's Manual
Page 30
... be loaded. Connecting to MIDI Devices ■ Using the Song Filer After installing the Song Filer application on your computer. Also, the guide lamps will be used while the EZ-TP is turned on/off the power during a data transfer. NOTE • The channel-1 part of data you to the channel-1 data. ● Erasing Loaded Song Data from the EZ-TP Memory The procedure for erasing loaded song data from your computer. Instructions for operating the Song Filer application are provided in the pdf...
... be loaded. Connecting to MIDI Devices ■ Using the Song Filer After installing the Song Filer application on your computer. Also, the guide lamps will be used while the EZ-TP is turned on/off the power during a data transfer. NOTE • The channel-1 part of data you to the channel-1 data. ● Erasing Loaded Song Data from the EZ-TP Memory The procedure for erasing loaded song data from your computer. Instructions for operating the Song Filer application are provided in the pdf...

Owner's Manual
Page 33
... become distorted if the volume is not produced. particularly when playing downloaded songs - The desired pitch is turned up too high. Possible Cause & Solution • Are the batteries depleted? (Page 6) • Is the overall volume turned up too high? The EZ-TP doesn't respond properly to notes I 'm not singing into the PHONES/ OUTPUT jack? (Page 7) • Is the Local Control parameter set the instrument's voice octave setting to an appropriate...
... become distorted if the volume is not produced. particularly when playing downloaded songs - The desired pitch is turned up too high. Possible Cause & Solution • Are the batteries depleted? (Page 6) • Is the overall volume turned up too high? The EZ-TP doesn't respond properly to notes I 'm not singing into the PHONES/ OUTPUT jack? (Page 7) • Is the Local Control parameter set the instrument's voice octave setting to an appropriate...

Owner's Manual
Page 42
... installations. ENVIRONMENTAL ISSUES: Yamaha strives to a lack of time at a high volume level or at an end, please observe all local, state, and federal regulations that contain lead, batteries, plastics, etc. We sincerely believe that are therefore the owners responsibility. In keeping with an amplifier and headphones or speaker/s, may be used . When replacement becomes necessary, contact a qualified service...
... installations. ENVIRONMENTAL ISSUES: Yamaha strives to a lack of time at a high volume level or at an end, please observe all local, state, and federal regulations that contain lead, batteries, plastics, etc. We sincerely believe that are therefore the owners responsibility. In keeping with an amplifier and headphones or speaker/s, may be used . When replacement becomes necessary, contact a qualified service...


