
Owner's Manual
Page 5
...cell phone (mobile telephone) near this unit may induce noise. Never pull the cord. If noise occurs, use , remove the rear of the rack or open a ventilation hole. EMX88S/EMX68S-Owner's Manual A damaged power cord is a fire and electrical shock hazard. • Do not remove the unit's cover. Operation ... has ventilation holes at the sides, 15 cm behind, and 25 cm above. Blocked ventilation holes are a fire hazard. • When rack-mounting the unit, allow the unit to the SPEAKERS jack of the phone plug before connecting it to become wet. If the airflow...
...cell phone (mobile telephone) near this unit may induce noise. Never pull the cord. If noise occurs, use , remove the rear of the rack or open a ventilation hole. EMX88S/EMX68S-Owner's Manual A damaged power cord is a fire and electrical shock hazard. • Do not remove the unit's cover. Operation ... has ventilation holes at the sides, 15 cm behind, and 25 cm above. Blocked ventilation holes are a fire hazard. • When rack-mounting the unit, allow the unit to the SPEAKERS jack of the phone plug before connecting it to become wet. If the airflow...
Owner's Manual
Page 7
... and reduced heat generation to 35% or less (in field applications, compared to Yamaha's previous models), and has lead to a reduction in a safe place for purchasing the Yamaha EMX88S/EMX68S Powered Mixer. ers 20 Using the digital effect 20 Example setups 22 As a conference PA... system/installed sound system 22 As a band PA 23 Installing an optional rack mount kit 25 Troubleshooting 26 Specifications 27 General ...
... and reduced heat generation to 35% or less (in field applications, compared to Yamaha's previous models), and has lead to a reduction in a safe place for purchasing the Yamaha EMX88S/EMX68S Powered Mixer. ers 20 Using the digital effect 20 Example setups 22 As a conference PA... system/installed sound system 22 As a band PA 23 Installing an optional rack mount kit 25 Troubleshooting 26 Specifications 27 General ...
Owner's Manual
Page 27
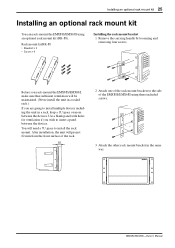
... will project 62 mm from the front surface of the rack. 62 2 Attach one of the EMX88S/EMX68S using an optional rack mount kit (RK-88). You will be maintained. (Never install the unit in a sealed rack.) If you wish to install multiple devices including the unit...between the devices. Installing an optional rack mount kit 25 Installing an optional rack mount kit You can rack-mount the EMX88S/EMX68S using three included screws. 3 Attach the other rack mount bracket in a rack, keep a 1U space or more between the devices. EMX88S/EMX68S-Owner's Manual Rack mount kit RK-88 • Bracket...
... will project 62 mm from the front surface of the rack. 62 2 Attach one of the EMX88S/EMX68S using an optional rack mount kit (RK-88). You will be maintained. (Never install the unit in a sealed rack.) If you wish to install multiple devices including the unit...between the devices. Installing an optional rack mount kit 25 Installing an optional rack mount kit You can rack-mount the EMX88S/EMX68S using three included screws. 3 Attach the other rack mount bracket in a rack, keep a 1U space or more between the devices. EMX88S/EMX68S-Owner's Manual Rack mount kit RK-88 • Bracket...
