

Owner's Manual
Page 3
... turn off for the instrument. PRECAUTIONS PLEASE READ CAREFULLY BEFORE PROCEEDING * Please keep this case, immediately memo the data settings, then have qualified Yamaha service personnel replace the backup battery. The instrument contains no user-serviceable parts. Water warning • Do not expose ... near a heater, or in use a soft, dry cloth. The required voltage is lost . When the backup battery is retained. Yamaha cannot be lost or destroyed. Connections • Before connecting the instrument to local regulations. 3 Make sure to discard used batteries according ...
... turn off for the instrument. PRECAUTIONS PLEASE READ CAREFULLY BEFORE PROCEEDING * Please keep this case, immediately memo the data settings, then have qualified Yamaha service personnel replace the backup battery. The instrument contains no user-serviceable parts. Water warning • Do not expose ... near a heater, or in use a soft, dry cloth. The required voltage is lost . When the backup battery is retained. Yamaha cannot be lost or destroyed. Connections • Before connecting the instrument to local regulations. 3 Make sure to discard used batteries according ...

Owner's Manual
Page 5
... kits. and are readily available for pads or drum triggers. • Also included in the unit are also supplied. The DTXPLORER's Main FeaturesMain Features The DTXPLORER is found in Yamaha's MU series of GM/XG compat- Voices cover a wide range of sounds such as pad trigger input type, sensitivity... settings, etc., are also 10 user memory kits in tempo on the rear panel lets you play sounds from rock, funk, jazz, reggae...
... kits. and are readily available for pads or drum triggers. • Also included in the unit are also supplied. The DTXPLORER's Main FeaturesMain Features The DTXPLORER is found in Yamaha's MU series of GM/XG compat- Voices cover a wide range of sounds such as pad trigger input type, sensitivity... settings, etc., are also 10 user memory kits in tempo on the rear panel lets you play sounds from rock, funk, jazz, reggae...

Owner's Manual
Page 6
CONTENTS Nomenclature 7 Top Panel 7 Rear Panel 8 Connections 9 Connecting the DTXPLORER's pads to the main unit 9 Using the DTXPLORER with an Acoustic Drum Kit 9 ■ Connecting to Speakers or Headphones 10 ■ Connecting the Power Supply 11 Time to Play 12 Adjusting the Hi-... Select 16 Play Along With a Song 17 Tap Tempo Function 18 Using the Groove Check Function 19 Create Your Own Original Drum Kit 20 Factory Set 23 Trigger Setup Edit 24 Selecting the Trigger Setup 24 Editing the Trigger Setup 24 Error Messages 28 Trouble Shooting 28 Specifications 30 MIDI Data...
CONTENTS Nomenclature 7 Top Panel 7 Rear Panel 8 Connections 9 Connecting the DTXPLORER's pads to the main unit 9 Using the DTXPLORER with an Acoustic Drum Kit 9 ■ Connecting to Speakers or Headphones 10 ■ Connecting the Power Supply 11 Time to Play 12 Adjusting the Hi-... Select 16 Play Along With a Song 17 Tap Tempo Function 18 Using the Groove Check Function 19 Create Your Own Original Drum Kit 20 Factory Set 23 Trigger Setup Edit 24 Selecting the Trigger Setup 24 Editing the Trigger Setup 24 Error Messages 28 Trouble Shooting 28 Specifications 30 MIDI Data...

Owner's Manual
Page 7
... 8 KICK/9 7HIHAT 6CRASH 5 RIDE R 4 TOM3 3TOM2 2TOM1 1 SNARE MIDI OUT q DRUM KIT TRIGGER SONG / DRUM MUTE e w CLICK GRV.CHECK SHIFT r i * DTXPLORER * * Welcome! * BEAT o CLICK !0 DRUM TRIGGER MODULE t ON/OFF TAP y SAVE/ENT UTILITY u q Drum Kit Button (DRUM KIT) • This button is ...Hold the [SHIFT] button and press the [CLICK] button to enter the Groove Check Setting display. (P. 19) e Song Button (SONG >/■) • This button is used to make overall settings for operating the DTXPLORER. • In the Song display, this button to change the value selected with the...
... 8 KICK/9 7HIHAT 6CRASH 5 RIDE R 4 TOM3 3TOM2 2TOM1 1 SNARE MIDI OUT q DRUM KIT TRIGGER SONG / DRUM MUTE e w CLICK GRV.CHECK SHIFT r i * DTXPLORER * * Welcome! * BEAT o CLICK !0 DRUM TRIGGER MODULE t ON/OFF TAP y SAVE/ENT UTILITY u q Drum Kit Button (DRUM KIT) • This button is ...Hold the [SHIFT] button and press the [CLICK] button to enter the Groove Check Setting display. (P. 19) e Song Button (SONG >/■) • This button is used to make overall settings for operating the DTXPLORER. • In the Song display, this button to change the value selected with the...

Owner's Manual
Page 9
...connections, make sure settings in the "Trigger Setup Edit" section (P. 24) should be expanded with an optional set of the DTXPLORER. Connections CAUTION To prevent electric shock and damage to the devices, make sure each Trigger Input jack on the rear panel of Yamaha DX20 Drum Triggers... and the triggers are connected to the DTXPLORER's input jacks. * After making ...
...connections, make sure settings in the "Trigger Setup Edit" section (P. 24) should be expanded with an optional set of the DTXPLORER. Connections CAUTION To prevent electric shock and damage to the devices, make sure each Trigger Input jack on the rear panel of Yamaha DX20 Drum Triggers... and the triggers are connected to the DTXPLORER's input jacks. * After making ...
Owner's Manual
Page 10
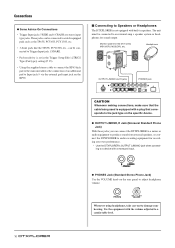
...connection of an additional pad to Input jack 9 via the external pad input jack on the rear panel to damage your own performance. * Use the DTXPLORER's OUTPUT L/MONO jack when connecting to a device with a monaural input. ● PHONES Jack (Standard Stereo Phone Jack) Use the VOLUME knob ...on the KP65. ■ Connecting to Speakers or Headphones The DTXPLORER is set in speakers. The unit must be connected to Trigger Input jack 1 SNARE. • Pad sensitivity is not equipped with the volume adjusted to ...
...connection of an additional pad to Input jack 9 via the external pad input jack on the rear panel to damage your own performance. * Use the DTXPLORER's OUTPUT L/MONO jack when connecting to a device with a monaural input. ● PHONES Jack (Standard Stereo Phone Jack) Use the VOLUME knob ...on the KP65. ■ Connecting to Speakers or Headphones The DTXPLORER is set in speakers. The unit must be connected to Trigger Input jack 1 SNARE. • Pad sensitivity is not equipped with the volume adjusted to ...

Owner's Manual
Page 12
...panel to the right to increase the overall volume to a comfortable volume level. Overall settings for the DTXPLORER are set . (P. 23) * DTXPLORER * * 5hits * When the Drum Kit Select display (shown below) appears, the DTXPLORER is ready to be played. * The most recently used drum kit is selected in.... Change the Output Sound Quality Use the [Master Equalizer] display found on again, and the total number times the pads have been specially programmed by Yamaha sound designers. UTIL1 Hi-hat HHofs= 0 T= 0, Press the [>] button again to go to page 4 in the Utility Mode. UTIL4 MasterEQ -Lo=+...
...panel to the right to increase the overall volume to a comfortable volume level. Overall settings for the DTXPLORER are set . (P. 23) * DTXPLORER * * 5hits * When the Drum Kit Select display (shown below) appears, the DTXPLORER is ready to be played. * The most recently used drum kit is selected in.... Change the Output Sound Quality Use the [Master Equalizer] display found on again, and the total number times the pads have been specially programmed by Yamaha sound designers. UTIL1 Hi-hat HHofs= 0 T= 0, Press the [>] button again to go to page 4 in the Utility Mode. UTIL4 MasterEQ -Lo=+...
Owner's Manual
Page 13
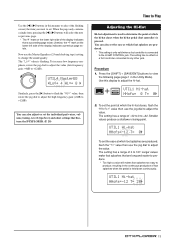
... only valid when a foot controller is held down continuously. The setting has no effect on a foot controller connected to any other settings that finetune the DTXPLORER. (P. 20) Time to Play Adjusting the Hi-Hat Hi-hat adjustment is used to 127. To set . Smaller values produce a shallower closing point. UTIL1 Hi-hat HHofs=-12...
... only valid when a foot controller is held down continuously. The setting has no effect on a foot controller connected to any other settings that finetune the DTXPLORER. (P. 20) Time to Play Adjusting the Hi-Hat Hi-hat adjustment is used to 127. To set . Smaller values produce a shallower closing point. UTIL1 Hi-hat HHofs=-12...
Owner's Manual
Page 14
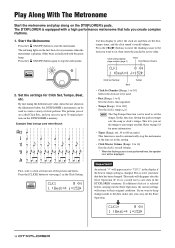
... patterns in this function, hitting the pads in the DTXPLORER's memory. Example) Beat timings used when Beat=4 Click Set Number Beat Tempo • Click Set Number [Range: 1 to 30] Selects the click set to be displayed. By fine tuning the different note ...Timer Click Master Volume CLK1 fl '¬ 1 :Beat=4 ƒ=152, 2. The patterns you want to keep changes made to select the click set and then set in the DTXPLORER's memory. CLK1 fl '¬ 1 :Beat=4 ƒ=152, An asterisk "*" will be used to automatically stop the metronome. CLK1* fl...
... patterns in this function, hitting the pads in the DTXPLORER's memory. Example) Beat timings used when Beat=4 Click Set Number Beat Tempo • Click Set Number [Range: 1 to 30] Selects the click set to be displayed. By fine tuning the different note ...Timer Click Master Volume CLK1 fl '¬ 1 :Beat=4 ƒ=152, 2. The patterns you want to keep changes made to select the click set and then set in the DTXPLORER's memory. CLK1 fl '¬ 1 :Beat=4 ƒ=152, An asterisk "*" will be used to automatically stop the metronome. CLK1* fl...

Owner's Manual
Page 15
..., The Click Measure Break puts a muted "break" for the number of the metronome's five click voices. * This setting is not available if the setting for CLK4 is set to "0", "NoAssign" is set to assign the 5 different click sounds that are changed as a group. Play Along With The Metronome Click Value Type CLK5...You can use the CLK5 and CLK6 pages to the lower half of the five click sounds in the Click Setting. Use this display to set to be produced. 7. Set the Click Voice Set Press the [>] button to view the [Click Measure Break] section on page 4 in increments of measures ...
..., The Click Measure Break puts a muted "break" for the number of the metronome's five click voices. * This setting is not available if the setting for CLK4 is set to "0", "NoAssign" is set to assign the 5 different click sounds that are changed as a group. Play Along With The Metronome Click Value Type CLK5...You can use the CLK5 and CLK6 pages to the lower half of the five click sounds in the Click Setting. Use this display to set to be produced. 7. Set the Click Voice Set Press the [>] button to view the [Click Measure Break] section on page 4 in increments of measures ...

Owner's Manual
Page 16
....) UTIL1 Hi-hat HHofs= 0 T= 0, 2. Completed! Save an Original Click Set After creating your confirmation to proceed with the data that the following display will rewrite the DTXPLORER's entire contents (all click sets, user trigger setup (No. 5), user drum kits 33 to their original factory ... (P. 23) Click Out Select The DTXPLORER lets you want to separate outputs. Play Along With The Metronome 8. However, please proceed with caution because carrying out this section would then be routed to store the click set in the DTXPLORER's memory using the Store Operation described ...
....) UTIL1 Hi-hat HHofs= 0 T= 0, 2. Completed! Save an Original Click Set After creating your confirmation to proceed with the data that the following display will rewrite the DTXPLORER's entire contents (all click sets, user trigger setup (No. 5), user drum kits 33 to their original factory ... (P. 23) Click Out Select The DTXPLORER lets you want to separate outputs. Play Along With The Metronome 8. However, please proceed with caution because carrying out this section would then be routed to store the click set in the DTXPLORER's memory using the Store Operation described ...
Owner's Manual
Page 17
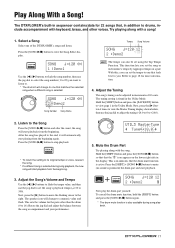
...voice, reselect the song. * If a different song is selected. Press the [SONG >/■] button to stop playback. * To return the setting to a numeric value and flash. Rotate the jog dial and adjust the balance between the song accompaniment and your performance. Hold the [SHIFT]... different song is selected during song playback. 17 UTIL5 MasterTune - This icon indicates that , in increments of the DTXPLORER's songs and listen. Play Along With a Song! The DTXPLORER's built-in sequencer contains data for more information. 4. Try playing along with the song. Select a Song Select ...
...voice, reselect the song. * If a different song is selected. Press the [SONG >/■] button to stop playback. * To return the setting to a numeric value and flash. Rotate the jog dial and adjust the balance between the song accompaniment and your performance. Hold the [SHIFT]... different song is selected during song playback. 17 UTIL5 MasterTune - This icon indicates that , in increments of the DTXPLORER's songs and listen. Play Along With a Song! The DTXPLORER's built-in sequencer contains data for more information. 4. Try playing along with the song. Select a Song Select ...

Owner's Manual
Page 18
... a different drum kit when playing along with just the bass part during song or metronome playback. Press the [ ON/OFF] button to give you can set the song or metronome's tempo by the tempo at . (Or press the [] buttons.) The tempo value determined by tapping in the display. * Any ...time reference. Press the [SAVE/ENT] button to one that is given in tempo on ". TAP TEMPO ƒ=124 3. This lets you . The Tap Tempo Setting display shown below will stop . First, press the [SHIFT] + [SAVE/ENT] buttons to enter the Drum Kit Select display, and then select another drum ...
... a different drum kit when playing along with just the bass part during song or metronome playback. Press the [ ON/OFF] button to give you can set the song or metronome's tempo by the tempo at . (Or press the [] buttons.) The tempo value determined by tapping in the display. * Any ...time reference. Press the [SAVE/ENT] button to one that is given in tempo on ". TAP TEMPO ƒ=124 3. This lets you . The Tap Tempo Setting display shown below will stop . First, press the [SHIFT] + [SAVE/ENT] buttons to enter the Drum Kit Select display, and then select another drum ...
Owner's Manual
Page 19
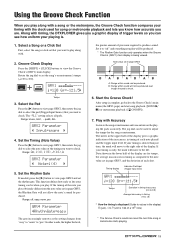
...GRV1) main display. Play with Accuracy Listen to the left. If your timing is early, the mark will not allow the note's sound be produced. Set the Timing (Note Value) Press the [>] button to view page GRV3, then rotate the jog dial to select the note value of the display. ...to produce sound. B: Range within sound can be produced. Along with timing, the DTXPLORER gives you a graphic display of the display are for tempo, the average inaccuracies in timing as the setting changes from the note value set in page GRV3, the Rhythm Gate will move to the right side of the...
...GRV1) main display. Play with Accuracy Listen to the left. If your timing is early, the mark will not allow the note's sound be produced. Set the Timing (Note Value) Press the [>] button to view page GRV3, then rotate the jog dial to select the note value of the display. ...to produce sound. B: Range within sound can be produced. Along with timing, the DTXPLORER gives you a graphic display of the display are for tempo, the average inaccuracies in timing as the setting changes from the note value set in page GRV3, the Rhythm Gate will move to the right side of the...

Owner's Manual
Page 20
... hi-hat controller is fully closed) for your own original drum kit by the pads or trigger sensors connected to input jacks 1 to 9 of the DTXPLORER. Each Input Source is defined as follows. ¡snare Pad input for Trigger Input Jack 1. ¡snrR1 Rim switch 1 input for Trigger Input Jack ... as a starting point for Trigger Input Jack 7. ¶footCl Event when the hi-hat controller is transmitted by assigning drum voices to the pads and setting their tuning, voice, decay, reverb, etc. 1. are used , one Input Source will be assigned to one input jack. When stereo pads TP65S/80S...
... hi-hat controller is fully closed) for your own original drum kit by the pads or trigger sensors connected to input jacks 1 to 9 of the DTXPLORER. Each Input Source is defined as follows. ¡snare Pad input for Trigger Input Jack 1. ¡snrR1 Rim switch 1 input for Trigger Input Jack ... as a starting point for Trigger Input Jack 7. ¶footCl Event when the hi-hat controller is transmitted by assigning drum voices to the pads and setting their tuning, voice, decay, reverb, etc. 1. are used , one Input Source will be assigned to one input jack. When stereo pads TP65S/80S...

Owner's Manual
Page 21
... disappear after the Store Operation (P. 23) is from "L64" (hard left) to "C" (center) to save data in the DTXPLORER's memory. If you want to keep changes made to set the voice's pan. Use the [>] button to view page KIT3, then rotate the jog dial to the data, make sure you...;kick -K/001 Maple 22, Create Your Own Original Drum Kit 3. Next, let's edit this example, select "K/001 Maple 22". * If the voice number is set anywhere between other pad voices. An asterisk "*" will be displayed. Change the Tuning (Pitch) Try changing the drum voice's tuning (pitch). Use the [>] button ...
... disappear after the Store Operation (P. 23) is from "L64" (hard left) to "C" (center) to save data in the DTXPLORER's memory. If you want to keep changes made to set the voice's pan. Use the [>] button to view page KIT3, then rotate the jog dial to the data, make sure you...;kick -K/001 Maple 22, Create Your Own Original Drum Kit 3. Next, let's edit this example, select "K/001 Maple 22". * If the voice number is set anywhere between other pad voices. An asterisk "*" will be displayed. Change the Tuning (Pitch) Try changing the drum voice's tuning (pitch). Use the [>] button ...

Owner's Manual
Page 22
...reverb. Use the [>] button to view page KIT8, then rotate the jog dial to set the alternate group (off frequency to the DTXPLORER's memory. Use the [>] button to view page KIT9, then rotate the jog dial to set key on /key off is switched off, the closed voices- Change the Reverb Level ...Try changing the amount of reverb that is applied to set the cut -off , 1 to ...
...reverb. Use the [>] button to view page KIT8, then rotate the jog dial to set the alternate group (off frequency to the DTXPLORER's memory. Use the [>] button to view page KIT9, then rotate the jog dial to set key on /key off is switched off, the closed voices- Change the Reverb Level ...Try changing the amount of reverb that is applied to set the cut -off , 1 to ...

Owner's Manual
Page 23
... pages, create other drum voices for your confirmation to 42) that you have created a drum kit that uses all of the DTXPLORER's internal settings back to view the following display appears after the store operation is complete. All data will appear. KIT save to cancel the ...operation). 23 Create Your Own Original Drum Kit Factory Set This operation returns all original voices. Procedure 1. Store Destination 12-4. Next, press the [>] button 7 times to view the following display ...
... pages, create other drum voices for your confirmation to 42) that you have created a drum kit that uses all of the DTXPLORER's internal settings back to view the following display appears after the store operation is complete. All data will appear. KIT save to cancel the ...operation). 23 Create Your Own Original Drum Kit Factory Set This operation returns all original voices. Procedure 1. Store Destination 12-4. Next, press the [>] button 7 times to view the following display ...
Owner's Manual
Page 24
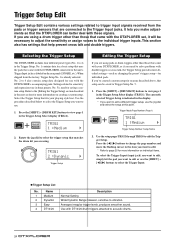
...on creating a custom setup. If you make adjustments so that setup can better deal with the DTXPLORER's accompanying pads. Name 1 Medium 2 Dynamic 3 Easy 4 DT10/20 Description Normal Setting Wide Dynamis Range however, sensitive to 4) in the Trigger Setup Select display (TRIG1). Averages irregular... (Page 1) TRIG1 1 :Medium , Trigger Setup Number: Setup Name 2. This section also has settings that fits your DTXPLORER, or if you need to solve problems with the DTXPLORER set, it will be saved to the unit's Trigger Input jacks as changing the preset's trigger setup-...
...on creating a custom setup. If you make adjustments so that setup can better deal with the DTXPLORER's accompanying pads. Name 1 Medium 2 Dynamic 3 Easy 4 DT10/20 Description Normal Setting Wide Dynamis Range however, sensitive to 4) in the Trigger Setup Select display (TRIG1). Averages irregular... (Page 1) TRIG1 1 :Medium , Trigger Setup Number: Setup Name 2. This section also has settings that fits your DTXPLORER, or if you need to solve problems with the DTXPLORER set, it will be saved to the unit's Trigger Input jacks as changing the preset's trigger setup-...
Owner's Manual
Page 25
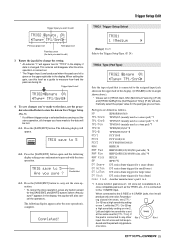
... for the [SAVE/ENT] and [SHIFT] buttons (when "Are you sure?" Left and right rim sensitivity is changed. Rotate the jog dial to change the setting. * An asterisk "*" will appear next to carry out the store operation. * To cancel the store operation, press any other Rim 2 Rim 1 input, the rim voice... to 5 Are you sure ? TRIG save changes you've made to the data, use this level as a guide to the data will be pro- When setting the gain, use the procedure described below to store the data in the display. To save to 5 4-2. Press the [SAVE/ENT] button again and the...
... for the [SAVE/ENT] and [SHIFT] buttons (when "Are you sure?" Left and right rim sensitivity is changed. Rotate the jog dial to change the setting. * An asterisk "*" will appear next to carry out the store operation. * To cancel the store operation, press any other Rim 2 Rim 1 input, the rim voice... to 5 Are you sure ? TRIG save changes you've made to the data, use this level as a guide to the data will be pro- When setting the gain, use the procedure described below to store the data in the display. To save to 5 4-2. Press the [SAVE/ENT] button again and the...


