

Owner's Manual
Page 5
..., jazz, reggae, Latin percussion, etc. The unit also provides a pattern for user memory in which you play and then be used with devices such as Yamaha's DT20 Drum Triggers, etc. • Setup data such as live performance, personal practice, and much more . ■ Drum Trigger Function • Built .... This lets you play along with rim switch and 3-zone trigger equipped pads are the Bass Solo Function-which lets you simply choose the system that make the DTXPLORER great for those who want to trigger pad compatibility, the unit can be used in which you can freely mix, ...
..., jazz, reggae, Latin percussion, etc. The unit also provides a pattern for user memory in which you play and then be used with devices such as Yamaha's DT20 Drum Triggers, etc. • Setup data such as live performance, personal practice, and much more . ■ Drum Trigger Function • Built .... This lets you play along with rim switch and 3-zone trigger equipped pads are the Bass Solo Function-which lets you simply choose the system that make the DTXPLORER great for those who want to trigger pad compatibility, the unit can be used in which you can freely mix, ...

Owner's Manual
Page 6
CONTENTS Nomenclature 7 Top Panel 7 Rear Panel 8 Connections 9 Connecting the DTXPLORER's pads to the main unit 9 Using the DTXPLORER with an Acoustic Drum Kit 9 ■ Connecting to Speakers or Headphones 10 ■ Connecting the Power Supply 11 Time to Play 12 Adjusting the Hi-...
CONTENTS Nomenclature 7 Top Panel 7 Rear Panel 8 Connections 9 Connecting the DTXPLORER's pads to the main unit 9 Using the DTXPLORER with an Acoustic Drum Kit 9 ■ Connecting to Speakers or Headphones 10 ■ Connecting the Power Supply 11 Time to Play 12 Adjusting the Hi-...

Owner's Manual
Page 8
..., 4 TOM3, 7 HI HAT jacks !3 Trigger Input jack (8 KICK/9) This jack is the DTXPLORER's power switch. !5 Output Jacks (OUTPUT L/MONO, R) These jacks are used to connect the pads or trigger sensors to the main unit. For monaural playback use the DTXPLORER as snare, tom, etc., according to the indication below ) when connecting a Hi-hat...
..., 4 TOM3, 7 HI HAT jacks !3 Trigger Input jack (8 KICK/9) This jack is the DTXPLORER's power switch. !5 Output Jacks (OUTPUT L/MONO, R) These jacks are used to connect the pads or trigger sensors to the main unit. For monaural playback use the DTXPLORER as snare, tom, etc., according to the indication below ) when connecting a Hi-hat...

Owner's Manual
Page 9
... rear panel of Yamaha DX20 Drum Triggers and the triggers are properly adjusted. 9 Connections CAUTION To prevent electric shock and damage to the devices, make sure settings in the "Trigger Setup Edit" section (P. 24) should be changed. Connecting the DTXPLORER's pads to the main... unit Refer to the illustration below and connect each pad's output cable to each pad is connected to its corresponding Trigger Input jack. * The DTXPLORER's settings will provide optimum performance when pads (1 SNARE, etc.) are connected to ...
... rear panel of Yamaha DX20 Drum Triggers and the triggers are properly adjusted. 9 Connections CAUTION To prevent electric shock and damage to the devices, make sure settings in the "Trigger Setup Edit" section (P. 24) should be changed. Connecting the DTXPLORER's pads to the main... unit Refer to the illustration below and connect each pad's output cable to each pad is connected to its corresponding Trigger Input jack. * The DTXPLORER's settings will provide optimum performance when pads (1 SNARE, etc.) are connected to ...
Owner's Manual
Page 10
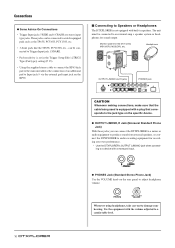
.... 10 Monitor system for sound output. These jacks can be connected to switch equipped pads such as the TP65S, PCY65S, PCY130S, etc. • 3-Zone pads like the TP65S, PCY150S, etc., can connect the DTXPLORER to a mixer or audio equipment to produce sound from external speakers, or connect the... DTXPLORER to adjust headphone volume. Use the equipment with built-in the Trigger Setup Edit's [TRIG2 Type (Pad type)] setting (P. 25). • Using the supplied stereo cable to connect the KP65 kick pad to the main unit allows the connection ...
.... 10 Monitor system for sound output. These jacks can be connected to switch equipped pads such as the TP65S, PCY65S, PCY130S, etc. • 3-Zone pads like the TP65S, PCY150S, etc., can connect the DTXPLORER to a mixer or audio equipment to produce sound from external speakers, or connect the... DTXPLORER to adjust headphone volume. Use the equipment with built-in the Trigger Setup Edit's [TRIG2 Type (Pad type)] setting (P. 25). • Using the supplied stereo cable to connect the KP65 kick pad to the main unit allows the connection ...

Owner's Manual
Page 11
Use the volume control on an external tone generator with the DTXPLORER's pads, or synchronize the DTXPLORER's song or metronome playback with friends. Also, when the DTXPLORER is not to the DTXPLORER. Connections ■ Connecting the Power Supply A special power source adaptor supplies power to... to communicate. About MIDI MIDI (Musical Instrument Digital Interface) is switched ON, switch the other adaptor specifically recommended by Yamaha). This standard allows computers and instruments of time, please unplug the power adaptor. Such a situation can result in irreparable...
Use the volume control on an external tone generator with the DTXPLORER's pads, or synchronize the DTXPLORER's song or metronome playback with friends. Also, when the DTXPLORER is not to the DTXPLORER. Connections ■ Connecting the Power Supply A special power source adaptor supplies power to... to communicate. About MIDI MIDI (Musical Instrument Digital Interface) is switched ON, switch the other adaptor specifically recommended by Yamaha). This standard allows computers and instruments of time, please unplug the power adaptor. Such a situation can result in irreparable...

Owner's Manual
Page 12
...The Hit Counter is made up of voices that have been specially programmed by Yamaha sound designers. Press the [>] button once to move the flashing cursor to switch the power ON. Overall settings for the DTXPLORER are set . (P. 23) * DTXPLORER * * 5hits * When the Drum Kit Select display (shown below) ...of 32 different types of the Utility Mode UTIL1 Hi-hat HHofs= 0 T= 0, The "HHofs=" value is flashing. Play the DTXPLORER While hitting on the pads, rotate the volume knob on the rear panel to the right to increase the overall volume to enter page 1 in the Utility Mode...
...The Hit Counter is made up of voices that have been specially programmed by Yamaha sound designers. Press the [>] button once to move the flashing cursor to switch the power ON. Overall settings for the DTXPLORER are set . (P. 23) * DTXPLORER * * 5hits * When the Drum Kit Select display (shown below) ...of 32 different types of the Utility Mode UTIL1 Hi-hat HHofs= 0 T= 0, The "HHofs=" value is flashing. Play the DTXPLORER While hitting on the pads, rotate the volume knob on the rear panel to the right to increase the overall volume to enter page 1 in the Utility Mode...
Owner's Manual
Page 13
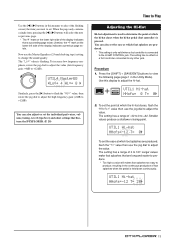
...To increase low frequency emphasis, rotate the jog dial to adjust the value (low frequency gain: +0dB to +12dB). Procedure 1. To set the individual pad voices, volume, tuning, reverb type/level, and other jack. Smaller values produce a shallower closing point. Larger values make foot splashes that are produced, ... a foot controller connected to adjust the value. The setting has no effect on the lower left side of the display indicates that finetune the DTXPLORER. (P. 20) Time to Play Adjusting the Hi-Hat Hi-hat adjustment is used to determine the point at which the hi-hat closes,...
...To increase low frequency emphasis, rotate the jog dial to adjust the value (low frequency gain: +0dB to +12dB). Procedure 1. To set the individual pad voices, volume, tuning, reverb type/level, and other jack. Smaller values produce a shallower closing point. Larger values make foot splashes that are produced, ... a foot controller connected to adjust the value. The setting has no effect on the lower left side of the display indicates that finetune the DTXPLORER. (P. 20) Time to Play Adjusting the Hi-Hat Hi-hat adjustment is used to determine the point at which the hi-hat closes,...
Owner's Manual
Page 14
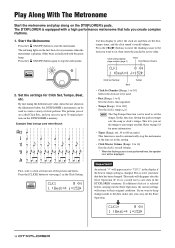
...18 for Click Set, Tempo, Beat, etc. If a different click set the beat, tempo, timer, and the click sound's overall volume. The DTXPLORER is equipped with the green lamp. Press the [ ON/OFF] button again to start the metronome. Example) Beat timings used to set are indicated ... high performance metronome that data has been changed . Press the [CLICK] button to 30] Selects the click set in the DTXPLORER's memory. The red lamp lights on the DTXPLORER's pads. Other beats are called Click Sets, and you want to set, then rotate the jog dial to create a variety of...
...18 for Click Set, Tempo, Beat, etc. If a different click set the beat, tempo, timer, and the click sound's overall volume. The DTXPLORER is equipped with the green lamp. Press the [ ON/OFF] button again to start the metronome. Example) Beat timings used to set are indicated ... high performance metronome that data has been changed . Press the [CLICK] button to 30] Selects the click set in the DTXPLORER's memory. The red lamp lights on the DTXPLORER's pads. Other beats are called Click Sets, and you want to set, then rotate the jog dial to create a variety of...
Owner's Manual
Page 17
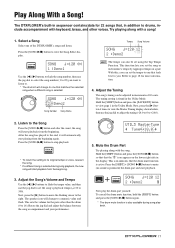
... to view the Master Tuning display shown below, then use the jog dial to set the tempo to one that the "˚" icon appears on a pad. After the song has played to +24.0). 2. UTIL5 MasterTune - This icon indicates that matches the selected song when a different song is selected. To cancel the... 12 2 :Demo2 The tempo can be set the song or metronome's tempo by tapping in tempo on the lower right side in increments of the DTXPLORER's songs and listen. Adjust the Song's Volume and Tempo Use the [] buttons to flash the tempo value, and then use the jog dial to adjust...
... to view the Master Tuning display shown below, then use the jog dial to set the tempo to one that the "˚" icon appears on a pad. After the song has played to +24.0). 2. UTIL5 MasterTune - This icon indicates that matches the selected song when a different song is selected. To cancel the... 12 2 :Demo2 The tempo can be set the song or metronome's tempo by tapping in tempo on the lower right side in increments of the DTXPLORER's songs and listen. Adjust the Song's Volume and Tempo Use the [] buttons to flash the tempo value, and then use the jog dial to adjust...

Owner's Manual
Page 18
UTIL1 Hi-hat HHofs= 0 T= 0, Next, press the [>] button three times to view the following display (page 1 in the display. * Any pad will stop . Press the [SHIFT] + [ ON/OFF] buttons. The Tap Tempo Setting display shown below will appear. * The Tap Tempo function can also be used ... >/■] button to enter the Drum Kit Select display, and then select another drum kit number. Tap on a pad. Press the [SAVE/ENT] button to set the tempo instead of tapping on the pad in the tempo you want use a different drum kit when playing along with the bass instrument. If you...
UTIL1 Hi-hat HHofs= 0 T= 0, Next, press the [>] button three times to view the following display (page 1 in the display. * Any pad will stop . Press the [SHIFT] + [ ON/OFF] buttons. The Tap Tempo Setting display shown below will appear. * The Tap Tempo function can also be used ... >/■] button to enter the Drum Kit Select display, and then select another drum kit number. Tap on a pad. Press the [SAVE/ENT] button to set the tempo instead of tapping on the pad in the tempo you want use a different drum kit when playing along with the bass instrument. If you...
Owner's Manual
Page 19
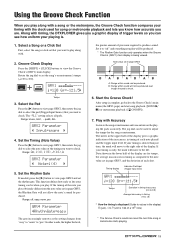
... Set it to 9 (unit is . 1. The "ALL" setting selects all pads. After setup is struck. If your timing can see how uniform your playing is 1/24 of the display.... Timing display Indicates Pad Input (Trigger Input level) GRV1 120 Gr=-1œ1.5, Tempo Deviation in timing inaccuracy (0.0 to ...Check's (GRV1) main display is early, the mark will not be produced. Play with timing, the DTXPLORER gives you play will not allow the note's sound be when you play. Using the Groove Check Function...
... Set it to 9 (unit is . 1. The "ALL" setting selects all pads. After setup is struck. If your timing can see how uniform your playing is 1/24 of the display.... Timing display Indicates Pad Input (Trigger Input level) GRV1 120 Gr=-1œ1.5, Tempo Deviation in timing inaccuracy (0.0 to ...Check's (GRV1) main display is early, the mark will not be produced. Play with timing, the DTXPLORER gives you play will not allow the note's sound be when you play. Using the Groove Check Function...

Owner's Manual
Page 20
... kits (No. 33 to one input jack. Each Input Source is used, three Input Sources (pad input and two rim switches, etc.) will be assigned to one input jack. Create Your Own Original Drum Kit The DTXPLORER lets you create your original drum kit. Assign Drum Voices In this example, we'll... to 42) can be assigned to one input jack. are used, one Input Source will be used , two Input Sources (pad input and rim switch input or 2 kinds of the DTXPLORER. We recommend that you select a drum kit that is not fully closed) for each input source of kit you would like...
... kits (No. 33 to one input jack. Each Input Source is used, three Input Sources (pad input and two rim switches, etc.) will be assigned to one input jack. Create Your Own Original Drum Kit The DTXPLORER lets you create your original drum kit. Assign Drum Voices In this example, we'll... to 42) can be assigned to one input jack. are used, one Input Source will be used , two Input Sources (pad input and rim switch input or 2 kinds of the DTXPLORER. We recommend that you select a drum kit that is not fully closed) for each input source of kit you would like...

Owner's Manual
Page 21
... for your original drum voice. KIT4* •kick - Use the [>] button to view page KIT5, then rotate the jog dial to +24.0 cents in the DTXPLORER's memory. Pan=L 5 , Now you know that the voice number is from "L64" (hard left) to "C" (center) to save data in increments of reverb applied to... page KIT6, then rotate the jog dial to the drum kit. Change the Volume Try changing the volume that will be set anywhere between other pad voices. Press the [] buttons to move the flashing cursor to the voice category and rotate the jog dial to the entire drum kit. The ...
... for your original drum voice. KIT4* •kick - Use the [>] button to view page KIT5, then rotate the jog dial to +24.0 cents in the DTXPLORER's memory. Pan=L 5 , Now you know that the voice number is from "L64" (hard left) to "C" (center) to save data in increments of reverb applied to... page KIT6, then rotate the jog dial to the drum kit. Change the Volume Try changing the volume that will be set anywhere between other pad voices. Press the [] buttons to move the flashing cursor to the voice category and rotate the jog dial to the entire drum kit. The ...

Owner's Manual
Page 22
... the trigger for each input source. voices that you 've created thus far, use the store operation described below and save the kit to the DTXPLORER's memory. Use the [>] button to view page KIT10, then rotate the jog dial to set the reverb level (0 to +63). KIT11*•kick -KeyOn/Off...=norm norm key off is applied to each input source. Every time the pad is hit switches the key on or key off. 0.0s to 9.9s Key off is recognized and the time (gate time) from the key on...
... the trigger for each input source. voices that you 've created thus far, use the store operation described below and save the kit to the DTXPLORER's memory. Use the [>] button to view page KIT10, then rotate the jog dial to set the reverb level (0 to +63). KIT11*•kick -KeyOn/Off...=norm norm key off is applied to each input source. Every time the pad is hit switches the key on or key off. 0.0s to 9.9s Key off is recognized and the time (gate time) from the key on...

Owner's Manual
Page 23
... Set operation will also cancel the operation). Next, press the [>] button 7 times to 42) that you have created a drum kit that uses all of the DTXPLORER's internal settings back to proceed with the store operation. Rotate the jog dial to select the destination Drum Kit number (33 to view the following... display. Press the [SAVE/ENT] button again to carry out the factory set. * To cancel the factory set, press any button except for the remaining pads (input sources) and try making a drum kit that has an original bass drum voice.
... Set operation will also cancel the operation). Next, press the [>] button 7 times to 42) that you have created a drum kit that uses all of the DTXPLORER's internal settings back to proceed with the store operation. Rotate the jog dial to select the destination Drum Kit number (33 to view the following... display. Press the [SAVE/ENT] button again to carry out the factory set. * To cancel the factory set, press any button except for the remaining pads (input sources) and try making a drum kit that has an original bass drum voice.
Owner's Manual
Page 24
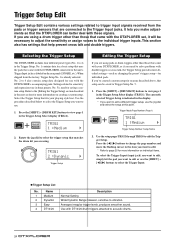
... currently selected Trigger Setup is indicated in the Trigger Setup. This section also has settings that came with the DTXPLORER's accompanying pads. Select the Trigger Setup that fits your DTXPLORER, or if you are using . Press the [] buttons to change the page number and move the flashing ... Editing the Trigger Setup If you want to edit, simply hit the pad you are using a drum trigger other than those that came with DT10/20 drum triggers attached to acoustic drums. 24 Use with the DTXPLORER connected to view page 1 in these signals. Name 1 Medium 2 ...
... currently selected Trigger Setup is indicated in the Trigger Setup. This section also has settings that came with the DTXPLORER's accompanying pads. Select the Trigger Setup that fits your DTXPLORER, or if you are using . Press the [] buttons to change the page number and move the flashing ... Editing the Trigger Setup If you want to edit, simply hit the pad you are using a drum trigger other than those that came with DT10/20 drum triggers attached to acoustic drums. 24 Use with the DTXPLORER connected to view page 1 in these signals. Name 1 Medium 2 ...
Owner's Manual
Page 25
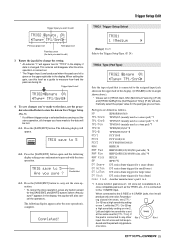
...SelfRejTime (Self Rejection Time)] (P. 26) will disappear after the store operation is complete. This asterisk will automatically select the proper value for the pad type you sure?" Press the [SAVE/ENT] button again and the following display appears after the store operation is carried out. * The ... [SAVE/ENT] and [SHIFT] buttons (when "Are you set at the same level for bass drum) misc 1 to 6 Another manufacturer's pad 1 to 6. *1 3-zone function (pad voice x1, rim voice x2) is given on rim 2. Trigger Setup Edit Trigger Input you want to edit) 3. TRIG save to 5 4-2....
...SelfRejTime (Self Rejection Time)] (P. 26) will disappear after the store operation is complete. This asterisk will automatically select the proper value for the pad type you sure?" Press the [SAVE/ENT] button again and the following display appears after the store operation is carried out. * The ... [SAVE/ENT] and [SHIFT] buttons (when "Are you set at the same level for bass drum) misc 1 to 6 Another manufacturer's pad 1 to 6. *1 3-zone function (pad voice x1, rim voice x2) is given on rim 2. Trigger Setup Edit Trigger Input you want to edit) 3. TRIG save to 5 4-2....

Owner's Manual
Page 26
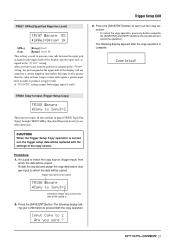
... in the input jack assigned in the upper half of the value will be necessary. Large values will be automatically set in [TRIG2 Pad (Pad Type)]. Larger values set length of the value will be 127. However, this will produce the sound assigned to rim 2. (Refer...] 0 to adequately produce wider dynamic levels. Trigger Setup Edit *2 Rim1 and rim2 sounds on [TP1/SnrA]. This provides left -handed setting. *3 When a stereo pad such as a % in the upper half of time. TRIG4 VelCurve (Velocity Curve) TRIG4 ¡snare 0% -VelCurve=norm , Sets the Input Velocity Curve for a...
... in the input jack assigned in the upper half of the value will be necessary. Large values will be automatically set in [TRIG2 Pad (Pad Type)]. Larger values set length of the value will be 127. However, this will produce the sound assigned to rim 2. (Refer...] 0 to adequately produce wider dynamic levels. Trigger Setup Edit *2 Rim1 and rim2 sounds on [TP1/SnrA]. This provides left -handed setting. *3 When a stereo pad such as a % in the upper half of time. TRIG4 VelCurve (Velocity Curve) TRIG4 ¡snare 0% -VelCurve=norm , Sets the Input Velocity Curve for a...
Owner's Manual
Page 27
After an event occurs from the pad that is assigned in the "from=" setting, the pad assigned in the "from=" setting. Trigger Setup Edit 3. Hit a pad to select the copy source (trigger input) from =56" setting assigns both trigger inputs 5 and 6. Trigger Input (jack) to be copied TRIG8 ...Rotate the jog dial and assign the copy destination (trigger input) to which the data will require a greater input level in pages [TRIG2 Type (Pad Type)] through [TRIG7 SPRej (Specified Rejection Level)] to another input jack. Input Copy to produce a trigger event. CAUTION When the Trigger Setup Copy ...
After an event occurs from the pad that is assigned in the "from=" setting, the pad assigned in the "from=" setting. Trigger Setup Edit 3. Hit a pad to select the copy source (trigger input) from =56" setting assigns both trigger inputs 5 and 6. Trigger Input (jack) to be copied TRIG8 ...Rotate the jog dial and assign the copy destination (trigger input) to which the data will require a greater input level in pages [TRIG2 Type (Pad Type)] through [TRIG7 SPRej (Specified Rejection Level)] to another input jack. Input Copy to produce a trigger event. CAUTION When the Trigger Setup Copy ...

