

Owner's Manual
Page 5
... a "Tap" function that meets your playing needs. Two functions that make the DTXPLORER great for pads or drum triggers. • Also included in the unit are nine trigger input jacks and a hi-hat controller jack. Jacks that are compatible with the song's bass part only-and the... the metronome will let you play along with rim switch and 3-zone trigger equipped pads are also supplied. The DTXPLORER's Main FeaturesMain Features The DTXPLORER is equipped with devices such as Yamaha's DT20 Drum Triggers, etc. • Setup data such as pad trigger input type, sensitivity settings, etc., ...
... a "Tap" function that meets your playing needs. Two functions that make the DTXPLORER great for pads or drum triggers. • Also included in the unit are nine trigger input jacks and a hi-hat controller jack. Jacks that are compatible with the song's bass part only-and the... the metronome will let you play along with rim switch and 3-zone trigger equipped pads are also supplied. The DTXPLORER's Main FeaturesMain Features The DTXPLORER is equipped with devices such as Yamaha's DT20 Drum Triggers, etc. • Setup data such as pad trigger input type, sensitivity settings, etc., ...

Owner's Manual
Page 6
CONTENTS Nomenclature 7 Top Panel 7 Rear Panel 8 Connections 9 Connecting the DTXPLORER's pads to the main unit 9 Using the DTXPLORER with an Acoustic Drum Kit 9 ■ Connecting to Speakers or Headphones 10 ■ Connecting the Power Supply 11 Time to Play 12 Adjusting the Hi-Hat 13 Play Along With The Metronome 14 Click Out Select...
CONTENTS Nomenclature 7 Top Panel 7 Rear Panel 8 Connections 9 Connecting the DTXPLORER's pads to the main unit 9 Using the DTXPLORER with an Acoustic Drum Kit 9 ■ Connecting to Speakers or Headphones 10 ■ Connecting the Power Supply 11 Time to Play 12 Adjusting the Hi-Hat 13 Play Along With The Metronome 14 Click Out Select...

Owner's Manual
Page 7
...a green light. !0 Jog Dial Rotate the jog dial to enter the Click (Metronome) Setting dis- Nomenclature Top Panel STANDBY ON DC IN 12V HI HAT CONTROL VOLUME AUX IN PHONES L/MONO 8 KICK/9 7HIHAT 6CRASH 5 RIDE R 4 TOM3 3TOM2 2TOM1 1 SNARE MIDI OUT q DRUM KIT TRIGGER SONG /... DRUM MUTE e w CLICK GRV.CHECK SHIFT r i * DTXPLORER * * Welcome! * BEAT o CLICK !0 DRUM TRIGGER MODULE t ON/OFF TAP y SAVE/ENT UTILITY u q Drum Kit Button (DRUM KIT) • This button is used...
...a green light. !0 Jog Dial Rotate the jog dial to enter the Click (Metronome) Setting dis- Nomenclature Top Panel STANDBY ON DC IN 12V HI HAT CONTROL VOLUME AUX IN PHONES L/MONO 8 KICK/9 7HIHAT 6CRASH 5 RIDE R 4 TOM3 3TOM2 2TOM1 1 SNARE MIDI OUT q DRUM KIT TRIGGER SONG /... DRUM MUTE e w CLICK GRV.CHECK SHIFT r i * DTXPLORER * * Welcome! * BEAT o CLICK !0 DRUM TRIGGER MODULE t ON/OFF TAP y SAVE/ENT UTILITY u q Drum Kit Button (DRUM KIT) • This button is used...

Owner's Manual
Page 8
...music from a CD or cassette player. * Use the volume control on the KP65. !4 Hi-Hat Controller Jack (HI HAT CONTROL) This jack is used to send data from an external tone generator, or synchronize the DTXPLORER's song or metronome playback with the playback of an external sequencer. (P. 11) !2 Trigger Input ... level of the signal delivered by the OUTPUT jacks and PHONE jack). For monaural playback use the DTXPLORER as snare, tom, etc., according to the indication below ) when connecting a Hi-hat controller. Using the supplied stereo cable to connect the KP65 kick pad to the main unit allows ...
...music from a CD or cassette player. * Use the volume control on the KP65. !4 Hi-Hat Controller Jack (HI HAT CONTROL) This jack is used to send data from an external tone generator, or synchronize the DTXPLORER's song or metronome playback with the playback of an external sequencer. (P. 11) !2 Trigger Input ... level of the signal delivered by the OUTPUT jacks and PHONE jack). For monaural playback use the DTXPLORER as snare, tom, etc., according to the indication below ) when connecting a Hi-hat controller. Using the supplied stereo cable to connect the KP65 kick pad to the main unit allows ...

Owner's Manual
Page 9
...SNARE to HI HAT CONTROL to 3 TOM2 to 2 TOM1 to 8 KICK/9 to 4 TOM3 * The kit can be played from an acoustic drum kit if the kit is fitted with an optional monaural pad (PCY65, etc.) connected to the external pad input jack on the KP65. Connecting the DTXPLORER's pads to ...Drum Kit The DTXPLORER can be changed. Connections CAUTION To prevent electric shock and damage to the devices, make sure each Trigger Input jack on the rear panel of Yamaha DX20 Drum Triggers and the triggers are connected to the DTXPLORER's input jacks. * After making any connections to the DTXPLORER's input and...
...SNARE to HI HAT CONTROL to 3 TOM2 to 2 TOM1 to 8 KICK/9 to 4 TOM3 * The kit can be played from an acoustic drum kit if the kit is fitted with an optional monaural pad (PCY65, etc.) connected to the external pad input jack on the KP65. Connecting the DTXPLORER's pads to ...Drum Kit The DTXPLORER can be changed. Connections CAUTION To prevent electric shock and damage to the devices, make sure each Trigger Input jack on the rear panel of Yamaha DX20 Drum Triggers and the triggers are connected to the DTXPLORER's input jacks. * After making any connections to the DTXPLORER's input and...

Owner's Manual
Page 12
...located on the rear panel to switch the power ON. UTIL4 MasterEQ -Lo=+ 4 Hi=+ 8 , 12 Rotate the jog dial to the "T=" value position. UTIL1 Hi-hat HHofs= 0 T= 0, Press the [>] button again to go to page 4 in the display. * Press the [DRUM KIT] button if another display is shown. Select... on again, and the total number times the pads have been specially programmed by Yamaha sound designers. Drum kit numbers 1 through 32 consist of 32 different types of voices that your speakers, first switch the DTXPLORER's power ON then switch on page 4 in the Utility Mode. Switch the power...
...located on the rear panel to switch the power ON. UTIL4 MasterEQ -Lo=+ 4 Hi=+ 8 , 12 Rotate the jog dial to the "T=" value position. UTIL1 Hi-hat HHofs= 0 T= 0, Press the [>] button again to go to page 4 in the display. * Press the [DRUM KIT] button if another display is shown. Select... on again, and the total number times the pads have been specially programmed by Yamaha sound designers. Drum kit numbers 1 through 32 consist of 32 different types of voices that your speakers, first switch the DTXPLORER's power ON then switch on page 4 in the Utility Mode. Switch the power...
Owner's Manual
Page 13
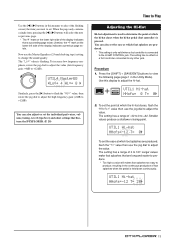
... Mode). Press the [SHIFT] + [SAVE/ENT] buttons to +32. The setting has a range of the display indicates a previous page exists. UTIL1 Hi-hat HHofs=-12 T= 0, To set the ease at which foot splashes are produced. * This setting is only valid when a foot controller is connected to 127.... Larger values make foot splashes that finetune the DTXPLORER. (P. 20) Time to Play Adjusting the Hi-Hat Hi-hat adjustment is used to set the individual pad voices, volume, tuning, reverb type/level, and other jack.
... Mode). Press the [SHIFT] + [SAVE/ENT] buttons to +32. The setting has a range of the display indicates a previous page exists. UTIL1 Hi-hat HHofs=-12 T= 0, To set the ease at which foot splashes are produced. * This setting is only valid when a foot controller is connected to 127.... Larger values make foot splashes that finetune the DTXPLORER. (P. 20) Time to Play Adjusting the Hi-Hat Hi-hat adjustment is used to set the individual pad voices, volume, tuning, reverb type/level, and other jack.

Owner's Manual
Page 15
... the flashing cursor to the lower half of the five click beats. First, select the voice category. ● Voice Category K: Kick S: Snare T: Tom C: Cymbal H: Hi-hat P: Percussion E: Effect Next, select the voice number (0, 1 to be produced. Click Value Type CLK6 Sound= « - Set the volume level to "0" if you don't want...
... the flashing cursor to the lower half of the five click beats. First, select the voice category. ● Voice Category K: Kick S: Snare T: Tom C: Cymbal H: Hi-hat P: Percussion E: Effect Next, select the voice number (0, 1 to be produced. Click Value Type CLK6 Sound= « - Set the volume level to "0" if you don't want...

Owner's Manual
Page 16
...?" Rotate the jog dial to select the destination memory number (1 to 1 Are you select from the factory. (P. 23) Click Out Select The DTXPLORER lets you sure ? Store Destination 8-4. Press the [SHIFT] + [SAVE/ENT] buttons and the following display asking your own original click set, save...SAVE/ENT] and [SHIFT] buttons (when "Are you want to the PHONES jack's stereo L and R. 16 appears in the Utility Mode.) UTIL1 Hi-hat HHofs= 0 T= 0, 2. Completed! Next, press the [>] button twice so that was shipped from which output jack the metronome's signal is delivered. All ...
...?" Rotate the jog dial to select the destination memory number (1 to 1 Are you select from the factory. (P. 23) Click Out Select The DTXPLORER lets you sure ? Store Destination 8-4. Press the [SHIFT] + [SAVE/ENT] buttons and the following display asking your own original click set, save...SAVE/ENT] and [SHIFT] buttons (when "Are you want to the PHONES jack's stereo L and R. 16 appears in the Utility Mode.) UTIL1 Hi-hat HHofs= 0 T= 0, 2. Completed! Next, press the [>] button twice so that was shipped from which output jack the metronome's signal is delivered. All ...

Owner's Manual
Page 18
... Setting display shown below will be used to set , press the [SONG >/■] button to give you set the tempo to the song. UTIL1 Hi-hat HHofs= 0 T= 0, Next, press the [>] button three times to stop flashing. Press the [ ON/OFF] button again to view the following display (page 1 in tempo on...
... Setting display shown below will be used to set , press the [SONG >/■] button to give you set the tempo to the song. UTIL1 Hi-hat HHofs= 0 T= 0, Next, press the [>] button three times to stop flashing. Press the [ ON/OFF] button again to view the following display (page 1 in tempo on...

Owner's Manual
Page 20
...hi-hat controller for Trigger Input Jack 7. •kick Pad input for Trigger Input Jack 8. ªpad9 Pad input for editing as the TP65S/PCY150S, etc., is not fully closed) for your original drum kit. are used, two Input Sources (pad input and rim switch input or 2 kinds of the DTXPLORER. ...etc. To select the pad (Trigger Input Source), simply hit the target pad, or press the [SHIFT] + [] buttons. Create Your Own Original Drum Kit The DTXPLORER lets you create your own original drum kit by the pads or trigger sensors connected to input jacks 1 to view page 1 in Drum Kit Select...
...hi-hat controller for Trigger Input Jack 7. •kick Pad input for Trigger Input Jack 8. ªpad9 Pad input for editing as the TP65S/PCY150S, etc., is not fully closed) for your original drum kit. are used, two Input Sources (pad input and rim switch input or 2 kinds of the DTXPLORER. ...etc. To select the pad (Trigger Input Source), simply hit the target pad, or press the [SHIFT] + [] buttons. Create Your Own Original Drum Kit The DTXPLORER lets you create your own original drum kit by the pads or trigger sensors connected to input jacks 1 to view page 1 in Drum Kit Select...

Owner's Manual
Page 21
... If a different drum kit is selected, etc., before carrying out the Store Operation, the current settings will appear next to "KIT" in the DTXPLORER's memory. Press the [] buttons so that is produced by the drum voice when the pad is applied to the setting. Change the Pan Try ... Drum voice categories are the same as the base for the metronome's click voice. ● Voice Category K: Kick S: Snare T: Tom C: Cymbal H: Hi-hat P: Percussion E: Effect Here, select "K: Kick". Press the [] buttons to move the flashing cursor to the voice category and rotate the jog dial to set the...
... If a different drum kit is selected, etc., before carrying out the Store Operation, the current settings will appear next to "KIT" in the DTXPLORER's memory. Press the [] buttons so that is produced by the drum voice when the pad is applied to the setting. Change the Pan Try ... Drum voice categories are the same as the base for the metronome's click voice. ● Voice Category K: Kick S: Snare T: Tom C: Cymbal H: Hi-hat P: Percussion E: Effect Here, select "K: Kick". Press the [] buttons to move the flashing cursor to the voice category and rotate the jog dial to set the...

Owner's Manual
Page 22
... (-64 to 0 to 127). Use the [>] button to view page KIT9, then rotate the jog dial to set the decay (-64 to 0 to the DTXPLORER's memory. Press the [DRUM KIT] button to 33 22 voices that you 've created thus far, use the store operation described below and save the... the filter's cut -off when the trigger for each input source. KIT10*•kick - Set the Alternate Group By assigning voices like the hi-hat's open hi-hat voice is set the reverb level (0 to +63). AltGroup= 1 , * Some voices such as thru). white A special short reverb effect. Save the Original Voice...
... (-64 to 0 to 127). Use the [>] button to view page KIT9, then rotate the jog dial to set the decay (-64 to 0 to the DTXPLORER's memory. Press the [DRUM KIT] button to 33 22 voices that you 've created thus far, use the store operation described below and save the... the filter's cut -off when the trigger for each input source. KIT10*•kick - Set the Alternate Group By assigning voices like the hi-hat's open hi-hat voice is set the reverb level (0 to +63). AltGroup= 1 , * Some voices such as thru). white A special short reverb effect. Save the Original Voice...

Owner's Manual
Page 23
... for your confirmation to proceed with the store operation. Create Your Own Original Drum Kit Factory Set This operation returns all original voices. UTIL1 Hi-hat HHofs= 0 T= 0, 2. UTIL6 - Completed! Press the [SAVE/ENT] button to carry out the factory set. * To cancel the factory set, press any ...the jog dial to select the destination Drum Kit number (33 to 42) that you have created a drum kit that uses all of the DTXPLORER's internal settings back to cancel the operation). 23 Press the [SAVE/ENT] button again and the following display appears after the store operation is...
... for your confirmation to proceed with the store operation. Create Your Own Original Drum Kit Factory Set This operation returns all original voices. UTIL1 Hi-hat HHofs= 0 T= 0, 2. UTIL6 - Completed! Press the [SAVE/ENT] button to carry out the factory set. * To cancel the factory set, press any ...the jog dial to select the destination Drum Kit number (33 to 42) that you have created a drum kit that uses all of the DTXPLORER's internal settings back to cancel the operation). 23 Press the [SAVE/ENT] button again and the following display appears after the store operation is...

Owner's Manual
Page 29
... sound when it is not compatible with a monaural pad. Pad controller functions do a factory reset. The Closed Hi-Hat voice is only compatible with pad control functions. 29 The DTXPLORER will reset to temporarily stop . ● Is the [KIT11 KeyOn/Off (MIDI Key On/OFF)] setting in the... MIDI Key On/Off display set to "norm"? (→ P. 22 ) When set to the owner's manual that is too high may sound continuously. The DTXPLORER does not receive any other than Yamaha...
... sound when it is not compatible with a monaural pad. Pad controller functions do a factory reset. The Closed Hi-Hat voice is only compatible with pad control functions. 29 The DTXPLORER will reset to temporarily stop . ● Is the [KIT11 KeyOn/Off (MIDI Key On/OFF)] setting in the... MIDI Key On/Off display set to "norm"? (→ P. 22 ) When set to the owner's manual that is too high may sound continuously. The DTXPLORER does not receive any other than Yamaha...

Owner's Manual
Page 30
...DRUMKIT, CLICK, SONG, >/■, SHIFT, , ON/OFF, SAVE/ENT VOLUME, Jog Dial Display 16 x 2 LCD display (w/Back light) Connections MIDI OUT HI HAT CONTROLLER (stereo phone jack) OUTPUT L/MONO (mono phone jack) OUTPUT R (mono phone jack) PHONES (stereo phone jack) AUX IN (stereo mini jack) Trigger... AC power adaptor (included or optional depending on local) * Specifications and descriptions in every locale, please check with your Yamaha dealer. 30 Yamaha Corp. reserves the right to change or modify products or specifications at any time without prior notice. Since specifications, equipment ...
...DRUMKIT, CLICK, SONG, >/■, SHIFT, , ON/OFF, SAVE/ENT VOLUME, Jog Dial Display 16 x 2 LCD display (w/Back light) Connections MIDI OUT HI HAT CONTROLLER (stereo phone jack) OUTPUT L/MONO (mono phone jack) OUTPUT R (mono phone jack) PHONES (stereo phone jack) AUX IN (stereo mini jack) Trigger... AC power adaptor (included or optional depending on local) * Specifications and descriptions in every locale, please check with your Yamaha dealer. 30 Yamaha Corp. reserves the right to change or modify products or specifications at any time without prior notice. Since specifications, equipment ...

Owner's Manual
Page 31
... Low tom Ride Ride edge Note Number 31 34 37 48 47 43 51 52 Input 6 6 7 7 7 7 8 9 Instrument Clash Clash edge HI-Hat open HI-Hat close HI-Hat foot close HI-Hat foot splash Kick Option Note Number 49 57 46 42 44 85 33 55 31 Channel Message Channel messages described below are...
... Low tom Ride Ride edge Note Number 31 34 37 48 47 43 51 52 Input 6 6 7 7 7 7 8 9 Instrument Clash Clash edge HI-Hat open HI-Hat close HI-Hat foot close HI-Hat foot splash Kick Option Note Number 49 57 46 42 44 85 33 55 31 Channel Message Channel messages described below are...

Owner's Manual
Page 35
... Power Beat 21 HornsGroove 22 Electro Kit 23 Jazz Kit 24 Light Shot No. Drum Voice List ● Voice Category K : Kick S : Snare T : Tom C : Cymbal H : Hi-Hat P : Percussion E : Effect K : Kick 1 Maple 22 2 MapleVtg 3 MapleAmb 4 Beech 22 5 Birch 20 6 Birch 18 7 DryTight 8 AnalogBD 9 TechnoBD 10 ElecBD 1 11 ElecBD 2... 14 RdEdge 15 RdSizlEd 16 China 18 17 Splash 8 18 Trash 19 Gong 20 VFX Crsh 21 VFX Ride 22 CrAnalog 23 RdAnalog H : Hi-Hat 1 HHOpen14 2 HHClse14 3 HHFoot14 4 HHSpls14 5 HHOpen13 6 HHClse13 7 HHFoot13 8 HHSpls13 9 HHDarkOp 10 HHDarkCl 11 HHDarkFt 12 HHDarkSp 13 HHOpen12 14 ...
... Power Beat 21 HornsGroove 22 Electro Kit 23 Jazz Kit 24 Light Shot No. Drum Voice List ● Voice Category K : Kick S : Snare T : Tom C : Cymbal H : Hi-Hat P : Percussion E : Effect K : Kick 1 Maple 22 2 MapleVtg 3 MapleAmb 4 Beech 22 5 Birch 20 6 Birch 18 7 DryTight 8 AnalogBD 9 TechnoBD 10 ElecBD 1 11 ElecBD 2... 14 RdEdge 15 RdSizlEd 16 China 18 17 Splash 8 18 Trash 19 Gong 20 VFX Crsh 21 VFX Ride 22 CrAnalog 23 RdAnalog H : Hi-Hat 1 HHOpen14 2 HHClse14 3 HHFoot14 4 HHSpls14 5 HHOpen13 6 HHClse13 7 HHFoot13 8 HHSpls13 9 HHDarkOp 10 HHDarkCl 11 HHDarkFt 12 HHDarkSp 13 HHOpen12 14 ...

