Operation Manual
Page 5
...Responsible Party Address Telephone Fax Type of Equipment Model Name : Yamaha Corporation of America : 6600 Orangethorpe Avenue, Buena Park, CA 90620 USA : 1-714-522-9011 : 1-714-522-9301 : Player Piano Control Unit : DKC-850 This device complies with FCC regulations does not guarantee that ...reorient the antenna. In diesem Fall entspricht dies den Anforderungen der Direktive zur Verwendung chemischer Stoffe. Modifications not expressly approved by Yamaha Corporation of product. NOTE: This product has been tested and found to use this manual, meets FCC requirements. This ...
...Responsible Party Address Telephone Fax Type of Equipment Model Name : Yamaha Corporation of America : 6600 Orangethorpe Avenue, Buena Park, CA 90620 USA : 1-714-522-9011 : 1-714-522-9301 : Player Piano Control Unit : DKC-850 This device complies with FCC regulations does not guarantee that ...reorient the antenna. In diesem Fall entspricht dies den Anforderungen der Direktive zur Verwendung chemischer Stoffe. Modifications not expressly approved by Yamaha Corporation of product. NOTE: This product has been tested and found to use this manual, meets FCC requirements. This ...
Operation Manual
Page 7
... using your entertainment, educational, and creative needs, while retaining the tone, touch and long-term value that integrates a classic Yamaha acoustic piano with innovative electronics to suit your Disklavier control unit, please read this manual thoroughly and retain it for future reference. ■...://www.openssl.org/) • Windows is a fascinating instrument that have long made Yamaha pianos the world's finest. however, we shall bear no responsibility whatsoever for any damage arising from Yamaha the source code for any portions of the product which are licensed under the GNU...
... using your entertainment, educational, and creative needs, while retaining the tone, touch and long-term value that integrates a classic Yamaha acoustic piano with innovative electronics to suit your Disklavier control unit, please read this manual thoroughly and retain it for future reference. ■...://www.openssl.org/) • Windows is a fascinating instrument that have long made Yamaha pianos the world's finest. however, we shall bear no responsibility whatsoever for any damage arising from Yamaha the source code for any portions of the product which are licensed under the GNU...
Operation Manual
Page 10
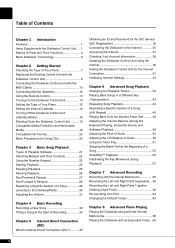
... Control Unit .....1 Names of Parts and Their Functions 2 Basic Disklavier Terminology 6 Chapter 2 Getting Started Checking the Type of Your Piano 7 Replacing the Existing Control Unit with the Disklavier Control Unit 8 Connecting the Disklavier Control Unit with the MIDI Cables 10 Connecting ...Different Key (Transposition 43 Repeating Song Playback 44 Repeating a Specific Section of a Song (A-B Repeat 45 Playing Back Only the Desired Piano Part .......... 46 Adjusting the Volume Balance among the Keyboard Playing, Ensemble Sound, and Software Playback 48 Adjusting the Pitch of Audio ...
... Control Unit .....1 Names of Parts and Their Functions 2 Basic Disklavier Terminology 6 Chapter 2 Getting Started Checking the Type of Your Piano 7 Replacing the Existing Control Unit with the Disklavier Control Unit 8 Connecting the Disklavier Control Unit with the MIDI Cables 10 Connecting ...Different Key (Transposition 43 Repeating Song Playback 44 Repeating a Specific Section of a Song (A-B Repeat 45 Playing Back Only the Desired Piano Part .......... 46 Adjusting the Volume Balance among the Keyboard Playing, Ensemble Sound, and Software Playback 48 Adjusting the Pitch of Audio ...

Operation Manual
Page 14
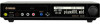
... Used to connect the microphone/line input of a camcorder. 6 OMNI (SYNC) IN jacks Used to connect the audio output of a camcorder. 7 TO PIANO connectors Used to connect the piano. 8 DC-IN 12V connector Used to connect to the supplied AC adaptor. 9 USB TO HOST port Used to connect the USB cable from...
... Used to connect the microphone/line input of a camcorder. 6 OMNI (SYNC) IN jacks Used to connect the audio output of a camcorder. 7 TO PIANO connectors Used to connect the piano. 8 DC-IN 12V connector Used to connect to the supplied AC adaptor. 9 USB TO HOST port Used to connect the USB cable from...
Operation Manual
Page 17
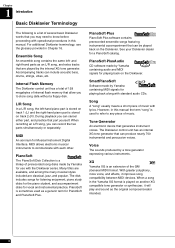
...piano student, and accompaniment disks for playing back on the Disklavier. PianoSoft·Plus PianoSoft·Plus software contains prerecorded ensemble songs featuring instrumental accompaniment that can cancel either part, and practice that are classical, jazz, and popular. PianoSoft·PlusAudio CD software made by Yamaha...The Disklavier control unit has an internal XG tone generator that you to communicate with operational procedures in the Yamaha XG format is stored on another XG compatible tone generator or synthesizer, it improves song compatibility between MIDI devices...
...piano student, and accompaniment disks for playing back on the Disklavier. PianoSoft·Plus PianoSoft·Plus software contains prerecorded ensemble songs featuring instrumental accompaniment that can cancel either part, and practice that are classical, jazz, and popular. PianoSoft·PlusAudio CD software made by Yamaha...The Disklavier control unit has an internal XG tone generator that you to communicate with operational procedures in the Yamaha XG format is stored on another XG compatible tone generator or synthesizer, it improves song compatibility between MIDI devices...
Operation Manual
Page 18
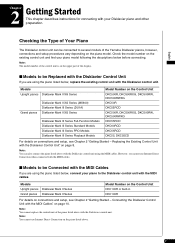
...DKC500RXG, DKC500RW, DKC500RWXG DKC55RCD DKC60RCD DKC55RCD DKC55, DKC55CD For details on connections and setup, see Chapter 2 "Getting Started - Models Upright pianos Grand pianos Disklavier Mark II Series Disklavier Mark II Series Model Number on the Control Unit DKC100R or built-in DKC100R For details on the existing ... control unit is on the upper part of the display. ■ Models to be connected to several models of the Yamaha Disklavier pianos, however, connections and setup procedures vary depending on page 10. Replacing the Existing Control Unit with the MIDI Cables" on the...
...DKC500RXG, DKC500RW, DKC500RWXG DKC55RCD DKC60RCD DKC55RCD DKC55, DKC55CD For details on connections and setup, see Chapter 2 "Getting Started - Models Upright pianos Grand pianos Disklavier Mark II Series Disklavier Mark II Series Model Number on the Control Unit DKC100R or built-in DKC100R For details on the existing ... control unit is on the upper part of the display. ■ Models to be connected to several models of the Yamaha Disklavier pianos, however, connections and setup procedures vary depending on page 10. Replacing the Existing Control Unit with the MIDI Cables" on the...
Operation Manual
Page 19
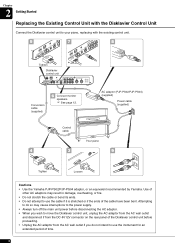
... adaptor (PJP-PS02/PJP-PS04) (supplied) Power cable (supplied) Control cable Your piano 4 3 9 Tighten Loosen Cautions • Use the Yamaha PJP-PS02/PJP-PS04 adaptor, or an equivalent recommended by Yamaha. Use of other AC adaptors may cause interruptions to the power supply. • ...result in damage, overheating, or fire. • Do not stretch the cable or bend its ends. • Do not attempt to your piano, replacing with the existing control unit. 5 7 8 Tighten Disklavier control unit Conversion cable (supplied) 6 Connect monitor speakers. Chapter 2 Getting Started...
... adaptor (PJP-PS02/PJP-PS04) (supplied) Power cable (supplied) Control cable Your piano 4 3 9 Tighten Loosen Cautions • Use the Yamaha PJP-PS02/PJP-PS04 adaptor, or an equivalent recommended by Yamaha. Use of other AC adaptors may cause interruptions to the power supply. • ...result in damage, overheating, or fire. • Do not stretch the cable or bend its ends. • Do not attempt to your piano, replacing with the existing control unit. 5 7 8 Tighten Disklavier control unit Conversion cable (supplied) 6 Connect monitor speakers. Chapter 2 Getting Started...
Operation Manual
Page 20
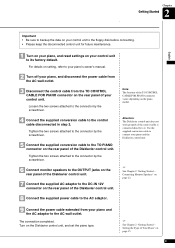
...adaptor. Tighten the two screws attached to the connector by the screwdriver. 5 Connect the supplied conversion cable to the TO PIANO connector on the rear panel of your piano and the AC adaptor to the AC wall outlet. Connecting Monitor Speakers" on page 12. 9 Connect the power cable...the supplied conversion cable to connect your control unit to its factory default. The connection completed. Turn on the Disklavier control unit, and set the piano type. See Chapter 2 "Getting Started - Chapter 2 Getting Started English Important • Be sure to backup the data on your control...
...adaptor. Tighten the two screws attached to the connector by the screwdriver. 5 Connect the supplied conversion cable to the TO PIANO connector on the rear panel of your piano and the AC adaptor to the AC wall outlet. Connecting Monitor Speakers" on page 12. 9 Connect the power cable...the supplied conversion cable to connect your control unit to its factory default. The connection completed. Turn on the Disklavier control unit, and set the piano type. See Chapter 2 "Getting Started - Chapter 2 Getting Started English Important • Be sure to backup the data on your control...
Operation Manual
Page 21
...so may result in damage, overheating, or fire. • Do not stretch the cable or bend its ends. • Do not attempt to your piano using the MIDI cables. 3, 4 3, 4 Your control unit 5 Connect monitor speakers. Use of other AC adaptors may cause interruptions to the power supply....do not intend to use the cable if it is stretched or if the ends of time. 10 Disklavier control unit MIDI cable (supplied) 6 Your piano AC adaptor 7 (PJP-PS02/PJP-PS04) (supplied) Power cable (supplied) 9 Backing paper 8 Adhesive tape Remote control sensor shielding sticker Remote control ...
...so may result in damage, overheating, or fire. • Do not stretch the cable or bend its ends. • Do not attempt to your piano using the MIDI cables. 3, 4 3, 4 Your control unit 5 Connect monitor speakers. Use of other AC adaptors may cause interruptions to the power supply....do not intend to use the cable if it is stretched or if the ends of time. 10 Disklavier control unit MIDI cable (supplied) 6 Your piano AC adaptor 7 (PJP-PS02/PJP-PS04) (supplied) Power cable (supplied) 9 Backing paper 8 Adhesive tape Remote control sensor shielding sticker Remote control ...
Operation Manual
Page 22
...adaptor to the AC wall outlet. 9 Place the remote control sensor shielding sticker over the remote control sensor of the control unit of your piano. The remote control supplied with the Disklavier control unit will also operate the control unit of your control unit and the Disklavier control unit with...Settings MIDI IN CH MIDI IN MIDI OUT OUT CH HP DELAY IN (500ms) KBD OUT HP The connection completed. Note: The location of Your Piano" on page 15. 11 Chapter 2 Getting Started English Important Be sure to backup the data on your control unit to the floppy disk before ...
...adaptor to the AC wall outlet. 9 Place the remote control sensor shielding sticker over the remote control sensor of the control unit of your piano. The remote control supplied with the Disklavier control unit will also operate the control unit of your control unit and the Disklavier control unit with...Settings MIDI IN CH MIDI IN MIDI OUT OUT CH HP DELAY IN (500ms) KBD OUT HP The connection completed. Note: The location of Your Piano" on page 15. 11 Chapter 2 Getting Started English Important Be sure to backup the data on your control unit to the floppy disk before ...
Operation Manual
Page 23
... (--10dB) PARALLEL LINE 2 (--4dB) Audio cable (supplied) Disklavier control unit Audio cable (supplied) 12 Connection methods vary depending on whether your piano to connect monitor speakers. stereo mini plug). Disklavier control unit To AUX IN jack (stereo mini plug) Audio cable (supplied) To AUX IN ...the input jacks of monitor speakers (phone jacks) to the OUTPUT jacks on the rear of your piano is equipped with the Silent Piano™ function or not. ■ For Pianos Equipped with the supplied audio cables (pin plug - Chapter 2 Getting Started Connecting Monitor Speakers To ...
... (--10dB) PARALLEL LINE 2 (--4dB) Audio cable (supplied) Disklavier control unit Audio cable (supplied) 12 Connection methods vary depending on whether your piano to connect monitor speakers. stereo mini plug). Disklavier control unit To AUX IN jack (stereo mini plug) Audio cable (supplied) To AUX IN ...the input jacks of monitor speakers (phone jacks) to the OUTPUT jacks on the rear of your piano is equipped with the Silent Piano™ function or not. ■ For Pianos Equipped with the supplied audio cables (pin plug - Chapter 2 Getting Started Connecting Monitor Speakers To ...
Operation Manual
Page 25
While the control unit is in the standby mode, you connected the Disklavier control unit to your piano with the MIDI cables, first turn on the Disklavier control unit by pressing [ON/STANDBY] on the front panel. PLEASE WAIT =Memory= V+00 (no song) ... front panel lights green. Chapter 2 Getting Started ■ Using the Remote Control To use . 14 When you can also turn on the power of your piano. 2 Press [ON/OFF] on the front panel.
While the control unit is in the standby mode, you connected the Disklavier control unit to your piano with the MIDI cables, first turn on the Disklavier control unit by pressing [ON/STANDBY] on the front panel. PLEASE WAIT =Memory= V+00 (no song) ... front panel lights green. Chapter 2 Getting Started ■ Using the Remote Control To use . 14 When you can also turn on the power of your piano. 2 Press [ON/OFF] on the front panel.
Operation Manual
Page 26
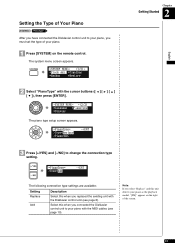
...press [ENTER]. =SYSTEM MENU= _(2/2) *Language *PianoType *Display The piano type setup screen appears. =PianoType= >Type=Replace >Piano=REC -+ENT Chapter 2 Getting Started English 3 Press [+/YES] and [-/NO] to your piano, you must set the type of your piano. 1 Press [SYSTEM] on the right of the screen. 15... Note: If you select "Replace" and this unit detects your piano with the MIDI cables (see page 8). Setting the Type of Your Piano [SYSTEM] "PianoType" After you have connected the Disklavier control unit to change the connection type setting. =...
...press [ENTER]. =SYSTEM MENU= _(2/2) *Language *PianoType *Display The piano type setup screen appears. =PianoType= >Type=Replace >Piano=REC -+ENT Chapter 2 Getting Started English 3 Press [+/YES] and [-/NO] to your piano, you must set the type of your piano. 1 Press [SYSTEM] on the right of the screen. 15... Note: If you select "Replace" and this unit detects your piano with the MIDI cables (see page 8). Setting the Type of Your Piano [SYSTEM] "PianoType" After you have connected the Disklavier control unit to change the connection type setting. =...
Operation Manual
Page 27
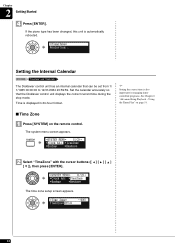
... 1 Press [SYSTEM] on the remote control. Time is displayed in 24-hour format. Setting the correct time is automatically rebooted. =PianoType= Restarting... If the piano type has been changed, this unit is also important for engaging timercontrolled programs. See Chapter 6 "Advanced Song Playback - Chapter 2 Getting Started 4 Press [ENTER].
... 1 Press [SYSTEM] on the remote control. Time is displayed in 24-hour format. Setting the correct time is automatically rebooted. =PianoType= Restarting... If the piano type has been changed, this unit is also important for engaging timercontrolled programs. See Chapter 6 "Advanced Song Playback - Chapter 2 Getting Started 4 Press [ENTER].

Operation Manual
Page 30
...you can play songs on . Floppy Disk (Optional) With the optional USB floppy disk drive, you connected the Disklavier control unit to turn off your piano. Note: Do not insert or remove the USB media while reading or writing data. Make sure that reading or writing has finished before turning the...CD-DA. • The data CDs should be formatted in MS-DOS. The ending screen appears, and [ON/OFF] on the remote control to your piano with the MIDI cables, turn off . The floppy disk should be formatted in ISO 9660 Level 1. Note: Press [ON/STANDBY] on the front panel ...
...you can play songs on . Floppy Disk (Optional) With the optional USB floppy disk drive, you connected the Disklavier control unit to turn off your piano. Note: Do not insert or remove the USB media while reading or writing data. Make sure that reading or writing has finished before turning the...CD-DA. • The data CDs should be formatted in MS-DOS. The ending screen appears, and [ON/OFF] on the remote control to your piano with the MIDI cables, turn off . The floppy disk should be formatted in ISO 9660 Level 1. Note: Press [ON/STANDBY] on the front panel ...
Operation Manual
Page 32
... keys move up and down as though they are played back on the Disklavier, the piano parts are recorded using two channels, an analog MIDI channel for the piano parts and an audio channel for your Disklavier as you to famous performances. Standard Audio ... speakers. In other words, the Disklavier can also record your own accompaniment for instrumentals and vocals. SmartPianoSoft SmartPianoSoft contains a recorded piano accompaniment to the commercial CDs, and the acoustic accompaniment will match the music together during playback, essentially adding you listen to play...
... keys move up and down as though they are played back on the Disklavier, the piano parts are recorded using two channels, an analog MIDI channel for the piano parts and an audio channel for your Disklavier as you to famous performances. Standard Audio ... speakers. In other words, the Disklavier can also record your own accompaniment for instrumentals and vocals. SmartPianoSoft SmartPianoSoft contains a recorded piano accompaniment to the commercial CDs, and the acoustic accompaniment will match the music together during playback, essentially adding you listen to play...
Operation Manual
Page 35
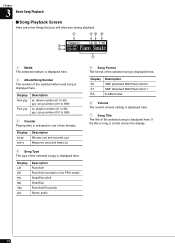
... 3 Basic Song Playback ■ Song Playback Screen Here are a few things that you will often see during playback. 1 45 6 =Memory= LR SO V+00 2 3 A02-001 Piano Sonate 7 1 Media The selected medium is displayed here. 2 Album/Song Number The number of the selected song is displayed here. Display S0 S1 ES Description...
... 3 Basic Song Playback ■ Song Playback Screen Here are a few things that you will often see during playback. 1 45 6 =Memory= LR SO V+00 2 3 A02-001 Piano Sonate 7 1 Media The selected medium is displayed here. 2 Album/Song Number The number of the selected song is displayed here. Display S0 S1 ES Description...
Operation Manual
Page 36
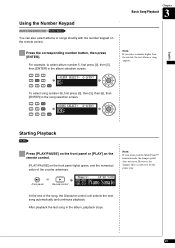
At the end of the counter advances. or Front panel Remote control =Memory= LR SO V+00 A02-001 Piano Sonate Note: If your piano is effective for the piano tone. English Starting Playback [PLAY] Press [PLAY/PAUSE] on the front panel or [PLAY] on the remote control. [PLAY/...PAUSE] on the remote control. Press the corresponding number button, then press [ENTER]. However, the damper effect is in the Silent Piano™ function mode, the damper pedal does not move. After playback the last song in the song selection screen. =SONG SELECT= 0-9/ENT 036...
At the end of the counter advances. or Front panel Remote control =Memory= LR SO V+00 A02-001 Piano Sonate Note: If your piano is effective for the piano tone. English Starting Playback [PLAY] Press [PLAY/PAUSE] on the front panel or [PLAY] on the remote control. [PLAY/...PAUSE] on the remote control. Press the corresponding number button, then press [ENTER]. However, the damper effect is in the Silent Piano™ function mode, the damper pedal does not move. After playback the last song in the song selection screen. =SONG SELECT= 0-9/ENT 036...
Operation Manual
Page 38
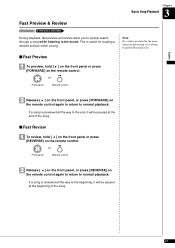
...] or [REVERSE] During playback, fast preview and review allow you to quickly search through a song while listening to normal playback. This is produced by the piano when fast-previewing or reviewing PianoSoft·PlusAudio CDs. English 2 Release [ ] on the front panel, or press [FORWARD] on the remote control again to return...
...] or [REVERSE] During playback, fast preview and review allow you to quickly search through a song while listening to normal playback. This is produced by the piano when fast-previewing or reviewing PianoSoft·PlusAudio CDs. English 2 Release [ ] on the front panel, or press [FORWARD] on the remote control again to return...
Operation Manual
Page 40
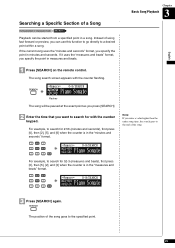
... (minutes and seconds), first press [0], then [2], [5], and [6] when the counter is in the "measures and beats" format. =Memory= 0-9/SEARCH A02-001 Piano Sonate 3 Press [SEARCH] again. Instead of using fast forward or preview, you enter a value higher than the entire song time, the search goes to the... end of the song. =Memory= 0-9/SEARCH A02-001 Piano Sonate For example, to search for 52-3 (measures and beats), first press [0], then [5], [2], and [3] when the counter is in measures and beats...
... (minutes and seconds), first press [0], then [2], [5], and [6] when the counter is in the "measures and beats" format. =Memory= 0-9/SEARCH A02-001 Piano Sonate 3 Press [SEARCH] again. Instead of using fast forward or preview, you enter a value higher than the entire song time, the search goes to the... end of the song. =Memory= 0-9/SEARCH A02-001 Piano Sonate For example, to search for 52-3 (measures and beats), first press [0], then [5], [2], and [3] when the counter is in measures and beats...


