Operation Manual
Page 3
... die Anwendung von Verfahren, die nicht in dieser Anleitung angegeben sind, kann zu gefährlicher Freisetzung von Strahlung fü hren. The control unit is marked with the letter N or coloured BLACK. ein Etikett ähnlichen Inhalts befindet sich im Inneren des CD-Laufwerks...coloured markings identifying the terminals in your plug, proceed as a Class 1 laser product. CAUTION-Use of controls or adjustments or performance of the CD drive unit. IMPORTANT NOTICE FOR THE UNITED KINGDOM Applies to Power Adaptor Connecting the Plug and Cord IMPORTANT THE WIRES IN THE MAINS LEAD ARE ...
... die Anwendung von Verfahren, die nicht in dieser Anleitung angegeben sind, kann zu gefährlicher Freisetzung von Strahlung fü hren. The control unit is marked with the letter N or coloured BLACK. ein Etikett ähnlichen Inhalts befindet sich im Inneren des CD-Laufwerks...coloured markings identifying the terminals in your plug, proceed as a Class 1 laser product. CAUTION-Use of controls or adjustments or performance of the CD drive unit. IMPORTANT NOTICE FOR THE UNITED KINGDOM Applies to Power Adaptor Connecting the Plug and Cord IMPORTANT THE WIRES IN THE MAINS LEAD ARE ...
Operation Manual
Page 5
... of Equipment Model Name : Yamaha Corporation of the FCC Rules. Operation is found to comply with Part 15 of America : 6600 Orangethorpe Avenue, Buena Park, CA 90620 USA : 1-714-522-9011 : 1-714-522-9301 : Player Piano Control Unit : DKC-850 This device complies with the ...requirements listed in this product to the following measures: Relocate either this product or the device that your authority, granted by Yamaha Corporation of radio or TV interference, relocate/reorient the antenna...
... of Equipment Model Name : Yamaha Corporation of the FCC Rules. Operation is found to comply with Part 15 of America : 6600 Orangethorpe Avenue, Buena Park, CA 90620 USA : 1-714-522-9011 : 1-714-522-9301 : Player Piano Control Unit : DKC-850 This device complies with the ...requirements listed in this product to the following measures: Relocate either this product or the device that your authority, granted by Yamaha Corporation of radio or TV interference, relocate/reorient the antenna...
Operation Manual
Page 7
...no charge; i The source code download is a fascinating instrument that integrates a classic Yamaha acoustic piano with innovative electronics to the Yamaha DisklavierTM! This control unit is also available on Source Code Distribution For three years after the factory shipment, ...you may require you for purchasing the Yamaha Disklavier control unit! English Welcome to suit your Disklavier control unit, please read this operation manual and the copyrights thereof are under exclusive ownership by Yamaha Corporation. • Yamaha, Disklavier, Silent, PianoSoft, PianoSoft·...
...no charge; i The source code download is a fascinating instrument that integrates a classic Yamaha acoustic piano with innovative electronics to the Yamaha DisklavierTM! This control unit is also available on Source Code Distribution For three years after the factory shipment, ...you may require you for purchasing the Yamaha Disklavier control unit! English Welcome to suit your Disklavier control unit, please read this operation manual and the copyrights thereof are under exclusive ownership by Yamaha Corporation. • Yamaha, Disklavier, Silent, PianoSoft, PianoSoft·...
Operation Manual
Page 8
...not compatible with rubber feet on the AC adaptor cable. Refer to the user's guide for a replacement. the thermal relay of the Disklavier control unit may also affect the performance of electric shock. • Do not use a soft damp cloth to external devices. • Use only the... outlet, and remove all cables connected to remove it off all the devices to minimum before operating the Disklavier control unit. ■ Warnings • Do not locate the Disklavier control unit in this way is , prolonged playback of the AC adaptor to fire or electric shock. • Connect...
...not compatible with rubber feet on the AC adaptor cable. Refer to the user's guide for a replacement. the thermal relay of the Disklavier control unit may also affect the performance of electric shock. • Do not use a soft damp cloth to external devices. • Use only the... outlet, and remove all cables connected to remove it off all the devices to minimum before operating the Disklavier control unit. ■ Warnings • Do not locate the Disklavier control unit in this way is , prolonged playback of the AC adaptor to fire or electric shock. • Connect...
Operation Manual
Page 9
... a fire, damage to equipment and/or nearby objects or in burns, injury or other bodily harm. English ■ Interference • The Disklavier control unit uses high-frequency digital circuits that may result in a fire, damage to nearby objects or in burns, injury or other bodily harm. •...batteries to use or misuse of batteries together. iii If interference does occur, relocate the affected equipment. ■ Handling Batteries The remote control of batteries in turn may cause interference to radios and TVs placed close to excessive heat such as sunshine, fire or the like....
... a fire, damage to equipment and/or nearby objects or in burns, injury or other bodily harm. English ■ Interference • The Disklavier control unit uses high-frequency digital circuits that may result in a fire, damage to nearby objects or in burns, injury or other bodily harm. •...batteries to use or misuse of batteries together. iii If interference does occur, relocate the affected equipment. ■ Handling Batteries The remote control of batteries in turn may cause interference to radios and TVs placed close to excessive heat such as sunshine, fire or the like....
Operation Manual
Page 10
...the Type of Your Piano 7 Replacing the Existing Control Unit with the Disklavier Control Unit 8 Connecting the Disklavier Control Unit with the MIDI Cables 10 Connecting Monitor Speakers 12 Using the Remote Control 13 Turning On the Disklavier Control Unit 14 Setting the Type of Your Piano 15 ...to the Internet 35 Accessing the Internet 37 Checking Your Account Information 38 Updating the Disklavier Control Unit Using the Internet 39 Setting the Disklavier Control Unit for the Internet Connection 41 Initializing Internet Settings 42 Chapter 6 Advanced Song Playback Changing the...
...the Type of Your Piano 7 Replacing the Existing Control Unit with the Disklavier Control Unit 8 Connecting the Disklavier Control Unit with the MIDI Cables 10 Connecting Monitor Speakers 12 Using the Remote Control 13 Turning On the Disklavier Control Unit 14 Setting the Type of Your Piano 15 ...to the Internet 35 Accessing the Internet 37 Checking Your Account Information 38 Updating the Disklavier Control Unit Using the Internet 39 Setting the Disklavier Control Unit for the Internet Connection 41 Initializing Internet Settings 42 Chapter 6 Advanced Song Playback Changing the...
Operation Manual
Page 11
...in a Medium 99 Deleting the Entire Contents in a Medium .........100 Copying Song File from a Personal Computer to the Disklavier Control Unit 101 Refreshing the Contents in [FromToPC 105 Formatting the Floppy Disk (Optional 106 Making Backups of Songs 107 Restoring the Backups ...126 Adjusting the Brightness of the Display 128 Switching the Languages for the Screen .......... 129 Resetting the Disklavier Control Unit 130 Updating the Disklavier Control Unit 132 Chapter 14 Troubleshooting 134 Chapter 15 Error Messages 137 Chapter 16 Glossary 139 Chapter 17 Internal Tone Generator...
...in a Medium 99 Deleting the Entire Contents in a Medium .........100 Copying Song File from a Personal Computer to the Disklavier Control Unit 101 Refreshing the Contents in [FromToPC 105 Formatting the Floppy Disk (Optional 106 Making Backups of Songs 107 Restoring the Backups ...126 Adjusting the Brightness of the Display 128 Switching the Languages for the Screen .......... 129 Resetting the Disklavier Control Unit 130 Updating the Disklavier Control Unit 132 Chapter 14 Troubleshooting 134 Chapter 15 Error Messages 137 Chapter 16 Glossary 139 Chapter 17 Internal Tone Generator...

Operation Manual
Page 12
..., contain over 11 music channel by Yamaha) • 1 Power cable • 1 Operation manual • 1 PianoSoft CD song list 1 Simple and Easy-to explore. You can see as well as hear performances with the Disklavier Control Unit Check that open up your Disklavier control unit. • 1 Remote control • 2 Batteries for control • 1 AC adaptor (PJP-PS02/PJP...
..., contain over 11 music channel by Yamaha) • 1 Power cable • 1 Operation manual • 1 PianoSoft CD song list 1 Simple and Easy-to explore. You can see as well as hear performances with the Disklavier Control Unit Check that open up your Disklavier control unit. • 1 Remote control • 2 Batteries for control • 1 AC adaptor (PJP-PS02/PJP...
Operation Manual
Page 13
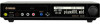
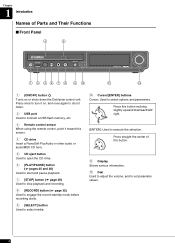
Press once to turn it on or shuts down . 2 USB port Used to connect a USB flash memory, etc. 3 Remote control sensor When using the remote control, point it down the Disklavier control unit. Press straight the center of Parts and Their Functions ■ Front Panel 4 5 1 2 36 7 8 9 10 11 12 1 [ON/OFF] button Turns on , and...
Press once to turn it on or shuts down . 2 USB port Used to connect a USB flash memory, etc. 3 Remote control sensor When using the remote control, point it down the Disklavier control unit. Press straight the center of Parts and Their Functions ■ Front Panel 4 5 1 2 36 7 8 9 10 11 12 1 [ON/OFF] button Turns on , and...

Operation Manual
Page 14
For models to be connected with the MIDI cables: Used to connect the existing control unit. 11 MIDI IN terminal For models to be replaced with Disklavier control unit: Used to connect external MIDI equipment. ■ Rear Panel 1 2 3456 Chapter 1 Introduction English 7 8 9 10 11 1 USB TO DEVICE port Used to connect a ...9 USB TO HOST port Used to connect the USB cable from a computer. 10 MIDI OUT terminal For models to be replaced with Disklavier control unit: Used to connect external MIDI equipment. For models to be connected with the MIDI cables: Used to connect the existing...
For models to be connected with the MIDI cables: Used to connect the existing control unit. 11 MIDI IN terminal For models to be replaced with Disklavier control unit: Used to connect external MIDI equipment. ■ Rear Panel 1 2 3456 Chapter 1 Introduction English 7 8 9 10 11 1 USB TO DEVICE port Used to connect a ...9 USB TO HOST port Used to connect the USB cable from a computer. 10 MIDI OUT terminal For models to be replaced with Disklavier control unit: Used to connect external MIDI equipment. For models to be connected with the MIDI cables: Used to connect the existing...
Operation Manual
Page 15
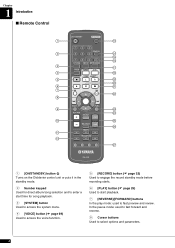
... 2 14 15 16 3 17 4 18 5 19 20 6 21 7 22 8 9 23 24 10 25 26 11 12 27 1 [ON/STANDBY] button Turns on the Disklavier control unit or puts it in the standby mode. 2 Number keypad Used for direct album/song selection and to enter a start time for song playback. 3 [SYSTEM] button ...
... 2 14 15 16 3 17 4 18 5 19 20 6 21 7 22 8 9 23 24 10 25 26 11 12 27 1 [ON/STANDBY] button Turns on the Disklavier control unit or puts it in the standby mode. 2 Number keypad Used for direct album/song selection and to enter a start time for song playback. 3 [SYSTEM] button ...
Operation Manual
Page 17
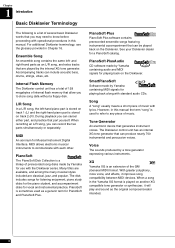
...popular. Song A "song" usually means a short piece of prerecorded song disks made by Yamaha containing MIDI signals for playing back along with standard audio CDs. The Disklavier control unit has an internal XG tone generator that allow you can produce nearly 700 instrumental and percussion ... is used as the original composer/creator intended. 6 PianoSoft·PlusAudio CD software made by Yamaha for PianoSoft and PianoSoft·Plus. Internal Flash Memory The Disklavier control unit has a total of 128 megabytes of the GM (General MIDI) format. During playback you to...
...popular. Song A "song" usually means a short piece of prerecorded song disks made by Yamaha containing MIDI signals for playing back along with standard audio CDs. The Disklavier control unit has an internal XG tone generator that allow you can produce nearly 700 instrumental and percussion ... is used as the original composer/creator intended. 6 PianoSoft·PlusAudio CD software made by Yamaha for PianoSoft and PianoSoft·Plus. Internal Flash Memory The Disklavier control unit has a total of 128 megabytes of the GM (General MIDI) format. During playback you to...
Operation Manual
Page 18
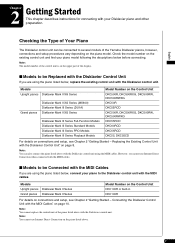
... Upright pianos Grand pianos Disklavier Mark II Series Disklavier Mark II Series Model Number on the Control Unit DKC100R or built-in DKC100R For details on the piano model. Note: You cannot replace the control unit of the Yamaha Disklavier pianos, however, connections and setup procedures vary depending on connections and setup, see Chapter 2 "Getting...
... Upright pianos Grand pianos Disklavier Mark II Series Disklavier Mark II Series Model Number on the Control Unit DKC100R or built-in DKC100R For details on the piano model. Note: You cannot replace the control unit of the Yamaha Disklavier pianos, however, connections and setup procedures vary depending on connections and setup, see Chapter 2 "Getting...
Operation Manual
Page 19
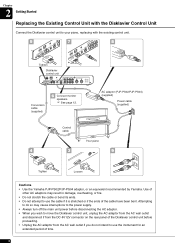
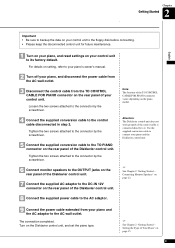
... adaptor from the AC wall outlet and disconnect if from the DC-IN 12V connector on the rear panel of the Disklavier control unit before proceeding. • Unplug the AC adaptor from the AC wall outlet if you do so may result in damage, overheating...) (supplied) Power cable (supplied) Control cable Your piano 4 3 9 Tighten Loosen Cautions • Use the Yamaha PJP-PS02/PJP-PS04 adaptor, or an equivalent recommended by Yamaha. Chapter 2 Getting Started Replacing the Existing Control Unit with the Disklavier Control Unit Connect the Disklavier control unit to use the cable if it is...
... adaptor from the AC wall outlet and disconnect if from the DC-IN 12V connector on the rear panel of the Disklavier control unit before proceeding. • Unplug the AC adaptor from the AC wall outlet if you do so may result in damage, overheating...) (supplied) Power cable (supplied) Control cable Your piano 4 3 9 Tighten Loosen Cautions • Use the Yamaha PJP-PS02/PJP-PS04 adaptor, or an equivalent recommended by Yamaha. Chapter 2 Getting Started Replacing the Existing Control Unit with the Disklavier Control Unit Connect the Disklavier control unit to use the cable if it is...
Operation Manual
Page 20
... supplied conversion cable to the TO PIANO connector on the rear panel of Your Piano" on page 15. 9 Setting the Type of the Disklavier control unit. For details on setting, refer to your piano's owner's manual. 2 Turn off your piano, and disconnect the power cable from the AC ...wall outlet. 3 Disconnect the control cable from your piano and the Disklavier control unit. See Chapter 2 "Getting Started - Chapter 2 Getting Started English Important • Be sure to backup the data on ...
... supplied conversion cable to the TO PIANO connector on the rear panel of Your Piano" on page 15. 9 Setting the Type of the Disklavier control unit. For details on setting, refer to your piano's owner's manual. 2 Turn off your piano, and disconnect the power cable from the AC ...wall outlet. 3 Disconnect the control cable from your piano and the Disklavier control unit. See Chapter 2 "Getting Started - Chapter 2 Getting Started English Important • Be sure to backup the data on ...
Operation Manual
Page 21
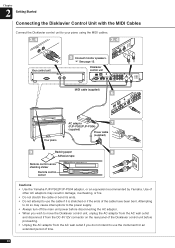
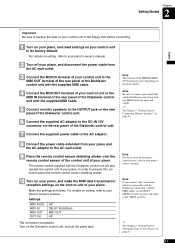
...time. 10 See page 12. Disklavier control unit MIDI cable (supplied) 6 Your piano AC adaptor 7 (PJP-PS02/PJP-PS04) (supplied) Power cable (supplied) 9 Backing paper 8 Adhesive tape Remote control sensor shielding sticker Remote control sensor Cautions • Use the Yamaha PJP-PS02/PJP-PS04 adaptor, or ...an equivalent recommended by Yamaha. Use of other AC adaptors may cause interruptions to the power supply. • Always turn off the main unit power before disconnecting the AC adaptor. • When you wish to move the Disklavier control unit, unplug the AC adaptor from...
...time. 10 See page 12. Disklavier control unit MIDI cable (supplied) 6 Your piano AC adaptor 7 (PJP-PS02/PJP-PS04) (supplied) Power cable (supplied) 9 Backing paper 8 Adhesive tape Remote control sensor shielding sticker Remote control sensor Cautions • Use the Yamaha PJP-PS02/PJP-PS04 adaptor, or ...an equivalent recommended by Yamaha. Use of other AC adaptors may cause interruptions to the power supply. • Always turn off the main unit power before disconnecting the AC adaptor. • When you wish to move the Disklavier control unit, unplug the AC adaptor from...
Operation Manual
Page 22
...model. The remote control supplied with the Disklavier control unit will also operate the control unit of your control unit and the Disklavier control unit with two MIDI cables for input and output. See Chapter 2 "Getting Started - Note: The location of the remote control sensor, refer to...MIDI data transmission/ reception settings on the control unit of your control unit to its factory default. Connecting Monitor Speakers" on page 15. 11 Note: If you connect your control unit, which is replaceable with the Disklavier control unit, with the supplied MIDI cable. 5 ...
...model. The remote control supplied with the Disklavier control unit will also operate the control unit of your control unit and the Disklavier control unit with two MIDI cables for input and output. See Chapter 2 "Getting Started - Note: The location of the remote control sensor, refer to...MIDI data transmission/ reception settings on the control unit of your control unit to its factory default. Connecting Monitor Speakers" on page 15. 11 Note: If you connect your control unit, which is replaceable with the Disklavier control unit, with the supplied MIDI cable. 5 ...
Operation Manual
Page 23
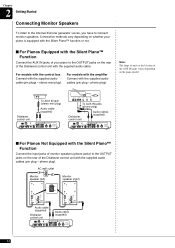
...monitor speakers (phone jacks) to the OUTPUT jacks on the piano model. stereo mini plug). Note: The shape of units or the location of the Disklavier control unit with the supplied audio cables (pin plug - AC wall outlet Monitor speaker (left) POWER ON OFF INPUT LINE 1...4dB) POWER ON OFF Monitor speaker (right) POWER ON OFF INPUT LINE 1 (--10dB) PARALLEL LINE 2 (--4dB) Audio cable (supplied) Disklavier control unit Audio cable (supplied) 12 phone plug). For models with the amplifier Connect with the supplied audio cable. Connection methods vary depending on whether your ...
...monitor speakers (phone jacks) to the OUTPUT jacks on the piano model. stereo mini plug). Note: The shape of units or the location of the Disklavier control unit with the supplied audio cables (pin plug - AC wall outlet Monitor speaker (left) POWER ON OFF INPUT LINE 1...4dB) POWER ON OFF Monitor speaker (right) POWER ON OFF INPUT LINE 1 (--10dB) PARALLEL LINE 2 (--4dB) Audio cable (supplied) Disklavier control unit Audio cable (supplied) 12 phone plug). For models with the amplifier Connect with the supplied audio cable. Connection methods vary depending on whether your ...
Operation Manual
Page 24
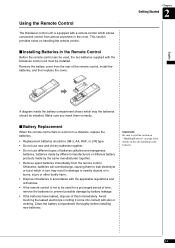
... the Disklavier control unit must be installed. Otherwise, batteries will overdischarge, causing them to read the section on "Handling Batteries" on page iii for details on handling the remote control. ■ Installing Batteries in the Remote Control Before the remote control can be ... leaked, dispose of dry batteries. 13 Avoid touching the leaked electrolyte or letting it come into contact with a remote control which allows convenient control from a distance, replace the batteries. • Replacement batteries should be installed. Make sure you insert them immediately. ...
... the Disklavier control unit must be installed. Otherwise, batteries will overdischarge, causing them to read the section on "Handling Batteries" on page iii for details on handling the remote control. ■ Installing Batteries in the Remote Control Before the remote control can be ... leaked, dispose of dry batteries. 13 Avoid touching the leaked electrolyte or letting it come into contact with a remote control which allows convenient control from a distance, replace the batteries. • Replacement batteries should be installed. Make sure you insert them immediately. ...
Operation Manual
Page 25
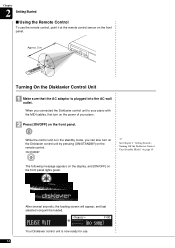
...now ready for use the remote control, point it at the remote control sensor on the front panel. Chapter 2 Getting Started ■ Using the Remote Control To use . 14 While the control unit is in the standby mode, you connected the Disklavier control unit to your piano with the MIDI... cables, first turn on the Disklavier control unit by pressing [ON/STANDBY] on page 19. The ...
...now ready for use the remote control, point it at the remote control sensor on the front panel. Chapter 2 Getting Started ■ Using the Remote Control To use . 14 While the control unit is in the standby mode, you connected the Disklavier control unit to your piano with the MIDI... cables, first turn on the Disklavier control unit by pressing [ON/STANDBY] on page 19. The ...


