
Data List
Page 4
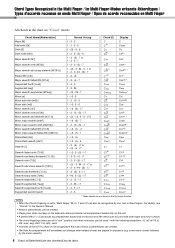
... minor chords. • The chord fingerings listed are "C-root" chords. b3 - (5) - 7 1 - 2 - b7 1 - 3 - b7 or 1 - (3) - 5 - b6 - b7 1 - (2) - 3 - #4 - 5 - b5 - b3 - b5 - For details, see "Chords" in the Owner's Manual. • Notes in parentheses can be omitted. • Playing two same root keys in the adjacent octaves produces accompaniment based only on the root. •...
... minor chords. • The chord fingerings listed are "C-root" chords. b3 - (5) - 7 1 - 2 - b7 1 - 3 - b7 or 1 - (3) - 5 - b6 - b7 1 - (2) - 3 - #4 - 5 - b5 - b3 - b5 - For details, see "Chords" in the Owner's Manual. • Notes in parentheses can be omitted. • Playing two same root keys in the adjacent octaves produces accompaniment based only on the root. •...
Owner's Manual
Page 1
Setting Up Basic Guide Reference Owner's Manual Keyboard Stand Assembly For information on assembling the keyboard stand, refer to the instructions on page 10 of this manual. EN Appendix
Setting Up Basic Guide Reference Owner's Manual Keyboard Stand Assembly For information on assembling the keyboard stand, refer to the instructions on page 10 of this manual. EN Appendix

Owner's Manual
Page 2
...are not covered by the FCC, to the disposal of products that is soldered in the manual, on the name plate, or specifically recommended by Yamaha are designed for battery disposal information. When installing batteries, never mix old batteries with the...Service Division, 6600 Orangethorpe Ave, Buena Park, CA90620 The above statements apply ONLY to those products distributed by YAMAHA CORPORATION OF AMERICA. (class B) 2 DGX-650 Owner's Manual When replacement becomes necessary, contact a qualified service representative to produce products that relate to use only high ...
...are not covered by the FCC, to the disposal of products that is soldered in the manual, on the name plate, or specifically recommended by Yamaha are designed for battery disposal information. When installing batteries, never mix old batteries with the...Service Division, 6600 Orangethorpe Ave, Buena Park, CA90620 The above statements apply ONLY to those products distributed by YAMAHA CORPORATION OF AMERICA. (class B) 2 DGX-650 Owner's Manual When replacement becomes necessary, contact a qualified service representative to produce products that relate to use only high ...
Owner's Manual
Page 3
...disposing of these items, please contact your local authorities or dealer and ask for the correct method of disposal. (weee_eu_en_01) DGX-650 Owner's Manual 3 If you wish to discard these products correctly, you wish to aid identification in other Countries outside the European Union... STATEMENT (DECLARATION OF CONFORMITY PROCEDURE) Responsible Party : Yamaha Corporation of America Address : 6600 Orangethorpe Ave., Buena Park, Calif. 90620 Telephone : 714-522-9011 Type of Equipment : Digital Piano Model Name : DGX-650 This device complies with your national legislation and the Directives...
...disposing of these items, please contact your local authorities or dealer and ask for the correct method of disposal. (weee_eu_en_01) DGX-650 Owner's Manual 3 If you wish to discard these products correctly, you wish to aid identification in other Countries outside the European Union... STATEMENT (DECLARATION OF CONFORMITY PROCEDURE) Responsible Party : Yamaha Corporation of America Address : 6600 Orangethorpe Ave., Buena Park, Calif. 90620 Telephone : 714-522-9011 Type of Equipment : Digital Piano Model Name : DGX-650 This device complies with your national legislation and the Directives...
Owner's Manual
Page 4
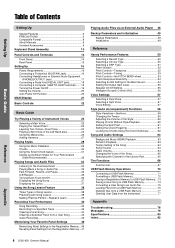
Setting Up Basic Guide Table of Contents Setting Up Special Features 5 PRECAUTIONS 6 Compatible Format 8 About Manuals 9 Included Accessories 9 Keyboard Stand Assembly 10 Panel Controls and Terminals 14 Front Panel 14 Rear Panel 15 Setting Up 16 Power Requirements 16 Connecting a Footswitch (... Deleting files from a USB Flash Memory 77 Deleting User Data from the Instrument 77 Appendix Troubleshooting 78 Messages 79 Specifications 80 Index 82 Reference Appendix 4 DGX-650 Owner's Manual
Setting Up Basic Guide Table of Contents Setting Up Special Features 5 PRECAUTIONS 6 Compatible Format 8 About Manuals 9 Included Accessories 9 Keyboard Stand Assembly 10 Panel Controls and Terminals 14 Front Panel 14 Rear Panel 15 Setting Up 16 Power Requirements 16 Connecting a Footswitch (... Deleting files from a USB Flash Memory 77 Deleting User Data from the Instrument 77 Appendix Troubleshooting 78 Messages 79 Specifications 80 Index 82 Reference Appendix 4 DGX-650 Owner's Manual
Owner's Manual
Page 5
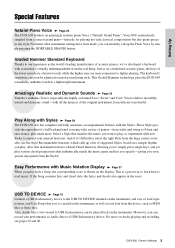
...as well as on a sample rhythm you play , or experiment with the Styles. Amazingly Realistic and Dynamic Sounds Page 23 Yamaha's authentic Voices (especially the highly acclaimed Live!, Sweet! These Styles provide the equivalent of a full backing band covering wide ... ("Natural! This Graded Hammer technology gives the DGX-650 remarkably authentic touch in a lightweight instrument. Easy Performance with Music Notation Display Page 37 When you play. DGX-650 Owner's Manual 5 Play Along with Styles Page 28 The DGX-650 also has complete and fully automatic accompaniment features...
...as well as on a sample rhythm you play , or experiment with the Styles. Amazingly Realistic and Dynamic Sounds Page 23 Yamaha's authentic Voices (especially the highly acclaimed Live!, Sweet! These Styles provide the equivalent of a full backing band covering wide ... ("Natural! This Graded Hammer technology gives the DGX-650 remarkably authentic touch in a lightweight instrument. Easy Performance with Music Notation Display Page 37 When you play. DGX-650 Owner's Manual 5 Play Along with Styles Page 28 The DGX-650 also has complete and fully automatic accompaniment features...
Owner's Manual
Page 6
...plug from the wall AC outlet. • Use only the stand specified for the instrument. Then have the device inspected by Yamaha service personnel. - CAUTION Always follow the basic precautions listed below to avoid the possibility of the following problems occur, immediately ... of the instrument. Also, do so could cause damage to assemble the instrument in the proper sequence might accidentally fall over . 6 DGX-650 Owner's Manual DMI-5 1/2 It emits unusual smells or smoke. - Failure to the internal components or result in the instrument falling over and cause ...
...plug from the wall AC outlet. • Use only the stand specified for the instrument. Then have the device inspected by Yamaha service personnel. - CAUTION Always follow the basic precautions listed below to avoid the possibility of the following problems occur, immediately ... of the instrument. Also, do so could cause damage to assemble the instrument in the proper sequence might accidentally fall over . 6 DGX-650 Owner's Manual DMI-5 1/2 It emits unusual smells or smoke. - Failure to the internal components or result in the instrument falling over and cause ...
Owner's Manual
Page 7
..., switches or connectors. • Do not use or modifications to the instrument, or data that you turn the power off. Setting Up Yamaha cannot be lost due to malfunction or incorrect operation. NOTICE To avoid the possibility of a TV, radio, stereo equipment, mobile phone, or...8226; Do not place vinyl, plastic or rubber objects on your iPhone/iPad, we recommend that is not permitted under relevant laws. DMI-5 2/2 DGX-650 Owner's Manual 7 Always turn the power off when the instrument is off by communication. • Do not expose the instrument to excessive dust or vibrations, or...
..., switches or connectors. • Do not use or modifications to the instrument, or data that you turn the power off. Setting Up Yamaha cannot be lost due to malfunction or incorrect operation. NOTICE To avoid the possibility of a TV, radio, stereo equipment, mobile phone, or...8226; Do not place vinyl, plastic or rubber objects on your iPhone/iPad, we recommend that is not permitted under relevant laws. DMI-5 2/2 DGX-650 Owner's Manual 7 Always turn the power off when the instrument is off by communication. • Do not expose the instrument to excessive dust or vibrations, or...
Owner's Manual
Page 8
STYLE FILE The Style File Format is Yamaha's original style file format which ensures that any GM-compatible music data can play back differently compared to the original data, due to the reduced set of control parameters and effects. 8 DGX-650 Owner's Manual The GM mark is played. The ... may play back any GM-compatible tone generator, regardless of manufacturer. XGlite As its name implies, "XGlite" is a simplified version of Yamaha's high-quality XG tone generation format. However, keep in mind that support GM System Level. Naturally, you can be accurately played by ...
STYLE FILE The Style File Format is Yamaha's original style file format which ensures that any GM-compatible music data can play back differently compared to the original data, due to the reduced set of control parameters and effects. 8 DGX-650 Owner's Manual The GM mark is played. The ... may play back any GM-compatible tone generator, regardless of manufacturer. XGlite As its name implies, "XGlite" is a simplified version of Yamaha's high-quality XG tone generation format. However, keep in mind that support GM System Level. Naturally, you can be accurately played by ...
Owner's Manual
Page 9
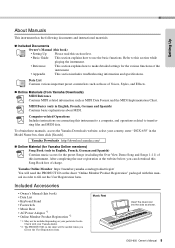
... a computer, and operations related to use the basic functions. Computer-related Operations Includes instructions on your country, enter "DGX-650" in English, French, German and Spanish) Contains basic explanations about MIDI. DGX-650 Owner's Manual 9 Yamaha Online Member https://member.yamaha.com/myproduct/regist/ You will be needed when you can download this book) • Data List •...
... a computer, and operations related to use the basic functions. Computer-related Operations Includes instructions on your country, enter "DGX-650" in English, French, German and Spanish) Contains basic explanations about MIDI. DGX-650 Owner's Manual 9 Yamaha Online Member https://member.yamaha.com/myproduct/regist/ You will be needed when you can download this book) • Data List •...
Owner's Manual
Page 10
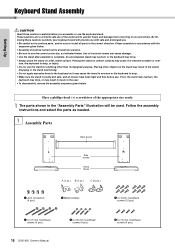
... Back board L R Side boards Stand bases A (1 pc.) B (1 pc.) C (2 pcs.) q Joint connectors (4 pcs.) w Metal brackets e 3 x 8 mm roundhead screws (12 pcs.) r 6 x 70 mm roundhead screws (4 pcs.) 10 DGX-650 Owner's Manual t 6 x 30 mm roundhead screws (4 pcs.) y 5 x 16 mm roundhead screws (4 pcs.) Placing the stand on the stand may result in the object dropping or the stand...
... Back board L R Side boards Stand bases A (1 pc.) B (1 pc.) C (2 pcs.) q Joint connectors (4 pcs.) w Metal brackets e 3 x 8 mm roundhead screws (12 pcs.) r 6 x 70 mm roundhead screws (4 pcs.) 10 DGX-650 Owner's Manual t 6 x 30 mm roundhead screws (4 pcs.) y 5 x 16 mm roundhead screws (4 pcs.) Placing the stand on the stand may result in the object dropping or the stand...

Owner's Manual
Page 11
... are marked on the boards. The joint connectors have trouble fastening the screws, use a screwdriver to the top of the side boards, using the screws r. DGX-650 Owner's Manual 11 Insert the joint connectors q into the side boards as shown. 3 Attach the stand bases. Attach the "L" (Left) and "R" (Right) stand bases to take them...
... are marked on the boards. The joint connectors have trouble fastening the screws, use a screwdriver to the top of the side boards, using the screws r. DGX-650 Owner's Manual 11 Insert the joint connectors q into the side boards as shown. 3 Attach the stand bases. Attach the "L" (Left) and "R" (Right) stand bases to take them...

Owner's Manual
Page 12
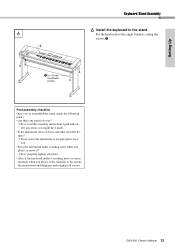
... between the keyboard and the stand parts. • Do not hold the keyboard in any position other than the position shown in the illustration. 12 DGX-650 Owner's Manual NOTE • If you have purchased an optional pedal unit, attach the pedal unit before proceeding to drop the back board or touch the sharp...
... between the keyboard and the stand parts. • Do not hold the keyboard in any position other than the position shown in the illustration. 12 DGX-650 Owner's Manual NOTE • If you have purchased an optional pedal unit, attach the pedal unit before proceeding to drop the back board or touch the sharp...
Owner's Manual
Page 13
Fix the keyboard to the stand. DGX-650 Owner's Manual 13 Setting Up Keyboard Stand Assembly 6 6 Install the keyboard to the angle brackets, using the screws y. y 5 x 16 mm roundhead screws Post-assembly checklist Once you'...
Fix the keyboard to the stand. DGX-650 Owner's Manual 13 Setting Up Keyboard Stand Assembly 6 6 Install the keyboard to the angle brackets, using the screws y. y 5 x 16 mm roundhead screws Post-assembly checklist Once you'...
Owner's Manual
Page 14
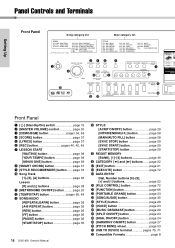
...] button page 39 [A-B REPEAT] button page 36 [REW] button page 36 [FF] button page 36 [PAUSE] button page 36 [START/STOP] button page 35 14 DGX-650 Owner's Manual !4 STYLE [ACMP ON/OFF] button page 28 [INTRO/ENDING/rit.] button page 58 [MAIN/AUTO FILL] button page 58 [SYNC STOP] button page 59 [SYNC...
...] button page 39 [A-B REPEAT] button page 36 [REW] button page 36 [FF] button page 36 [PAUSE] button page 36 [START/STOP] button page 35 14 DGX-650 Owner's Manual !4 STYLE [ACMP ON/OFF] button page 28 [INTRO/ENDING/rit.] button page 58 [MAIN/AUTO FILL] button page 58 [SYNC STOP] button page 59 [SYNC...

Owner's Manual
Page 15
... holding down one of the buttons having this symbol, you can call up an alternate function, other than the one called up when simply pressing. DGX-650 Owner's Manual 15
... holding down one of the buttons having this symbol, you can call up an alternate function, other than the one called up when simply pressing. DGX-650 Owner's Manual 15
Owner's Manual
Page 16
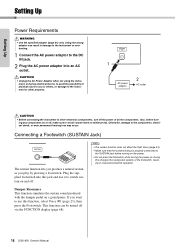
... sustain sound produced with the damper pedal on or off via the FUNCTION display (page 68). This function can result in reversed footswitch operation. 16 DGX-650 Owner's Manual Using the wrong adaptor can be turned off , make sure to set all the components. CAUTION • Unplug the AC Power Adaptor when not using...
... sustain sound produced with the damper pedal on or off via the FUNCTION display (page 68). This function can result in reversed footswitch operation. 16 DGX-650 Owner's Manual Using the wrong adaptor can be turned off , make sure to set all the components. CAUTION • Unplug the AC Power Adaptor when not using...

Owner's Manual
Page 17
... inserted into this jack. For details on how to the AUX IN jack. Optimum setting Output gain level for connecting headphones, as an external output. DGX-650 Owner's Manual 17 If the instrument's power is set to the instrument then the external device again. External Audio Equipment CAUTION • Do not use the instrument...
... inserted into this jack. For details on how to the AUX IN jack. Optimum setting Output gain level for connecting headphones, as an external output. DGX-650 Owner's Manual 17 If the instrument's power is set to the instrument then the external device again. External Audio Equipment CAUTION • Do not use the instrument...
Owner's Manual
Page 18
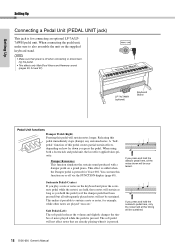
... this pedal creates partial sustain effects, depending on how far down you hold the damper pedal here, all subsequently played notes will be sustained. 18 DGX-650 Owner's Manual A "halfpedal" function of notes played while the pedal is for connecting an optional LP-7A/LP7AWH pedal unit. Soft Pedal (Left) The soft pedal reduces...
... this pedal creates partial sustain effects, depending on how far down you hold the damper pedal here, all subsequently played notes will be sustained. 18 DGX-650 Owner's Manual A "halfpedal" function of notes played while the pedal is for connecting an optional LP-7A/LP7AWH pedal unit. Soft Pedal (Left) The soft pedal reduces...
Owner's Manual
Page 19
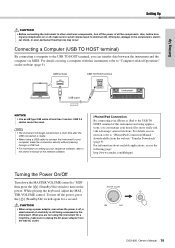
...your computer, make sure to the components, electrical shock, or even permanent hearing loss may occur. USB 3.0 cables cannot be used. DGX-650 Owner's Manual 19 Setting Up Setting Up CAUTION • Before connecting the instrument to other electronic components, turn off the power of all volume ...levels to minimum (0). For information about available applications, access the following page: http://www.yamaha.com/kbdapps/ Turning the Power On/Off Turn down the MASTER VOLUME control to "MIN" then press the [ ] (Standby/On) switch...
...your computer, make sure to the components, electrical shock, or even permanent hearing loss may occur. USB 3.0 cables cannot be used. DGX-650 Owner's Manual 19 Setting Up Setting Up CAUTION • Before connecting the instrument to other electronic components, turn off the power of all volume ...levels to minimum (0). For information about available applications, access the following page: http://www.yamaha.com/kbdapps/ Turning the Power On/Off Turn down the MASTER VOLUME control to "MIN" then press the [ ] (Standby/On) switch...


