

Data List
Page 5
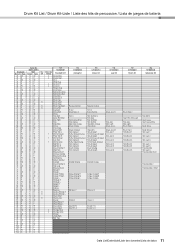
... Live! If the maximum polyphony is exceeded, earlier played notes will be cut off and the most recent notes have been released while the sustain pedal (footswitch) is used . Use these program change numbers when playing the instrument via MIDI from the transmitted program change numbers to select the appropriate sound...
... Live! If the maximum polyphony is exceeded, earlier played notes will be cut off and the most recent notes have been released while the sustain pedal (footswitch) is used . Use these program change numbers when playing the instrument via MIDI from the transmitted program change numbers to select the appropriate sound...

Data List
Page 10
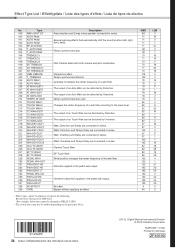
... Power Open Kick Power Closed Side Stick Power Snare Power Hand Clap Power Snare Rough Tom Power 1 Hi-Hat Closed Power Tom Power 2 Hi-Hat Pedal Power Tom Power 3 Hi-Hat Open Power Tom Power 4 Tom Power 5 Crash Cymbal Acoustic 1 Tom Power 6 Ride Cymbal Acoustic 1 Chinese Cymbal Acoustic Ride Cymbal Acoustic... Sticks Kick Soft Open Rim Shot Kick Tight Kick Side Stick Snare Hand Clap Snare Tight Floor Tom L Hi-Hat Closed Floor Tom H Hi-Hat Pedal Low Tom Hi-Hat Open Mid Tom L Mid Tom H Crash Cymbal 1 High Tom Ride Cymbal 1 Chinese Cymbal Ride Cymbal Cup Tambourine Splash Cymbal Cowbell Crash...
... Power Open Kick Power Closed Side Stick Power Snare Power Hand Clap Power Snare Rough Tom Power 1 Hi-Hat Closed Power Tom Power 2 Hi-Hat Pedal Power Tom Power 3 Hi-Hat Open Power Tom Power 4 Tom Power 5 Crash Cymbal Acoustic 1 Tom Power 6 Ride Cymbal Acoustic 1 Chinese Cymbal Acoustic Ride Cymbal Acoustic... Sticks Kick Soft Open Rim Shot Kick Tight Kick Side Stick Snare Hand Clap Snare Tight Floor Tom L Hi-Hat Closed Floor Tom H Hi-Hat Pedal Low Tom Hi-Hat Open Mid Tom L Mid Tom H Crash Cymbal 1 High Tom Ride Cymbal 1 Chinese Cymbal Ride Cymbal Cup Tambourine Splash Cymbal Cowbell Crash...
Data List
Page 11
... 51 D# 2 39 D# 1 Hand Clap 52 E 2 40 E 1 Snare Tight 53 F 2 41 F 1 Floor Tom L 54 F# 2 42 F# 1 1 Hi-Hat Closed 55 G 2 43 G 1 Floor Tom H 56 G# 2 44 G# 1 1 Hi-Hat Pedal 57 A 2 45 A 1 Low Tom 58 A# 2 46 A# 1 1 Hi-Hat Open 59 B 2 47 B 1 Mid Tom L 60 C 3 48 C 2 Mid Tom H 61 C# 3 49 C# 2 Crash Cymbal 1 62 D 3 50 D 2 High Tom...
... 51 D# 2 39 D# 1 Hand Clap 52 E 2 40 E 1 Snare Tight 53 F 2 41 F 1 Floor Tom L 54 F# 2 42 F# 1 1 Hi-Hat Closed 55 G 2 43 G 1 Floor Tom H 56 G# 2 44 G# 1 1 Hi-Hat Pedal 57 A 2 45 A 1 Low Tom 58 A# 2 46 A# 1 1 Hi-Hat Open 59 B 2 47 B 1 Mid Tom L 60 C 3 48 C 2 Mid Tom H 61 C# 3 49 C# 2 Crash Cymbal 1 62 D 3 50 D 2 High Tom...
Data List
Page 24
... 24 26 0 0 24 Data List/Datenliste/Liste des données/Lista de datos U.R.G., Digital Musical Instruments Division © 2013 Yamaha Corporation 302POGR*.*-01A0 Printed in series. Bypass without applying an effect. • Effect types cannot be adjusted, except for the following: ... pitch modulation. Tempo synchronized tremolo. Wah, Distortion and Delay are connected in series. Overdrive (distortion) applied to the pedal wah output. Tempo synchronized auto wah. WAH, Overdrive and Tempo Delay are connected in series. Several panning effects that automatically...
... 24 26 0 0 24 Data List/Datenliste/Liste des données/Lista de datos U.R.G., Digital Musical Instruments Division © 2013 Yamaha Corporation 302POGR*.*-01A0 Printed in series. Bypass without applying an effect. • Effect types cannot be adjusted, except for the following: ... pitch modulation. Tempo synchronized tremolo. Wah, Distortion and Delay are connected in series. Overdrive (distortion) applied to the pedal wah output. Tempo synchronized auto wah. WAH, Overdrive and Tempo Delay are connected in series. Several panning effects that automatically...
Midi Reference
Page 2
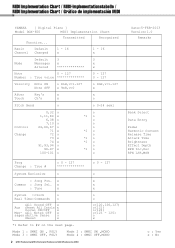
... Bank Select Data Entry Pedal Harmonic Content Release Time Attack Time Brightness Effect Depth RPN Inc,Dec RPN LSB,MSB Prog Change : True # o 0 - 127 o 0 - 127 System Exclusive o o : Song Pos. MIDI Implementation Chart / MIDI-Implementationstabelle / MIDI Implementation Chart / Gráfico de implementación MIDI YAMAHA [ Digital Piano ] Model DGX-650 MIDI Implementation Chart Function...
... Bank Select Data Entry Pedal Harmonic Content Release Time Attack Time Brightness Effect Depth RPN Inc,Dec RPN LSB,MSB Prog Change : True # o 0 - 127 o 0 - 127 System Exclusive o o : Song Pos. MIDI Implementation Chart / MIDI-Implementationstabelle / MIDI Implementation Chart / Gráfico de implementación MIDI YAMAHA [ Digital Piano ] Model DGX-650 MIDI Implementation Chart Function...
Owner's Manual
Page 4
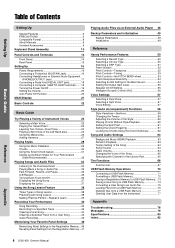
... Panel 15 Setting Up 16 Power Requirements 16 Connecting a Footswitch (SUSTAIN Jack 16 Connecting Headphones or External Audio Equipment (PHONES/OUTPUT Jack 17 Connecting a Pedal Unit (PEDAL UNIT jack 18 Connecting a Computer (USB TO HOST terminal)........19 Turning the Power On/Off 19 Setting the Volume 20 Auto Power Off Function 20... Deleting files from a USB Flash Memory 77 Deleting User Data from the Instrument 77 Appendix Troubleshooting 78 Messages 79 Specifications 80 Index 82 Reference Appendix 4 DGX-650 Owner's Manual
... Panel 15 Setting Up 16 Power Requirements 16 Connecting a Footswitch (SUSTAIN Jack 16 Connecting Headphones or External Audio Equipment (PHONES/OUTPUT Jack 17 Connecting a Pedal Unit (PEDAL UNIT jack 18 Connecting a Computer (USB TO HOST terminal)........19 Turning the Power On/Off 19 Setting the Volume 20 Auto Power Off Function 20... Deleting files from a USB Flash Memory 77 Deleting User Data from the Instrument 77 Appendix Troubleshooting 78 Messages 79 Specifications 80 Index 82 Reference Appendix 4 DGX-650 Owner's Manual

Owner's Manual
Page 12
NOTE • If you have purchased an optional pedal unit, attach the pedal unit before proceeding to drop the back board or touch the sharp metal fittings. CAUTION • Be .... Check the back-to get your hands at least 10 cm from either end of the keyboard are properly aligned with your pedal unit. 5 At least 10 cm Be sure to -front orientation for stand, and carefully place the keyboard on the bottom...• Do not hold the keyboard in any position other than the position shown in the illustration. 12 DGX-650 Owner's Manual Make sure the non-colored surface is facing down.
NOTE • If you have purchased an optional pedal unit, attach the pedal unit before proceeding to drop the back board or touch the sharp metal fittings. CAUTION • Be .... Check the back-to get your hands at least 10 cm from either end of the keyboard are properly aligned with your pedal unit. 5 At least 10 cm Be sure to -front orientation for stand, and carefully place the keyboard on the bottom...• Do not hold the keyboard in any position other than the position shown in the illustration. 12 DGX-650 Owner's Manual Make sure the non-colored surface is facing down.

Owner's Manual
Page 15
... C2 C3 C4 C5 C6 C7 Rear Panel #3 #4 #5 #6 Rear Panel #3 CONTRAST knob page 21 #4 USB TO HOST terminal pages 19, 68 #5 SUSTAIN jack page 16 #6 PEDAL UNIT jack page 18 #7 AUX IN jack page 48 #8 PHONES/OUTPUT jack page 17 #9 DC IN jack page 16 #7 #8 #9 "Press & Hold" symbol By holding down... one of the buttons having this symbol, you can call up an alternate function, other than the one called up when simply pressing. DGX-650 Owner's Manual 15
... C2 C3 C4 C5 C6 C7 Rear Panel #3 #4 #5 #6 Rear Panel #3 CONTRAST knob page 21 #4 USB TO HOST terminal pages 19, 68 #5 SUSTAIN jack page 16 #6 PEDAL UNIT jack page 18 #7 AUX IN jack page 48 #8 PHONES/OUTPUT jack page 17 #9 DC IN jack page 16 #7 #8 #9 "Press & Hold" symbol By holding down... one of the buttons having this symbol, you can call up an alternate function, other than the one called up when simply pressing. DGX-650 Owner's Manual 15
Owner's Manual
Page 16
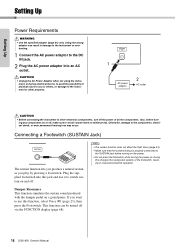
...Plug the AC power adaptor into this jack and use this changes the recognized polarity of the footswitch, resulting in reversed footswitch operation. 16 DGX-650 Owner's Manual This function can result in damage to the instrument or overheating. 1 Connect the AC power adaptor to switch sustain on or...set all the components. Plug the supplied footswitch into an AC outlet. Damper Resonance This function simulates the sustain sound produced with the damper pedal on . NOTE • The sustain function does not affect the Split Voice (page 24). • Make sure that the footswitch plug...
...Plug the AC power adaptor into this jack and use this changes the recognized polarity of the footswitch, resulting in reversed footswitch operation. 16 DGX-650 Owner's Manual This function can result in damage to the instrument or overheating. 1 Connect the AC power adaptor to switch sustain on or...set all the components. Plug the supplied footswitch into an AC outlet. Damper Resonance This function simulates the sustain sound produced with the damper pedal on . NOTE • The sustain function does not affect the Split Voice (page 24). • Make sure that the footswitch plug...
Owner's Manual
Page 18
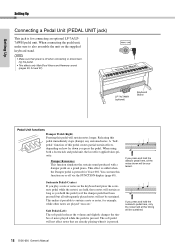
...how far down you press and hold the damper pedal here, all subsequently played notes will be sustained. Sostenuto Pedal (Center) If you play a note or notes on a grand piano. Releasing this pedal will be sustained. 18 DGX-650 Owner's Manual You can turn this timing will not... be sustained. Setting Up Setting Up Connecting a Pedal Unit (PEDAL UNIT jack) This jack is pressed for Voice 001. Damper Resonance ...
...how far down you press and hold the damper pedal here, all subsequently played notes will be sustained. Sostenuto Pedal (Center) If you play a note or notes on a grand piano. Releasing this pedal will be sustained. 18 DGX-650 Owner's Manual You can turn this timing will not... be sustained. Setting Up Setting Up Connecting a Pedal Unit (PEDAL UNIT jack) This jack is pressed for Voice 001. Damper Resonance ...
Owner's Manual
Page 81
... • Headphones: HPE-150 • Pedal Unit: LP-7A/7AWH • Footswitch: FC4/5 • USB MIDI Interface for information purposes only. Appendix DGX-650 Owner's Manual 81 Since specifications, equipment or options may not be needed when you fill out the User Registration form. • AC Power Adaptor: - Yamaha Corp. reserves the right to...
... • Headphones: HPE-150 • Pedal Unit: LP-7A/7AWH • Footswitch: FC4/5 • USB MIDI Interface for information purposes only. Appendix DGX-650 Owner's Manual 81 Since specifications, equipment or options may not be needed when you fill out the User Registration form. • AC Power Adaptor: - Yamaha Corp. reserves the right to...

Owner's Manual
Page 82
... Music Database 29 Music Rest 9 Mute 36 N Number buttons 22 O Output Gain Level 55 Overview Demo 34 P Panel Settings 46 Panel Sustain 52 Pause 36 Pedal Unit 18 Piano Voice 23 Pitch 52, 53 PITCH BEND wheel 53 Power On/Off 19 Power Requirements 16 Practice 38 "Press & Hold 15 R Random... 40 V Voice 23, 57 Volume (Audio 64 Volume (Main Voice, Dual Voice, Split Voice 67 Volume (Master 20 Volume (Song 64 Volume (Style 60 82 DGX-650 Owner's Manual Appendix
... Music Database 29 Music Rest 9 Mute 36 N Number buttons 22 O Output Gain Level 55 Overview Demo 34 P Panel Settings 46 Panel Sustain 52 Pause 36 Pedal Unit 18 Piano Voice 23 Pitch 52, 53 PITCH BEND wheel 53 Power On/Off 19 Power Requirements 16 Practice 38 "Press & Hold 15 R Random... 40 V Voice 23, 57 Volume (Audio 64 Volume (Main Voice, Dual Voice, Split Voice 67 Volume (Master 20 Volume (Song 64 Volume (Style 60 82 DGX-650 Owner's Manual Appendix


