
Data List
Page 4
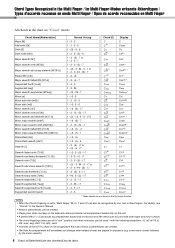
... fourth [7sus4] Suspended second [sus2] Normal Voicing Chord (C) Display 1 - 3 - 5 1 - 2 - 3 - 5 1 - (3) - 5 - 6 1 - 2 - 3 - (5) - 6 1 - 3 - (5) - 7 or 1 - 3 - 5 - 7 1 - 2 - 3 - (5) - 7 1 - (2) - 3 - #4 - 5 - 7 or 1 - 2 - 3 - #4 - (5) - 7 1 - 3 - b3 - 5 1 - b3 - (5) - 7 1 - b7 1 - b5 - b7 1 - 4 - 5 - b5 - b5 - 7 1 - b7 1 - (2) - 3 - #4 - 5 - For details, see "Chords" in the Owner's Manual. • Notes in parentheses can be omitted. • Playing two same root keys in the adjacent octaves produces accompaniment based only on the root. •...
... fourth [7sus4] Suspended second [sus2] Normal Voicing Chord (C) Display 1 - 3 - 5 1 - 2 - 3 - 5 1 - (3) - 5 - 6 1 - 2 - 3 - (5) - 6 1 - 3 - (5) - 7 or 1 - 3 - 5 - 7 1 - 2 - 3 - (5) - 7 1 - (2) - 3 - #4 - 5 - 7 or 1 - 2 - 3 - #4 - (5) - 7 1 - 3 - b3 - 5 1 - b3 - (5) - 7 1 - b7 1 - b5 - b7 1 - 4 - 5 - b5 - b5 - 7 1 - b7 1 - (2) - 3 - #4 - 5 - For details, see "Chords" in the Owner's Manual. • Notes in parentheses can be omitted. • Playing two same root keys in the adjacent octaves produces accompaniment based only on the root. •...
Owner's Manual
Page 1
EN Appendix Setting Up Basic Guide Reference Owner's Manual Keyboard Stand Assembly For information on assembling the keyboard stand, refer to the instructions on page 10 of this manual.
EN Appendix Setting Up Basic Guide Reference Owner's Manual Keyboard Stand Assembly For information on assembling the keyboard stand, refer to the instructions on page 10 of this manual.

Owner's Manual
Page 2
..., CA90620 The above statements apply ONLY to accessories and/ or another product use this manual carefully and consult your authority, granted by YAMAHA CORPORATION OF AMERICA. (class B) 2 DGX-650 Owner's Manual WARNING: Do not place this product is found in the users manual, may cause interference harmful to the operation of this product to perform the replacement...
..., CA90620 The above statements apply ONLY to accessories and/ or another product use this manual carefully and consult your authority, granted by YAMAHA CORPORATION OF AMERICA. (class B) 2 DGX-650 Owner's Manual WARNING: Do not place this product is found in the users manual, may cause interference harmful to the operation of this product to perform the replacement...
Owner's Manual
Page 3
...health and the environment which is suspected. * This applies only to applicable collection points, in the event of disposal. (weee_eu_en_01) DGX-650 Owner's Manual 3 Apparaten kopplas inte ur växelströmskällan (nätet) så länge som den ar ansluten till...INFORMATION STATEMENT (DECLARATION OF CONFORMITY PROCEDURE) Responsible Party : Yamaha Corporation of America Address : 6600 Orangethorpe Ave., Buena Park, Calif. 90620 Telephone : 714-522-9011 Type of Equipment : Digital Piano Model Name : DGX-650 This device complies with Part 15 of Old Equipment This...
...health and the environment which is suspected. * This applies only to applicable collection points, in the event of disposal. (weee_eu_en_01) DGX-650 Owner's Manual 3 Apparaten kopplas inte ur växelströmskällan (nätet) så länge som den ar ansluten till...INFORMATION STATEMENT (DECLARATION OF CONFORMITY PROCEDURE) Responsible Party : Yamaha Corporation of America Address : 6600 Orangethorpe Ave., Buena Park, Calif. 90620 Telephone : 714-522-9011 Type of Equipment : Digital Piano Model Name : DGX-650 This device complies with Part 15 of Old Equipment This...
Owner's Manual
Page 4
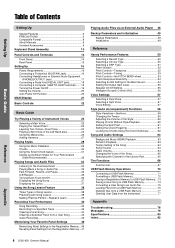
Setting Up Basic Guide Table of Contents Setting Up Special Features 5 PRECAUTIONS 6 Compatible Format 8 About Manuals 9 Included Accessories 9 Keyboard Stand Assembly 10 Panel Controls and Terminals 14 Front Panel 14 Rear Panel 15 Setting Up 16 Power Requirements 16 Connecting a Footswitch (... Deleting files from a USB Flash Memory 77 Deleting User Data from the Instrument 77 Appendix Troubleshooting 78 Messages 79 Specifications 80 Index 82 Reference Appendix 4 DGX-650 Owner's Manual
Setting Up Basic Guide Table of Contents Setting Up Special Features 5 PRECAUTIONS 6 Compatible Format 8 About Manuals 9 Included Accessories 9 Keyboard Stand Assembly 10 Panel Controls and Terminals 14 Front Panel 14 Rear Panel 15 Setting Up 16 Power Requirements 16 Connecting a Footswitch (... Deleting files from a USB Flash Memory 77 Deleting User Data from the Instrument 77 Appendix Troubleshooting 78 Messages 79 Specifications 80 Index 82 Reference Appendix 4 DGX-650 Owner's Manual
Owner's Manual
Page 5
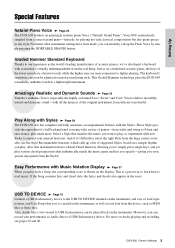
... how to select the right Style from the device, such as MIDI files or Style files. For more . DGX-650 Owner's Manual 5 This Graded Hammer technology gives the DGX-650 remarkably authentic touch in the score. Select a Style that 's virtually indistinguishable from the real thing. And if it... Performance with new Styles to powerful. Amazingly Realistic and Dynamic Sounds Page 23 Yamaha's authentic Voices (especially the highly acclaimed Live!, Sweet! Play Along with Styles Page 28 The DGX-650 also has complete and fully automatic accompaniment features with all the nuances of acoustic...
... how to select the right Style from the device, such as MIDI files or Style files. For more . DGX-650 Owner's Manual 5 This Graded Hammer technology gives the DGX-650 remarkably authentic touch in the score. Select a Style that 's virtually indistinguishable from the real thing. And if it... Performance with new Styles to powerful. Amazingly Realistic and Dynamic Sounds Page 23 Yamaha's authentic Voices (especially the highly acclaimed Live!, Sweet! Play Along with Styles Page 28 The DGX-650 also has complete and fully automatic accompaniment features with all the nuances of acoustic...
Owner's Manual
Page 6
...the instrument to disassemble or modify the internal components in any dirt or dust which might trip over . 6 DGX-650 Owner's Manual DMI-5 1/2 Then have the instrument inspected by Yamaha service personnel. - Some object has been dropped into any openings. There is not to the instrument or even..., damages, fire or other property. If it any containers (such as heaters or radiators. Then have the device inspected by qualified Yamaha service personnel. • Never insert or remove an electric plug with wet hands. It emits unusual smells or smoke. - CAUTION ...
...the instrument to disassemble or modify the internal components in any dirt or dust which might trip over . 6 DGX-650 Owner's Manual DMI-5 1/2 Then have the instrument inspected by Yamaha service personnel. - Some object has been dropped into any openings. There is not to the instrument or even..., damages, fire or other property. If it any containers (such as heaters or radiators. Then have the device inspected by qualified Yamaha service personnel. • Never insert or remove an electric plug with wet hands. It emits unusual smells or smoke. - CAUTION ...
Owner's Manual
Page 7
...ILLEGAL COPIES. About functions/data bundled with respect to which Yamaha owns copyrights or with the instrument • Some of the instrument without limitation, all components at their respective companies. DMI-5 2/2 DGX-650 Owner's Manual 7 Always turn off the power for length or arrangement, and ...laws. This could cause physical injury to you set the desired listening level. Setting Up Yamaha cannot be exactly the same as the original. About this manual are lost or destroyed. Before turning the power on the buttons, switches or connectors. &#...
...ILLEGAL COPIES. About functions/data bundled with respect to which Yamaha owns copyrights or with the instrument • Some of the instrument without limitation, all components at their respective companies. DMI-5 2/2 DGX-650 Owner's Manual 7 Always turn off the power for length or arrangement, and ...laws. This could cause physical injury to you set the desired listening level. Setting Up Yamaha cannot be exactly the same as the original. About this manual are lost or destroyed. Before turning the power on the buttons, switches or connectors. &#...
Owner's Manual
Page 8
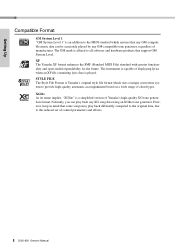
...System Level. The GM mark is Yamaha's original style file format which ensures that any GM-compatible music data can play back differently compared to the original data, due to the reduced set of control parameters and effects. 8 DGX-650 Owner's Manual XGlite As its name implies, "XGlite..." is played. XF The Yamaha XF format enhances the SMF (Standard MIDI File) standard with greater functionality and open-ended expandability for...
...System Level. The GM mark is Yamaha's original style file format which ensures that any GM-compatible music data can play back differently compared to the original data, due to the reduced set of control parameters and effects. 8 DGX-650 Owner's Manual XGlite As its name implies, "XGlite..." is played. XF The Yamaha XF format enhances the SMF (Standard MIDI File) standard with greater functionality and open-ended expandability for...
Owner's Manual
Page 9
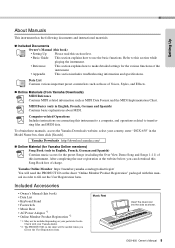
...to fill out the User Registration form. To obtain these manuals, access the Yamaha Downloads website, select your Yamaha dealer. *2: The PRODUCT ID on your particular locale. Included Accessories • Owner's Manual (this manual in English, French, German and Spanish) Contains music scores... Yamaha Online Member https://member.yamaha.com/myproduct/regist/ You will need the PRODUCT ID on the sheet "Online Member Product Registration" packaged with your country, enter "DGX-650" in English, French, German and Spanish) Contains basic explanations about MIDI. DGX-650 Owner's Manual 9...
...to fill out the User Registration form. To obtain these manuals, access the Yamaha Downloads website, select your Yamaha dealer. *2: The PRODUCT ID on your particular locale. Included Accessories • Owner's Manual (this manual in English, French, German and Spanish) Contains music scores... Yamaha Online Member https://member.yamaha.com/myproduct/regist/ You will need the PRODUCT ID on the sheet "Online Member Product Registration" packaged with your country, enter "DGX-650" in English, French, German and Spanish) Contains basic explanations about MIDI. DGX-650 Owner's Manual 9...
Owner's Manual
Page 10
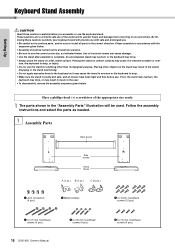
... Back board L R Side boards Stand bases A (1 pc.) B (1 pc.) C (2 pcs.) q Joint connectors (4 pcs.) w Metal brackets e 3 x 8 mm roundhead screws (12 pcs.) r 6 x 70 mm roundhead screws (4 pcs.) 10 DGX-650 Owner's Manual t 6 x 30 mm roundhead screws (4 pcs.) y 5 x 16 mm roundhead screws (4 pcs.)
... Back board L R Side boards Stand bases A (1 pc.) B (1 pc.) C (2 pcs.) q Joint connectors (4 pcs.) w Metal brackets e 3 x 8 mm roundhead screws (12 pcs.) r 6 x 70 mm roundhead screws (4 pcs.) 10 DGX-650 Owner's Manual t 6 x 30 mm roundhead screws (4 pcs.) y 5 x 16 mm roundhead screws (4 pcs.)

Owner's Manual
Page 11
... bottom of the side boards, using the screws r. "L" (Left) and "R" (Right) are aligned with the screw holes on the upper surfaces of the stand bases. DGX-650 Owner's Manual 11 Insert the joint connectors q into the side boards as shown. 3 Attach the stand bases. Setting Up 2 w Metal bracket w Metal bracket (C) (A) e 3 x 8 mm roundhead screws Keyboard...
... bottom of the side boards, using the screws r. "L" (Left) and "R" (Right) are aligned with the screw holes on the upper surfaces of the stand bases. DGX-650 Owner's Manual 11 Insert the joint connectors q into the side boards as shown. 3 Attach the stand bases. Setting Up 2 w Metal bracket w Metal bracket (C) (A) e 3 x 8 mm roundhead screws Keyboard...

Owner's Manual
Page 12
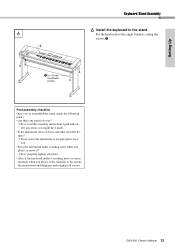
... between the keyboard and the stand parts. • Do not hold the keyboard in any position other than the position shown in the illustration. 12 DGX-650 Owner's Manual Make sure the non-colored surface is facing down. CAUTION • Be careful not to the next step. Setting Up Keyboard Stand Assembly 4 t 6 x 30 mm...
... between the keyboard and the stand parts. • Do not hold the keyboard in any position other than the position shown in the illustration. 12 DGX-650 Owner's Manual Make sure the non-colored surface is facing down. CAUTION • Be careful not to the next step. Setting Up Keyboard Stand Assembly 4 t 6 x 30 mm...
Owner's Manual
Page 13
..., if the keyboard makes a creaking noise or seems unsteady when you play it, refer carefully to the assembly instructions and diagrams and retighten all screws. DGX-650 Owner's Manual 13
..., if the keyboard makes a creaking noise or seems unsteady when you play it, refer carefully to the assembly instructions and diagrams and retighten all screws. DGX-650 Owner's Manual 13
Owner's Manual
Page 14
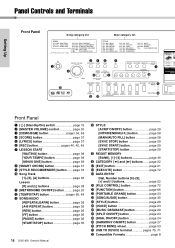
...] button page 39 [A-B REPEAT] button page 36 [REW] button page 36 [FF] button page 36 [PAUSE] button page 36 [START/STOP] button page 35 14 DGX-650 Owner's Manual !4 STYLE [ACMP ON/OFF] button page 28 [INTRO/ENDING/rit.] button page 58 [MAIN/AUTO FILL] button page 58 [SYNC STOP] button page 59 [SYNC...
...] button page 39 [A-B REPEAT] button page 36 [REW] button page 36 [FF] button page 36 [PAUSE] button page 36 [START/STOP] button page 35 14 DGX-650 Owner's Manual !4 STYLE [ACMP ON/OFF] button page 28 [INTRO/ENDING/rit.] button page 58 [MAIN/AUTO FILL] button page 58 [SYNC STOP] button page 59 [SYNC...

Owner's Manual
Page 15
DGX-650 Owner's Manual 15 Setting Up Panel Controls and Terminals Display (page 21) Voice category list Music Database category list !9 !6 !7 !8 @2 @3 @4 @5 @6 @0 #1 @1 !5 @7 @8 @9 #0 A-1 C0 C1 C2 C3 C4 C5 C6 C7 ...
DGX-650 Owner's Manual 15 Setting Up Panel Controls and Terminals Display (page 21) Voice category list Music Database category list !9 !6 !7 !8 @2 @3 @4 @5 @6 @0 #1 @1 !5 @7 @8 @9 #0 A-1 C0 C1 C2 C3 C4 C5 C6 C7 ...
Owner's Manual
Page 16
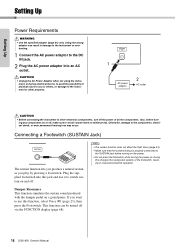
... during electrical storms, to avoid the possibility of physical injury to you play by pressing a footswitch. This function can result in reversed footswitch operation. 16 DGX-650 Owner's Manual Also, before turning on the power. • Do not press the footswitch while turning the power on a grand piano. Plug the supplied footswitch into an...
... during electrical storms, to avoid the possibility of physical injury to you play by pressing a footswitch. This function can result in reversed footswitch operation. 16 DGX-650 Owner's Manual Also, before turning on the power. • Do not press the footswitch while turning the power on a grand piano. Plug the supplied footswitch into an...

Owner's Manual
Page 17
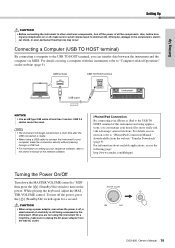
... • Use audio cables and adaptor cables having no (zero) resis- You can be changed so that speaker sound is inserted or not (page 55). DGX-650 Owner's Manual 17 If the instrument's power is inserted into this to the value suitable for connecting headphones, as an external output. These connections could result in...
... • Use audio cables and adaptor cables having no (zero) resis- You can be changed so that speaker sound is inserted or not (page 55). DGX-650 Owner's Manual 17 If the instrument's power is inserted into this to the value suitable for connecting headphones, as an external output. These connections could result in...
Owner's Manual
Page 18
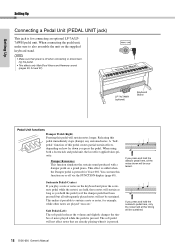
... effect is added when the Damper pedal is pressed for connecting an optional LP-7A/LP7AWH pedal unit. The soft pedal will be sustained. 18 DGX-650 Owner's Manual Damper Resonance This function simulates the sustain sound produced with a damper pedal on or off when connecting or disconnect- If you press and hold the...
... effect is added when the Damper pedal is pressed for connecting an optional LP-7A/LP7AWH pedal unit. The soft pedal will be sustained. 18 DGX-650 Owner's Manual Damper Resonance This function simulates the sustain sound produced with a damper pedal on or off when connecting or disconnect- If you press and hold the...
Owner's Manual
Page 19
...electricity is made. • When using the instrument for a second. For information about available applications, access the following page: http://www.yamaha.com/kbdapps/ Turning the Power On/Off Turn down the MASTER VOLUME control to "MIN" then press the [ ] (Standby/On)...control. iPhone/iPad Connection By connecting your music files more easily and take advantage various functions. USB 3.0 cables cannot be used. DGX-650 Owner's Manual 19 NOTE • The instrument will begin transmission a short time after the USB connection is still being consumed by the instrument....
...electricity is made. • When using the instrument for a second. For information about available applications, access the following page: http://www.yamaha.com/kbdapps/ Turning the Power On/Off Turn down the MASTER VOLUME control to "MIN" then press the [ ] (Standby/On)...control. iPhone/iPad Connection By connecting your music files more easily and take advantage various functions. USB 3.0 cables cannot be used. DGX-650 Owner's Manual 19 NOTE • The instrument will begin transmission a short time after the USB connection is still being consumed by the instrument....


