

DD-75 Owners Manual
Page 1
Digital Percussion Owner's Manual Before using the instrument, be sure to read "PRECAUTIONS" on page 5-6. EN
Digital Percussion Owner's Manual Before using the instrument, be sure to read "PRECAUTIONS" on page 5-6. EN
DD-75 Owners Manual
Page 2
...to perform the replacement. The model number, serial number, power requirements, etc., are well secured BEFORE using. Purchase Date 92-BP (bottom) PLEASE KEEP THIS MANUAL 2 DD-75 Owner's Manual DO NOT connect this manual carefully and consult your purchase. Make sure that benches are...before damage occurs. If a cart, etc., is used batteries promptly and as designed) are not covered by Yamaha. Please make sure that the battery being charged. Batteries MUST be dealer assembled or installed. For DD-75 SPECIAL MESSAGE SECTION This product utilizes batteries or an ...
...to perform the replacement. The model number, serial number, power requirements, etc., are well secured BEFORE using. Purchase Date 92-BP (bottom) PLEASE KEEP THIS MANUAL 2 DD-75 Owner's Manual DO NOT connect this manual carefully and consult your purchase. Make sure that benches are...before damage occurs. If a cart, etc., is used batteries promptly and as designed) are not covered by Yamaha. Please make sure that the battery being charged. Batteries MUST be dealer assembled or installed. For DD-75 SPECIAL MESSAGE SECTION This product utilizes batteries or an ...
DD-75 Owners Manual
Page 3
...requirements, etc., may be found to be determined by turning the unit "OFF" and "ON", please try to products distributed by Yamaha Corporation of radio or TV interference, relocate/reorient the antenna. IMPORTANT NOTICE: DO NOT MODIFY THIS UNIT! Follow all installations. NOTE...ngts av. også selvom der er slukket på apparatets afbryder. Serial No. (bottom_en_01) DD-75 Owner's Manual 3 Modifications not expressly approved by the FCC, to use of the following measures: Relocate either this product in a residential environment will not occur in harmful ...
...requirements, etc., may be found to be determined by turning the unit "OFF" and "ON", please try to products distributed by Yamaha Corporation of radio or TV interference, relocate/reorient the antenna. IMPORTANT NOTICE: DO NOT MODIFY THIS UNIT! Follow all installations. NOTE...ngts av. også selvom der er slukket på apparatets afbryder. Serial No. (bottom_en_01) DD-75 Owner's Manual 3 Modifications not expressly approved by the FCC, to use of the following measures: Relocate either this product in a residential environment will not occur in harmful ...
DD-75 Owners Manual
Page 4
... WARNING TO REDUCE THE RISK OF FIRE OR ELECTRIC SHOCK, DO NOT EXPOSE THIS APPARATUS TO RAIN OR MOISTURE. (UL60065_03) 4 DD-75 Owner's Manual The wide blade or the third prong are provided for your outlet, consult an electrician for replacement of the obsolete ... accompanying the product. When a cart is required when the apparatus has been damaged in accor- Install in any ventilation openings. Servicing is used, use caution when moving the cart/apparatus combination to persons. IMPORTANT SAFETY INSTRUCTIONS 1 Read these instructions. 2 Keep these instructions. 3 Heed all ...
... WARNING TO REDUCE THE RISK OF FIRE OR ELECTRIC SHOCK, DO NOT EXPOSE THIS APPARATUS TO RAIN OR MOISTURE. (UL60065_03) 4 DD-75 Owner's Manual The wide blade or the third prong are provided for your outlet, consult an electrician for replacement of the obsolete ... accompanying the product. When a cart is required when the apparatus has been damaged in accor- Install in any ventilation openings. Servicing is used, use caution when moving the cart/apparatus combination to persons. IMPORTANT SAFETY INSTRUCTIONS 1 Read these instructions. 2 Keep these instructions. 3 Heed all ...
DD-75 Owners Manual
Page 5
.... PRECAUTIONS PLEASE READ CAREFULLY BEFORE PROCEEDING Please keep in any way. Do not use with only Yamaha electronic instruments. When you are not using the instrument for any dirt or dust which are not designed to be malfunctioning, discontinue use only. For DD-75 WARNING Always follow the instructions that the AC outlet is a sudden loss...
.... PRECAUTIONS PLEASE READ CAREFULLY BEFORE PROCEEDING Please keep in any way. Do not use with only Yamaha electronic instruments. When you are not using the instrument for any dirt or dust which are not designed to be malfunctioning, discontinue use only. For DD-75 WARNING Always follow the instructions that the AC outlet is a sudden loss...
DD-75 Owners Manual
Page 6
...to be lost or destroyed. Before turning the power on or off , electricity is still flowing to the product at their respective companies. 6 DD-75 Owner's Manual DMI-5 2/2 Location • Do not place the instrument in an unstable position where it . • Remove the electric plug...use. • This product incorporates and bundles contents in which these contents are saved or recorded and remain virtually the same or very similar to those on that the AC outlet you are the result of product inspection. and other relevant laws, you are NOT allowed to distribute media in which Yamaha...
...to be lost or destroyed. Before turning the power on or off , electricity is still flowing to the product at their respective companies. 6 DD-75 Owner's Manual DMI-5 2/2 Location • Do not place the instrument in an unstable position where it . • Remove the electric plug...use. • This product incorporates and bundles contents in which these contents are saved or recorded and remain virtually the same or very similar to those on that the AC outlet you are the result of product inspection. and other relevant laws, you are NOT allowed to distribute media in which Yamaha...
DD-75 Owners Manual
Page 7
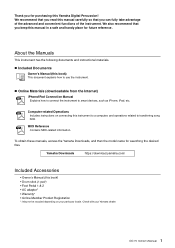
...locale. DD-75 Owner's Manual 7 Yamaha Downloads https://download.yamaha.com/ Included Accessories • Owner's Manual (this book) • Drum stick (1 pair) • Foot Pedal 1 & 2 • AC adaptor* • Warranty* • Online Member Product Registration *: May not be included depending on connecting this Yamaha Digital ...and handy place for future reference. We also recommend that you keep this book) This document explains how to use the instrument. Online Materials (downloadable from the Internet) iPhone/iPad Connection Manual Explains how to connect the instrument to ...
...locale. DD-75 Owner's Manual 7 Yamaha Downloads https://download.yamaha.com/ Included Accessories • Owner's Manual (this book) • Drum stick (1 pair) • Foot Pedal 1 & 2 • AC adaptor* • Warranty* • Online Member Product Registration *: May not be included depending on connecting this Yamaha Digital ...and handy place for future reference. We also recommend that you keep this book) This document explains how to use the instrument. Online Materials (downloadable from the Internet) iPhone/iPad Connection Manual Explains how to connect the instrument to ...
DD-75 Owners Manual
Page 8
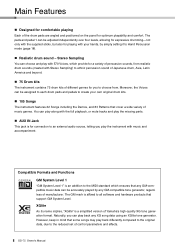
...compared to the original data, due to the reduced set of control parameters and effects. 8 DD-75 Owner's Manual The GM mark is a simplified version of music genres. Moreover, the Voices can... along with the full playback, or mute tracks and play back any XG song data using an XGlite tone generator. You can be adjusted independently over four levels, allowing for expressive...GM System Level 1" is for playing with 570 Voices, which ensures that cover a wide variety of Yamaha's high-quality XG tone generation format. Naturally, you play with your own original drum kits. ...
...compared to the original data, due to the reduced set of control parameters and effects. 8 DD-75 Owner's Manual The GM mark is a simplified version of music genres. Moreover, the Voices can... along with the full playback, or mute tracks and play back any XG song data using an XGlite tone generator. You can be adjusted independently over four levels, allowing for expressive...GM System Level 1" is for playing with 570 Voices, which ensures that cover a wide variety of Yamaha's high-quality XG tone generation format. Naturally, you play with your own original drum kits. ...
DD-75 Owners Manual
Page 9
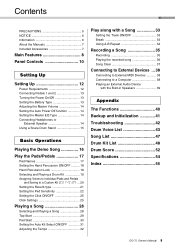
...Volume 14 Setting the Auto Power Off function 14 Setting the Master EQ Type 14 Connecting Headphones or External Speaker 14 Using a Snare Drum Stand 15 Basic Operations Playing the Demo Song 16 Play the Pads/Pedals 17 Pad Names 17 Setting... Select ON/OFF 31 Adjusting the Tempo 32 Play along with a Song 33 Setting the Track ON/OFF 33 Break 33 Using A-B Repeat 34 Recording a Song 35 Recording 35 Playing the recorded song 36 Song Clear 37 Connecting to External Devices ... ...List 43 Song List 47 Drum Kit List 48 Drum Score 52 Specifications 54 Index 55 DD-75 Owner's Manual 9
...Volume 14 Setting the Auto Power Off function 14 Setting the Master EQ Type 14 Connecting Headphones or External Speaker 14 Using a Snare Drum Stand 15 Basic Operations Playing the Demo Song 16 Play the Pads/Pedals 17 Pad Names 17 Setting... Select ON/OFF 31 Adjusting the Tempo 32 Play along with a Song 33 Setting the Track ON/OFF 33 Break 33 Using A-B Repeat 34 Recording a Song 35 Recording 35 Playing the recorded song 36 Song Clear 37 Connecting to External Devices ... ...List 43 Song List 47 Drum Kit List 48 Drum Score 52 Specifications 54 Index 55 DD-75 Owner's Manual 9

DD-75 Owners Manual
Page 11
...-HAT jack 13 @4 PEDAL 1 • KICK jack 13 @5 MIDI IN/OUT terminals 38 DD-75 Owner's Manual 11 Also, to never leave any watches, credit cards or any kind of magnetic storage media on the panel- Do not use them . doing so may result in data loss or damage to the items. Also... avoid using this instrument, you should be careful to avoid damage or injury, refrain from waving them recklessly or...
...-HAT jack 13 @4 PEDAL 1 • KICK jack 13 @5 MIDI IN/OUT terminals 38 DD-75 Owner's Manual 11 Also, to never leave any watches, credit cards or any kind of magnetic storage media on the panel- Do not use them . doing so may result in data loss or damage to the items. Also... avoid using this instrument, you should be careful to avoid damage or injury, refrain from waving them recklessly or...
DD-75 Owners Manual
Page 12
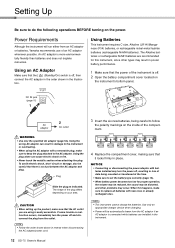
...on the inside of an AC adaptor whenever possible. Using the plug alone can result in damage to the instrument or overheating. • When using is off and disconnect the plug from an AC adaptor or batteries, Yamaha recommends use of the compartment. 4 Replace the compartment cover, ... recharged ones. NOTE • Follow the order shown above in the instrument. 12 DD-75 Owner's Manual Setting Up Setting Up Be sure to do the following operations BEFORE turning on your area. Using Batteries This instrument requires C size, Alkaline (LR14)/Manganese (R14) batteries, or rechargeable...
...on the inside of an AC adaptor whenever possible. Using the plug alone can result in damage to the instrument or overheating. • When using is off and disconnect the plug from an AC adaptor or batteries, Yamaha recommends use of the compartment. 4 Replace the compartment cover, ... recharged ones. NOTE • Follow the order shown above in the instrument. 12 DD-75 Owner's Manual Setting Up Setting Up Be sure to do the following operations BEFORE turning on your area. Using Batteries This instrument requires C size, Alkaline (LR14)/Manganese (R14) batteries, or rechargeable...
DD-75 Owners Manual
Page 13
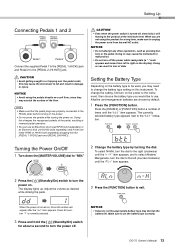
... appears. When the power is still flowing to unplug the power cord from left (counter-clockwise) until the "btt" item appears. DD-75 Owner's Manual 13 When you would like to set the appropriate battery type may cause the instrument to the PEDAL jacks before turning on the... (sold separately) and hi-hat controller HH65 or HH40 (sold separately) plugging into the [PEDAL 1 (KICK)] jack and [PEDAL 2(HI-HAT)]. NOTICE • Avoid using the product for about a second to turn on the power to the instrument, then choose the battery type you are properly connected to fall and...
... appears. When the power is still flowing to unplug the power cord from left (counter-clockwise) until the "btt" item appears. DD-75 Owner's Manual 13 When you would like to set the appropriate battery type may cause the instrument to the PEDAL jacks before turning on the... (sold separately) and hi-hat controller HH65 or HH40 (sold separately) plugging into the [PEDAL 1 (KICK)] jack and [PEDAL 2(HI-HAT)]. NOTICE • Avoid using the product for about a second to turn on the power to the instrument, then choose the battery type you are properly connected to fall and...
DD-75 Owners Manual
Page 14
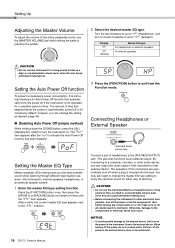
...clockwise to set to "HP" (Headphone), and turn on or off the power to the external device, then to the instrument. 14 DD-75 Owner's Manual Setting the Master EQ Type Master equalizer (EQ) settings give you can output the audio signal of this instrument to that elapses...systems-the instrument's internal speakers, headphones, or an external speaker system. 1 Enter the master EQ type setting function. CAUTION • Do not use the [MASTER VOLUME] dial while striking the pads or pressing the pedals. 2 Select the desired master EQ type. Connecting Headphones or External Speaker ...
...clockwise to set to "HP" (Headphone), and turn on or off the power to the external device, then to the instrument. 14 DD-75 Owner's Manual Setting the Master EQ Type Master equalizer (EQ) settings give you can output the audio signal of this instrument to that elapses...systems-the instrument's internal speakers, headphones, or an external speaker system. 1 Enter the master EQ type setting function. CAUTION • Do not use the [MASTER VOLUME] dial while striking the pads or pressing the pedals. 2 Select the desired master EQ type. Connecting Headphones or External Speaker ...
DD-75 Owners Manual
Page 15
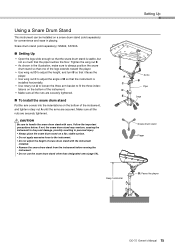
.... • Make sure all the nuts are secured. Setting Up A Arms B C Pipe D E Legs Snare drum stand Player Keep horizontal B: Faces the player DD-75 Owner's Manual 15 Snare drum stand (sold separately) for convenience and ease in the illustration, make sure to always position the snare drum stand so...to adjust the angle of B so that the instrument is stable, but not so much that the snare drum stand is installed horizontally. • Use rotary nut A to loosen the three arm basket to fit the three indentations on the bottom of snare drum stand with care. If not, ...
.... • Make sure all the nuts are secured. Setting Up A Arms B C Pipe D E Legs Snare drum stand Player Keep horizontal B: Faces the player DD-75 Owner's Manual 15 Snare drum stand (sold separately) for convenience and ease in the illustration, make sure to always position the snare drum stand so...to adjust the angle of B so that the instrument is stable, but not so much that the snare drum stand is installed horizontally. • Use rotary nut A to loosen the three arm basket to fit the three indentations on the bottom of snare drum stand with care. If not, ...

DD-75 Owners Manual
Page 16
Press the [DEMO] button and the demo song starts playing. To stop playback, press the [DEMO] button again or press the [START/STOP] button. 16 DD-75 Owner's Manual NOTE • With the Auto Kit Select feature turned on, the best suited Drum Kit for the song will automatically be selected. (See ... the Demo Song Basic Operations This instrument features several demonstration songs ("001"-"005"), specially created to select a demo song ("001"-"005"). 3 Stop the Demo Song. Use the dial to show you the dynamic possibilities of the instrument. 1 Start the Demo Song.
Press the [DEMO] button and the demo song starts playing. To stop playback, press the [DEMO] button again or press the [START/STOP] button. 16 DD-75 Owner's Manual NOTE • With the Auto Kit Select feature turned on, the best suited Drum Kit for the song will automatically be selected. (See ... the Demo Song Basic Operations This instrument features several demonstration songs ("001"-"005"), specially created to select a demo song ("001"-"005"). 3 Stop the Demo Song. Use the dial to show you the dynamic possibilities of the instrument. 1 Start the Demo Song.

DD-75 Owners Manual
Page 17
Pad Names A hi-hat sound is too slow or soft, there may control a different sound.) NOTE • When using Pedal 2, touch response does not function. NOTE • If your pressing of Drum Kit 1; Play the Pads/Pedals Strike the pad with your hands, turn ... or your playing; when you play soft the volume is soft, and when you press the pedal. for other kits, this may be no sound. DD-75 Owner's Manual 17
Pad Names A hi-hat sound is too slow or soft, there may control a different sound.) NOTE • When using Pedal 2, touch response does not function. NOTE • If your pressing of Drum Kit 1; Play the Pads/Pedals Strike the pad with your hands, turn ... or your playing; when you play soft the volume is soft, and when you press the pedal. for other kits, this may be no sound. DD-75 Owner's Manual 17

DD-75 Owners Manual
Page 18
... that you play the pads of the instrument either with the supplied sticks or with your hands. Press and set the following button when you use this operation to lock the Hand Percussion so that Hand Percussion is automatically adjusted for optimum playing by hand. Play the Pads/Pedals Setting the... Hand Percussion ON/OFF You can play the instrument with your hands. 1 Press the [HAND PERC.] button. Lit When you perform on the display. 18 DD-75 Owner's Manual Hand Percussion Lock If you press the [HAND PERC.] button, the button's lamp lights, and the pad sensitivity is set to ON.
... that you play the pads of the instrument either with the supplied sticks or with your hands. Press and set the following button when you use this operation to lock the Hand Percussion so that Hand Percussion is automatically adjusted for optimum playing by hand. Play the Pads/Pedals Setting the... Hand Percussion ON/OFF You can play the instrument with your hands. 1 Press the [HAND PERC.] button. Lit When you perform on the display. 18 DD-75 Owner's Manual Hand Percussion Lock If you press the [HAND PERC.] button, the button's lamp lights, and the pad sensitivity is set to ON.

DD-75 Owners Manual
Page 20
... the dial. Striking the pad or pressing the pedal to select a voice. To call up the saved Custom Kit, press the [KIT] button and use the dial to select a Custom Kit number. Every time the pad is struck or a pedal is shown in the display. 4 Select a Voice Number. See the... one (1). Strike any or all of the 8 drum pads and 2 pedals. When you can assign these freely to each of the pads and pedals. 20 DD-75 Owner's Manual To cancel, simply press the [KIT] button. Repeat the previous steps 3 and 4 for saving. 3 Select a pad or pedal to be changed and saved...
... the dial. Striking the pad or pressing the pedal to select a voice. To call up the saved Custom Kit, press the [KIT] button and use the dial to select a Custom Kit number. Every time the pad is struck or a pedal is shown in the display. 4 Select a Voice Number. See the... one (1). Strike any or all of the 8 drum pads and 2 pedals. When you can assign these freely to each of the pads and pedals. 20 DD-75 Owner's Manual To cancel, simply press the [KIT] button. Repeat the previous steps 3 and 4 for saving. 3 Select a pad or pedal to be changed and saved...

DD-75 Owners Manual
Page 21
... of the available Reverb types, if desired. 1 Enter the Reverb type setting function. To call up the saved Custom Kit, press the [KIT] button and use the dial to the sound by turning the dial. Setting the Reverb type This control adds reverberation to select a Custom Kit number. Display oFF HA1... kit. Play the Pads/Pedals Unlit 5 Save to exit from the Function mode. NOTE • The Reverb Type of times until the "rbt" item appears. DD-75 Owner's Manual 21 To change to "Setting the Reverb type." You can change the Reverb type, please refer to any of a concert hall.
... of the available Reverb types, if desired. 1 Enter the Reverb type setting function. To call up the saved Custom Kit, press the [KIT] button and use the dial to the sound by turning the dial. Setting the Reverb type This control adds reverberation to select a Custom Kit number. Display oFF HA1... kit. Play the Pads/Pedals Unlit 5 Save to exit from the Function mode. NOTE • The Reverb Type of times until the "rbt" item appears. DD-75 Owner's Manual 21 To change to "Setting the Reverb type." You can change the Reverb type, please refer to any of a concert hall.

DD-75 Owners Manual
Page 26
... basic note value for example, in the time signature 6/8, "8" is 4. 3 Press the [FUNCTION] button to the "CLL" indication. 2 Set the click volume by using the dial. 26 DD-75 Owner's Manual 3 Press the [FUNCTION] button to the "CLd" indication. 2 Set the denominator value of times until the "CLd" indication appears. Play the Pads...
... basic note value for example, in the time signature 6/8, "8" is 4. 3 Press the [FUNCTION] button to the "CLL" indication. 2 Set the click volume by using the dial. 26 DD-75 Owner's Manual 3 Press the [FUNCTION] button to the "CLd" indication. 2 Set the denominator value of times until the "CLd" indication appears. Play the Pads...
