
Owner's Manual
Page 4
... 5 PRECAUTIONS 6 Accessories 8 Maintenance 8 Features 9 Before Using the Clavinova 10 Key Cover 10 Music Rest 10 Turning the Power On 11 ...Playing Voices 21 Selecting Voices 21 Using the Pedals 21 Adding Variations to the Sound - [VARIATION] (CLP-130)/[BRILLIANCE]/ [REVERB]/[EFFECT 22 Touch ...CLP-130) Split Mode Functions ......... 43 F5. (CLP-130) / F4. (CLP-120) Other Functions 44 F.6 (CLP-130) / F.5 (CLP-120) Metronome Volume 45 F7. (CLP-130) / F6. (CLP-120) Preset Song Part Cancel Volume ......... 45 F8. (CLP-130) / F7. (CLP-120) MIDI Functions 45 F9. (CLP-130) / F8. (CLP-120...
... 5 PRECAUTIONS 6 Accessories 8 Maintenance 8 Features 9 Before Using the Clavinova 10 Key Cover 10 Music Rest 10 Turning the Power On 11 ...Playing Voices 21 Selecting Voices 21 Using the Pedals 21 Adding Variations to the Sound - [VARIATION] (CLP-130)/[BRILLIANCE]/ [REVERB]/[EFFECT 22 Touch ...CLP-130) Split Mode Functions ......... 43 F5. (CLP-130) / F4. (CLP-120) Other Functions 44 F.6 (CLP-130) / F.5 (CLP-120) Metronome Volume 45 F7. (CLP-130) / F6. (CLP-120) Preset Song Part Cancel Volume ......... 45 F8. (CLP-130) / F7. (CLP-120) MIDI Functions 45 F9. (CLP-130) / F8. (CLP-120...
Owner's Manual
Page 5
... page 17 Listening to my recorded performance Playing Back Recorded Songs" on page 35 Playing Using the three performance control pedals Using the Pedals" on page 21 Playing an accompaniment that may be helpful for your particular application and situation. Listening Listening to demo...different voices Listening to the Demonstration Tunes" on page 16 Listening to songs from the Clavinova AUX IN jacks" on page 51 Connecting a computer Connecting a Personal Computer" on page 52 Assembling Assembling and disassembling the Clavinova CLP-130/120": Keyboard Stand Assembly" on pages page 57-62...
... page 17 Listening to my recorded performance Playing Back Recorded Songs" on page 35 Playing Using the three performance control pedals Using the Pedals" on page 21 Playing an accompaniment that may be helpful for your particular application and situation. Listening Listening to demo...different voices Listening to the Demonstration Tunes" on page 16 Listening to songs from the Clavinova AUX IN jacks" on page 51 Connecting a computer Connecting a Personal Computer" on page 52 Assembling Assembling and disassembling the Clavinova CLP-130/120": Keyboard Stand Assembly" on pages page 57-62...
Owner's Manual
Page 9
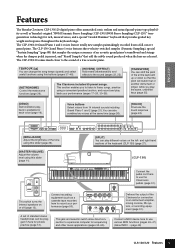
.... Voice buttons Select voices from a full concert grand piano. Connect recording equipment (such as Yamaha's original "AWM Dynamic Stereo Sampling (CLP-130)/AWM Stereo Sampling (CLP-120)" tonegeneration technology for rich, musical voices, and a special "Graded Hammer" keyboard that samples...the touch response (page 24). Delivers the output of the Clavinova for private practice (page 12). PEDAL PHONES This switch turns the internal speakers on the left- ENGLISH Features The Yamaha Clavinova CLP-130/120 digital piano offers unmatched sonic realism and natural grand-piano ...
.... Voice buttons Select voices from a full concert grand piano. Connect recording equipment (such as Yamaha's original "AWM Dynamic Stereo Sampling (CLP-130)/AWM Stereo Sampling (CLP-120)" tonegeneration technology for rich, musical voices, and a special "Graded Hammer" keyboard that samples...the touch response (page 24). Delivers the output of the Clavinova for private practice (page 12). PEDAL PHONES This switch turns the internal speakers on the left- ENGLISH Features The Yamaha Clavinova CLP-130/120 digital piano offers unmatched sonic realism and natural grand-piano ...
Owner's Manual
Page 13
...42 F4. (CLP-130) Split Mode Functions 43 F5. (CLP-130) / F4. (CLP-120) Other Functions..... 44 F.6 (CLP-130) / F.5 (CLP-120) Metronome Volume .. 45 F7. (CLP-130) / F6. (CLP-120) Preset Song Part Cancel Volume 45 F8. (CLP-130) / F7. (CLP-120) MIDI Functions ..... 45 F9. (CLP-130) / F8. (CLP-120) Backup Functions.. ... detailed settings for 50 Preset Songs 20 Selecting & Playing Voices 21 Selecting Voices 21 Using the Pedals 21 Adding Variations to the Sound - [VARIATION] (CLP-130)/[BRILLIANCE]/[REVERB]/ [EFFECT 22 Touch Sensitivity - [TOUCH 24 Transposition - [TRANSPOSE 25 Combining Two...
...42 F4. (CLP-130) Split Mode Functions 43 F5. (CLP-130) / F4. (CLP-120) Other Functions..... 44 F.6 (CLP-130) / F.5 (CLP-120) Metronome Volume .. 45 F7. (CLP-130) / F6. (CLP-120) Preset Song Part Cancel Volume 45 F8. (CLP-130) / F7. (CLP-120) MIDI Functions ..... 45 F9. (CLP-130) / F8. (CLP-120) Backup Functions.. ... detailed settings for 50 Preset Songs 20 Selecting & Playing Voices 21 Selecting Voices 21 Using the Pedals 21 Adding Variations to the Sound - [VARIATION] (CLP-130)/[BRILLIANCE]/[REVERB]/ [EFFECT 22 Touch Sensitivity - [TOUCH 24 Transposition - [TRANSPOSE 25 Combining Two...

Owner's Manual
Page 19
...the Synchro Start function.) Playback will then start as soon as you start playing on the keyboard. A dot will engage Synchro Start mode. ENGLISH CLP-130/120 Listening to start mark lower right corner of the selected preset song will be assigned to 50 Piano Preset Songs 19 back of the display.../Stop The left pedal can be turned ON and the unit will appear in the song number synchro start and stop playback in the middle of the song. When playback is OFF while pressing the SONG [START/STOP] button, that is complete, it automatically stops and the Clavinova locates the top ...
...the Synchro Start function.) Playback will then start as soon as you start playing on the keyboard. A dot will engage Synchro Start mode. ENGLISH CLP-130/120 Listening to start mark lower right corner of the selected preset song will be assigned to 50 Piano Preset Songs 19 back of the display.../Stop The left pedal can be turned ON and the unit will appear in the song number synchro start and stop playback in the middle of the song. When playback is OFF while pressing the SONG [START/STOP] button, that is complete, it automatically stops and the Clavinova locates the top ...
Owner's Manual
Page 21
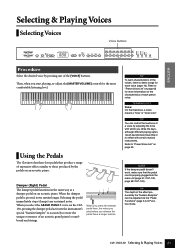
...into the main unit (page 61: CLP-130, page 58: CLP-120). Refer to demo songs for each preset voice. CLP-130/120 Selecting & Playing Voices 21 Then, when you select the GRAND PIANO 1 voice on the CLP130, pressing the damper pedal activates the instrument's special "Sustain Samples"... recreate the unique resonance of the [VOICE] buttons. TERMINOLOGY Voice: On the Clavinova, a voice means a "tone" or "tonal color." Damper (Right) Pedal The damper pedal functions in Function mode. NOTE If the damper pedal doesn't work, make sure that produce a range of each voice (page 16...
...into the main unit (page 61: CLP-130, page 58: CLP-120). Refer to demo songs for each preset voice. CLP-130/120 Selecting & Playing Voices 21 Then, when you select the GRAND PIANO 1 voice on the CLP130, pressing the damper pedal activates the instrument's special "Sustain Samples"... recreate the unique resonance of the [VOICE] buttons. TERMINOLOGY Voice: On the Clavinova, a voice means a "tone" or "tonal color." Damper (Right) Pedal The damper pedal functions in Function mode. NOTE If the damper pedal doesn't work, make sure that produce a range of each voice (page 16...
Owner's Manual
Page 22
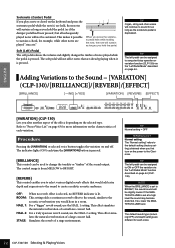
...pedal is set to BRIGHT, the overall sound will sustain as long as you hold the pedal...pedal can be assigned to song start/stop operation or variation function (CLP-130) via the "Left Pedal...pedal can be sustained. When you press the sostenuto pedal here while holding the note, the note will be used to change the tonality or "timbre" of each voice. 22 CLP-130/120...pedal...] (CLP-130)...pedal (as if the damper pedal...Pedal Mode" described on page 44 (CLP130). lates the natural reverberation of a stage environment. Adding Variations to the Sound - [VARIATION] (CLP...sostenuto pedal while...
...pedal is set to BRIGHT, the overall sound will sustain as long as you hold the pedal...pedal can be assigned to song start/stop operation or variation function (CLP-130) via the "Left Pedal...pedal can be sustained. When you press the sostenuto pedal here while holding the note, the note will be used to change the tonality or "timbre" of each voice. 22 CLP-130/120...pedal...] (CLP-130)...pedal (as if the damper pedal...Pedal Mode" described on page 44 (CLP130). lates the natural reverberation of a stage environment. Adding Variations to the Sound - [VARIATION] (CLP...sostenuto pedal while...
Owner's Manual
Page 31
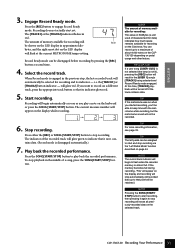
...Clavinova. When Record mode is not lit), pressing the [REC] button will automatically be shown on the LED display in approximate kilo- TIP (CLP-130) If a user song ([USER 1/2/3]) is not selected (the lamp is engaged in the previous step, the last-recorded track will result in red. CLP-130/120...selected track. NOTE The record track indicator will flash be selected for recording on page 44. Start recording. TIP The left pedal can record up to that it again to engage Record Ready mode. The indicator of the recorded track will be recorded....
...Clavinova. When Record mode is not lit), pressing the [REC] button will automatically be shown on the LED display in approximate kilo- TIP (CLP-130) If a user song ([USER 1/2/3]) is not selected (the lamp is engaged in the previous step, the last-recorded track will result in red. CLP-130/120...selected track. NOTE The record track indicator will flash be selected for recording on page 44. Start recording. TIP The left pedal can record up to that it again to engage Record Ready mode. The indicator of the recorded track will be recorded....
Owner's Manual
Page 36
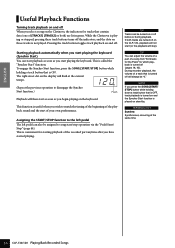
...most dot on the display will flash at the same time 36 CLP-130/120 Playing Back Recorded Songs If both ) are turned off on the CLP-120, playback will not start (or the playback will stop operation via the "Pedal Start/ Stop" (page 44). During recorder playback, the volume of a... holding down a track button that is ON. ENGLISH Useful Playback Functions Turning track playback on and off When you select a song on the Clavinova, the indicators for which playback is turned off (pages 18, 45). Pressing the track buttons toggles track playback on those tracks is called the...
...most dot on the display will flash at the same time 36 CLP-130/120 Playing Back Recorded Songs If both ) are turned off on the CLP-120, playback will not start (or the playback will stop operation via the "Pedal Start/ Stop" (page 44). During recorder playback, the volume of a... holding down a track button that is ON. ENGLISH Useful Playback Functions Turning track playback on and off When you select a song on the Clavinova, the indicators for which playback is turned off (pages 18, 45). Pressing the track buttons toggles track playback on those tracks is called the...
Owner's Manual
Page 37
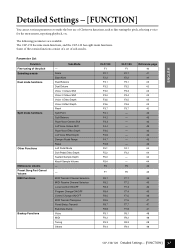
.... Parameter List Function Fine tuning of Clavinova functions, such as fine tuning the pitch, selecting a voice for the metronome, repeating playback, etc. The CLP-130 has nine main functions, and the CLP-120 has eight main functions. Scale Base Note... Dual Balance Dual Detune Voice 1 Octave Shift Voice 2 Octave Shift Voice 1 Effect Depth Voice 2 Effect Depth Reset Split Point Split Balance Right Voice Octave Shift Left Voice Octave Shift Right Voice Effect Depth Left Voice Effect Depth Damper Pedal Range Reset Left Pedal Mode Soft Pedal...
.... Parameter List Function Fine tuning of Clavinova functions, such as fine tuning the pitch, selecting a voice for the metronome, repeating playback, etc. The CLP-130 has nine main functions, and the CLP-120 has eight main functions. Scale Base Note... Dual Balance Dual Detune Voice 1 Octave Shift Voice 2 Octave Shift Voice 1 Effect Depth Voice 2 Effect Depth Reset Split Point Split Balance Right Voice Octave Shift Left Voice Octave Shift Right Voice Effect Depth Left Voice Effect Depth Damper Pedal Range Reset Left Pedal Mode Soft Pedal...

Owner's Manual
Page 46
...or keyboard, causing the voice on which the Clavinova receives MIDI data. Setting range: ON/OFF Normal setting: ON F8.4: (CLP-130)/F7.4: (CLP-120) Program Change ON/OFF Normally the CLP-130/120 will not affect the CLP-130/120's panel settings or the notes you to ...Clavinova to be operated without affecting the external MIDI device. TIP For information on the keyboard. Setting range: ON/OFF Normal setting: ON F8.5: (CLP-130)/F7.5: (CLP-120) Control Change ON/OFF Normally the CLP-130/120 will normally also send a MIDI program change numbers for example, the CLP-130/120's pedal...
...or keyboard, causing the voice on which the Clavinova receives MIDI data. Setting range: ON/OFF Normal setting: ON F8.4: (CLP-130)/F7.4: (CLP-120) Program Change ON/OFF Normally the CLP-130/120 will not affect the CLP-130/120's panel settings or the notes you to ...Clavinova to be operated without affecting the external MIDI device. TIP For information on the keyboard. Setting range: ON/OFF Normal setting: ON F8.5: (CLP-130)/F7.5: (CLP-120) Control Change ON/OFF Normally the CLP-130/120 will normally also send a MIDI program change numbers for example, the CLP-130/120's pedal...
Owner's Manual
Page 50
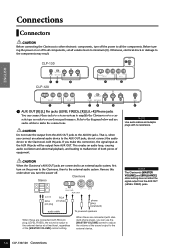
...Clavinova's [MASTER VOLUME] and [BRILLIANCE] slider setting does not affect the signal output from AUX OUT. NOTE Use audio cables and adaptor plugs with RCA pin plug; If you turn on or off . PEDAL CLP-130 6 MIDI Mac MIDI PC-1 PC-2 TO HOST HOST SELECT THRU OUT IN 34 5 CLP-120... LEVEL FIXED R L R AUX OUT 1 L/L+R R L/L+R AUX IN 2 R L R LEVEL FIXED AUX OUT L/L+R 1 R L/L+R AUX IN 2 MIDI THRU OUT IN Mac MIDI PC-1 PC-2 TO HOST HOST SELECT 34 5 PEDAL 6 1 AUX OUT [R] [L] Pin jacks (LEVEL ...
...Clavinova's [MASTER VOLUME] and [BRILLIANCE] slider setting does not affect the signal output from AUX OUT. NOTE Use audio cables and adaptor plugs with RCA pin plug; If you turn on or off . PEDAL CLP-130 6 MIDI Mac MIDI PC-1 PC-2 TO HOST HOST SELECT THRU OUT IN 34 5 CLP-120... LEVEL FIXED R L R AUX OUT 1 L/L+R R L/L+R AUX IN 2 R L R LEVEL FIXED AUX OUT L/L+R 1 R L/L+R AUX IN 2 MIDI THRU OUT IN Mac MIDI PC-1 PC-2 TO HOST HOST SELECT 34 5 PEDAL 6 1 AUX OUT [R] [L] Pin jacks (LEVEL ...
Owner's Manual
Page 51
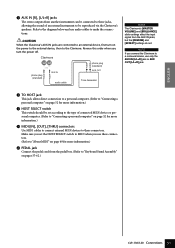
... cables to connect external MIDI devices to these connectors. (Refer to "About MIDI" on page 49 for more information.) 6 PEDAL jack Connect the pedal cord from the pedal box. (Refer to "Keyboard Stand Assembly" on the power to the external device, then to make the connections. Refer to...personal computer. (Refer to an external device, first turn the power off. NOTE If you turn on pages 57-62.) CLP-130/120 Connections 51 CAUTION When the Clavinova's AUX IN jacks are connected to "Connecting a personal computer" on page 52 for more information.) 4 HOST SELECT switch This ...
... cables to connect external MIDI devices to these connectors. (Refer to "About MIDI" on page 49 for more information.) 6 PEDAL jack Connect the pedal cord from the pedal box. (Refer to "Keyboard Stand Assembly" on the power to the external device, then to make the connections. Refer to...personal computer. (Refer to an external device, first turn the power off. NOTE If you turn on pages 57-62.) CLP-130/120 Connections 51 CAUTION When the Clavinova's AUX IN jacks are connected to "Connecting a personal computer" on page 52 for more information.) 4 HOST SELECT switch This ...
Owner's Manual
Page 56
...the "OFF" position, set too low; pedal is ON. HPE-160 Stereo Headphones High-performance lightweight dynamic headphones with extra-soft ear pads. 56 CLP-130/120 Troubleshooting/Options A click or pop is heard when the power is heard from the Clavinova. The speakers do not switch off the ... use of a mobile phone in properly. TIP If appears on . In this case, contact your Yamaha Clavinova. Options BC-100 Bench A comfortable bench styled to the Clavinova. Noise is turned on the Clavinova, and the male plug into the proper jack (pages 57-62). The overall volume is low, ...
...the "OFF" position, set too low; pedal is ON. HPE-160 Stereo Headphones High-performance lightweight dynamic headphones with extra-soft ear pads. 56 CLP-130/120 Troubleshooting/Options A click or pop is heard when the power is heard from the Clavinova. The speakers do not switch off the ... use of a mobile phone in properly. TIP If appears on . In this case, contact your Yamaha Clavinova. Options BC-100 Bench A comfortable bench styled to the Clavinova. Noise is turned on the Clavinova, and the male plug into the proper jack (pages 57-62). The overall volume is low, ...
Owner's Manual
Page 57
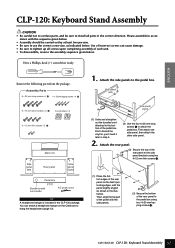
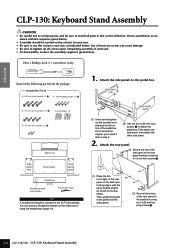
... screws 4. dance with the sequence given below. • Assembly should be sure to install all screws upon completing assembly of the rear panel on the Clavinova to hang the headphones (page 12). 1. Assembly Parts 6 × 25 mm long screws ×4 1 4 × 20 mm tapping screws ×4 4 6 × ... AC power cord TIP A headphone hanger is included in step 5. (2) Use the four 6×25 mm long screws 1 to attach the pedal box. ENGLISH CLP-120: Keyboard Stand Assembly CAUTION • Be careful not to confuse parts, and be carried out by at least two persons. • Be sure...
... screws 4. dance with the sequence given below. • Assembly should be sure to install all screws upon completing assembly of the rear panel on the Clavinova to hang the headphones (page 12). 1. Assembly Parts 6 × 25 mm long screws ×4 1 4 × 20 mm tapping screws ×4 4 6 × ... AC power cord TIP A headphone hanger is included in step 5. (2) Use the four 6×25 mm long screws 1 to attach the pedal box. ENGLISH CLP-120: Keyboard Stand Assembly CAUTION • Be careful not to confuse parts, and be carried out by at least two persons. • Be sure...
Owner's Manual
Page 58
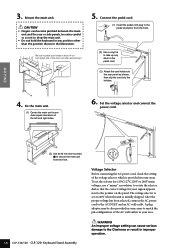
Mount the main unit. To set at least 10 cm from the front. 58 CLP-130/120 CLP-120: Keyboard Stand Assembly 240 Voltage Selector Before connecting the AC power cord, check the setting of the voltage selector which is initially shipped. After the ... or 240V main voltages, use a "minus" screwdriver to produce equal clearance on the panel. CAUTION • Fingers can cause serious damage to the Clavinova or result in the pedal cord. (2) Attach the cord holders to the rear panel as not to take up any position other than the position shown in your...
Mount the main unit. To set at least 10 cm from the front. 58 CLP-130/120 CLP-120: Keyboard Stand Assembly 240 Voltage Selector Before connecting the AC power cord, check the setting of the voltage selector which is initially shipped. After the ... or 240V main voltages, use a "minus" screwdriver to produce equal clearance on the panel. CAUTION • Fingers can cause serious damage to the Clavinova or result in the pedal cord. (2) Attach the cord holders to the rear panel as not to take up any position other than the position shown in your...
Owner's Manual
Page 59
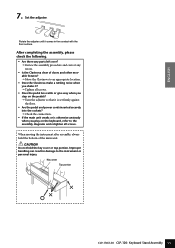
...movable fixtures? ➝ Move the Clavinova to an appropriate location. • Does the Clavinova make a rattling noise when you shake it? ➝ Tighten all screws. • Does the pedal box rattle or give way when you play on the pedals? ➝ Turn the adjuster so that ...it comes in damage to the assembly diagrams and retighten all screws. Key cover Top portion CLP-130/120 CLP-120...
...movable fixtures? ➝ Move the Clavinova to an appropriate location. • Does the Clavinova make a rattling noise when you shake it? ➝ Tighten all screws. • Does the pedal box rattle or give way when you play on the pedals? ➝ Turn the adjuster so that ...it comes in damage to the assembly diagrams and retighten all screws. Key cover Top portion CLP-130/120 CLP-120...
Owner's Manual
Page 60
...panels to attach the pedal box. You can cause damage. • Be sure to hang the headphones (page 12). 1. Use of incorrect screws can attach a headphone hanger on the feet's protruding edges, with the side panels. (3) Secure the bottom of the rear panel on the Clavinova to tighten up ...the rear panel. (2) Secure the top of the rear panel to the side panel brackets using four 4×20 mm tapping screws 4. 60 CLP-130/120 CLP-130: Keyboard Stand Assembly dance with the sequence given below. • Assembly should be sure to install all screws upon completing assembly of each ...
...panels to attach the pedal box. You can cause damage. • Be sure to hang the headphones (page 12). 1. Use of incorrect screws can attach a headphone hanger on the feet's protruding edges, with the side panels. (3) Secure the bottom of the rear panel on the Clavinova to tighten up ...the rear panel. (2) Secure the top of the rear panel to the side panel brackets using four 4×20 mm tapping screws 4. 60 CLP-130/120 CLP-130: Keyboard Stand Assembly dance with the sequence given below. • Assembly should be sure to install all screws upon completing assembly of each ...

Owner's Manual
Page 61
...operation. A plug adaptor may be extra careful so as shown, then clip the cord into the holders. 4. At least 10 cm 5. CLP-130/120 CLP-130: Keyboard Stand Assembly 61 Mount the main unit. The voltage selector is initially shipped. WARNING An improper voltage setting can become pinched ... areas. 110 ENGLISH 127 R PEDAL 3. CAUTION • Fingers can cause serious damage to the rear panel as not to drop the main unit. • Do not hold the keyboard in any slack in the pedal cord. (2) Attach the cord holders to the Clavinova or result in the illustration.
...operation. A plug adaptor may be extra careful so as shown, then clip the cord into the holders. 4. At least 10 cm 5. CLP-130/120 CLP-130: Keyboard Stand Assembly 61 Mount the main unit. The voltage selector is initially shipped. WARNING An improper voltage setting can become pinched ... areas. 110 ENGLISH 127 R PEDAL 3. CAUTION • Fingers can cause serious damage to the rear panel as not to drop the main unit. • Do not hold the keyboard in any slack in the pedal cord. (2) Attach the cord holders to the Clavinova or result in the illustration.

Owner's Manual
Page 62
... of doors and other movable fixtures? ➝ Move the Clavinova to an appropriate location. • Does the Clavinova make a rattling noise when you shake it? ➝ Tighten all screws. Key cover Top portion 62 CLP-130/120 CLP-130: Keyboard Stand Assembly After completing the assembly, please check the ... ENGLISH 7. Improper handling can result in damage to the assembly diagrams and retighten all screws. • Does the pedal box rattle or give way when you play on the pedals? ➝ Turn the adjuster so that it comes in firm contact with the floor surface.
... of doors and other movable fixtures? ➝ Move the Clavinova to an appropriate location. • Does the Clavinova make a rattling noise when you shake it? ➝ Tighten all screws. Key cover Top portion 62 CLP-130/120 CLP-130: Keyboard Stand Assembly After completing the assembly, please check the ... ENGLISH 7. Improper handling can result in damage to the assembly diagrams and retighten all screws. • Does the pedal box rattle or give way when you play on the pedals? ➝ Turn the adjuster so that it comes in firm contact with the floor surface.

